Azure B2C Authentication
Introduction
We will need some form of identity management to provide a method for users to register for, and log into, the application. We will also need a method to verify users' email addresses.
Azure Active Directory B2C looks as if it will provide the functionality I need, and at no cost. (B2C stands for 'Business to Customer', although Business is a little too grand for what I have in mind!)
As mentioned, using my free Azure account, I should be able to use Azure B2C Authentication without incurring any cost. With fewer than 50,000 'users' the service is free. (I don't imagine getting more than 50 users!)
I am indebted to Michael Washington for his YouTube posting on this subject.
YouTube Video
Summary of Tasks
- Sign up for Azure 12-month Free Trial
- Create Azure Resource Group
- Create Azure AD B2C
- Registering an app
- Create a User Flow
- Password Reset
Create Azure Free Trial
If you haven't already, sign up for an Azure Free Trial.
To create an Azure account the first prerequisite is that you have a Microsoft or GitHub account. I have an Outlook.com account and used that. To create an Azure account go to https://azure.microsoft.com/en-gb/free/ and follow the links to 'Start for Free' or 'Free Account'. You will see that you will get 12 months of certain free services, $200 (£150) credit for use in the first 30 days and access to some always free services. At the time of writing, one of the 12 months free services is 250GB of SQL database; we will be making use of this offering.
As part of the sign up procedure, as well as a Microsoft account, you will be asked to provide a telephone number for verification (I had a text message with a verification code) and a valid debit or credit card. To keep the Azure account 'live' after the first 30 days you will have to 'upgrade' to a 'pay-as-you-go' account; you will therefore need to be very wary about using services that could be costly. For example, as mentioned, one of the free for 12 months services is "250 GB of Azure SQL Database standard S0 instance with 10 database transaction units". Note that I think this specifically refers to ONE database, not a server with a number of databases whose size is less than 250GB.
Creating the Azure B2C resource
I will assume that an Azure account has already been created.
Create a Resource Group
I am going to use a separate Resource Group for this project and the B2C resource, simply because if anything goes wrong I can just delete the whole resource group.
Login into the Azure Portal and you should find 'Resource groups' in the top toolbar section. If it isn't visible, either enter 'Resource' in the search box, or click the Portal menu icon in the top left-hand corner of the window.
On the Resource Groups page, either select the '+ Create' at the top of the form, or the blue 'Create resource group' in the centre of the form.
- Subscription should default to 'Free Trial' - unless you have already upgraded to a 'pay-as-you-go' account.
- Leave the 'Subscription' as the default. (There will probably only be one anyway.)
- Enter a suitable name for the Resource Group. Anything suitable will do; I have added the suffix 'RG' for 'Resource Group'.
- Select a region from the drop-down list. I suggest a region depending on your location, but I don't think it matters that much for what we are doing.
- Click 'Review + create' and on the next form click 'Create'. (I think there are validation tests for duplicate Resource Group names, etc.)
- Once the Resource Group has been created click the 'Home' item at the top left.


Create Azure AD B2C
From the 'Home' page, select '+ Create a resource'.
- Enter 'B2C' in the search box at the top of the page
- Select 'Azure Active Directory B2C' from the drop-down list
- On the next page note that the free tier includes 50,000 monthly active users, but that it doesn't include multi-factor authentication. (We won't be using multi-factor authentication.)
- Click 'Create'.
- Click 'Create a new Azure AD B2C Tenant.'
- On the next page enter
- For Directory details:
- Your organisation name (This is used as the B2C 'Directory' Name)
- An initial domain name (Use something relevant and simple. This seems to be the first part of the domain name preceding '.onmicrosoft.com'.)
- Country/Region
- For Subscription
- Subscription - leave as default
- Resource Group - select the group created in the previous step
- Click 'Review + create'
- On the final page, assuming validation is passed, click 'Create'.
- It will take a few minutes to create the B2C Tenant. When it has been created you can click the link under the request for feedback to go to the new tenant.
- Clicking the link will open a new tab in your browser.
- Note that the 'Directory' name under your login name in the top right-hand corner of the screen now shows the 'Organisation' name. It previously was 'Default Directory'.
- You can switch between directories by clicking the toolbar button that looks like a folder with a filter icon.
- (Initially this additional directory caused me considerable confusion - all the B2C setup needs to be done in the new directory.)


Digression
When I clicked 'Create' on last page to create an Azure AD B2C is got the following error message, that states
- "The subscription is not registered to use namespace 'Microsoft.AzureActiveDirectory'. See https://aka.ms/rps-not-found for how to register subscriptions."

To resolve this problem I took the following steps:
- Installed Azure CLI on Windows (https://docs.microsoft.com/en-us/cli/azure/install-azure-cli-windows?tabs=azure-cli)
- When Azure CLI had finished installing, open a command prompt (cmd) and type
- az login
- A web browser opens allowing me to login to Azure. Once logged in, return to the command prompt, which should now show some details of your user name and subscription.
- If the above does not show the subscription name, type in:
- az account list
- we now need to set the subscription required. In my case the subscription name was 'Azure Subscription 1'. Type in:
- az account set --subscription "Azure Subscription 1"
- This is the bit that does the work, and may take several minutes to complete. Type in:
- az provider register --namespace Microsoft.AzureActiveDirectory
- More or less immediately I got the message, in the command window:
- Registering is still ongoing. You can monitor using "az provider show -n Microsoft.AzureActiveDirectory"
- After a few minutes I ran this command, but I'm not sure what it told me, but no obvious error message was shown.


Thanks to Adam Storr (https://adamstorr.azurewebsites.net/blog/subscription-is-not-registered-to-use-namespace-Microsoft.AzureActiveDirectory)
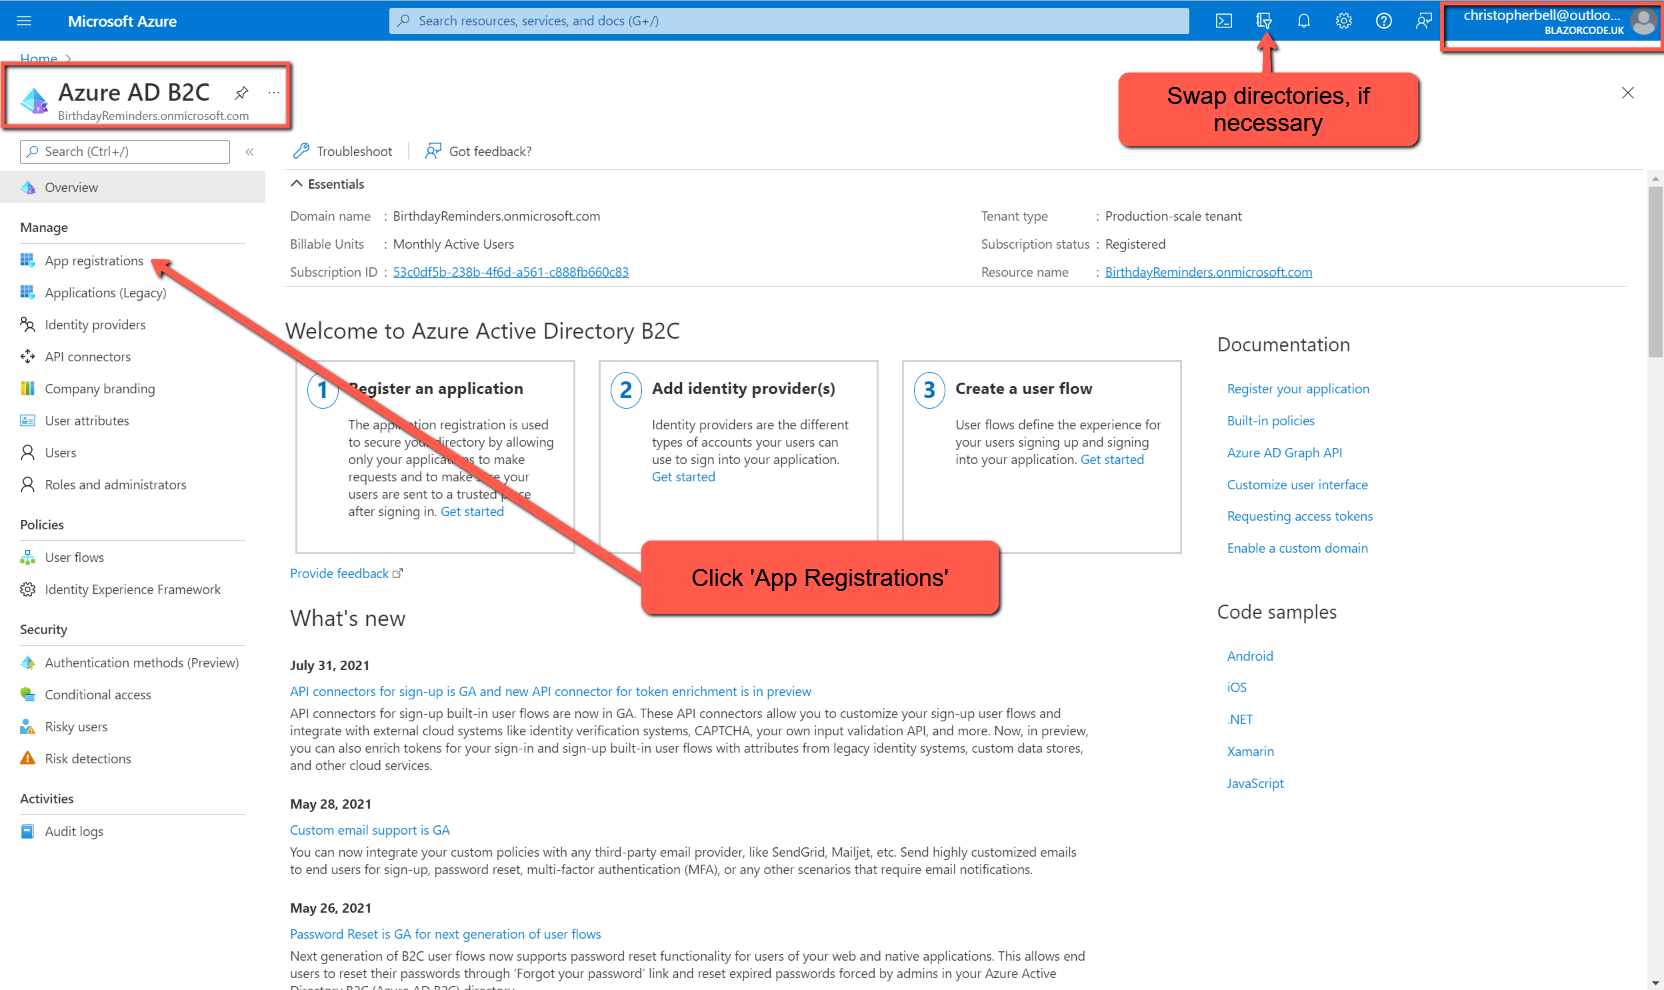
Registering an app
We need to 'Register an app'.
Make sure you are in the Azure AD B2C directory.
- Click on 'App Registrations'
- Click '+ New registration'. On this page I
- Added a simple name for the application (BlazorBirthdaysApp)
- Select the third option in 'Supported Account Types' - 'Accounts in any identity provider...'
- I left 'Redirect URI' blank.
- Make sure 'Grant admin consent...' is ticked.
- Click 'Register'


Create a User Flow
Next we need to create a 'User Flow'. To add a 'User Flow'
I had awful trouble with this. At first 'User Flows' was listed in the left-hand menu, but somehow I clicked away from the option and couldn't find my way back. If you encounter this problem this seems to get round the problem.
- Make sure you are in the 'Azure B2C' Directory (i.e. not the Default Directory) If necessary switch to the Default Directory and then switch back.
- Click the Home button (top left-hand corner)
- In the Search bar, search for 'Azure AD B2C' and select it, or if it appears in the recent services items, select it from there. It doesn't matter which you select.
- Select 'User flows' from the left-hand menu, or from the large 'block'
- Click '+ Create new user flows'
- Select 'Sign up and sign in'
- Select 'Recommended' when that option pops up, and click 'Create'


On the Create User flow page:
- Enter a name
- I don't think this is important, but it can't be changed and is used later
- Identity providers
- The only option I was presented with was 'Email signup' so I left it at that. A bit more investigation revealed that on the main Azure B2C page there is an 'Identity providers' option that opens up a list of alternative identity providers, but these options did not appear on User Flows form.
- Multifactor authentication
- I left 'Type of method' as Email
- MFA Enforcement as 'Off
- There are potentially additional charges for Multifactor authentication (I think by sms or phone), so I purposely avoided these
- Conditional access
- I left this un-checked
- Scroll down to User attributes and click the 'Show more...' link
- I don't want to make sign up too onerous so just checked
- Display Name - 'Collect attribute' and 'Return claim'
- Email Address - 'Collect attribute'
- Email Addresses - 'Return claim'
- Given Name - 'Collect attribute' and 'Return claim'
- Surname - 'Collect attribute' and 'Return claim'
- User's Object ID - 'Return claim'. (I'm not sure this is required)
- Click OK
- Click 'Create'


That should add the User flow.
Password Reset
We can set the system to allow users 'self-service' to reset their passwords. Enabling this feature will save a lot of bother later, so we may as well do it now. As above, log into Azure and the Azure AD B2C page and select User flows from the menu. Click on the User flow and then click Properties; scroll down the page to 'Password configuration' and check 'Self-service password reset'. Click 'Save' at the top of the list of properties.


References
Michael Washington: https://www.youtube.com/watch?v=ecaiqrU_67k&t=1s