Deploying to Azure
Introduction
The Birthday Reminder application is designed to be used by multiple users potentially spread over a wide geographic area. By signing up for the 12-month Azure 'Free Trial' costs should be kept to a minimum. In theory, I should not incur any costs for what I want to achieve - but be careful, I don't guarantee that it will be entirely cost-free. And after the 12-month 'Free Trial' there will be costs; from what I can see at the moment the only future cost for just this application is the SQL database, which I think/hope will be about £5 per month.
YouTube Video
Summary of Tasks
- Migrate to SQL Database in Azure
- Resource Group
- Create a SQL Server
- Migrate SQL database to Azure
- Publish
- Link Live App to Azure B2C
Migrate SQL Database to Azure
Digression
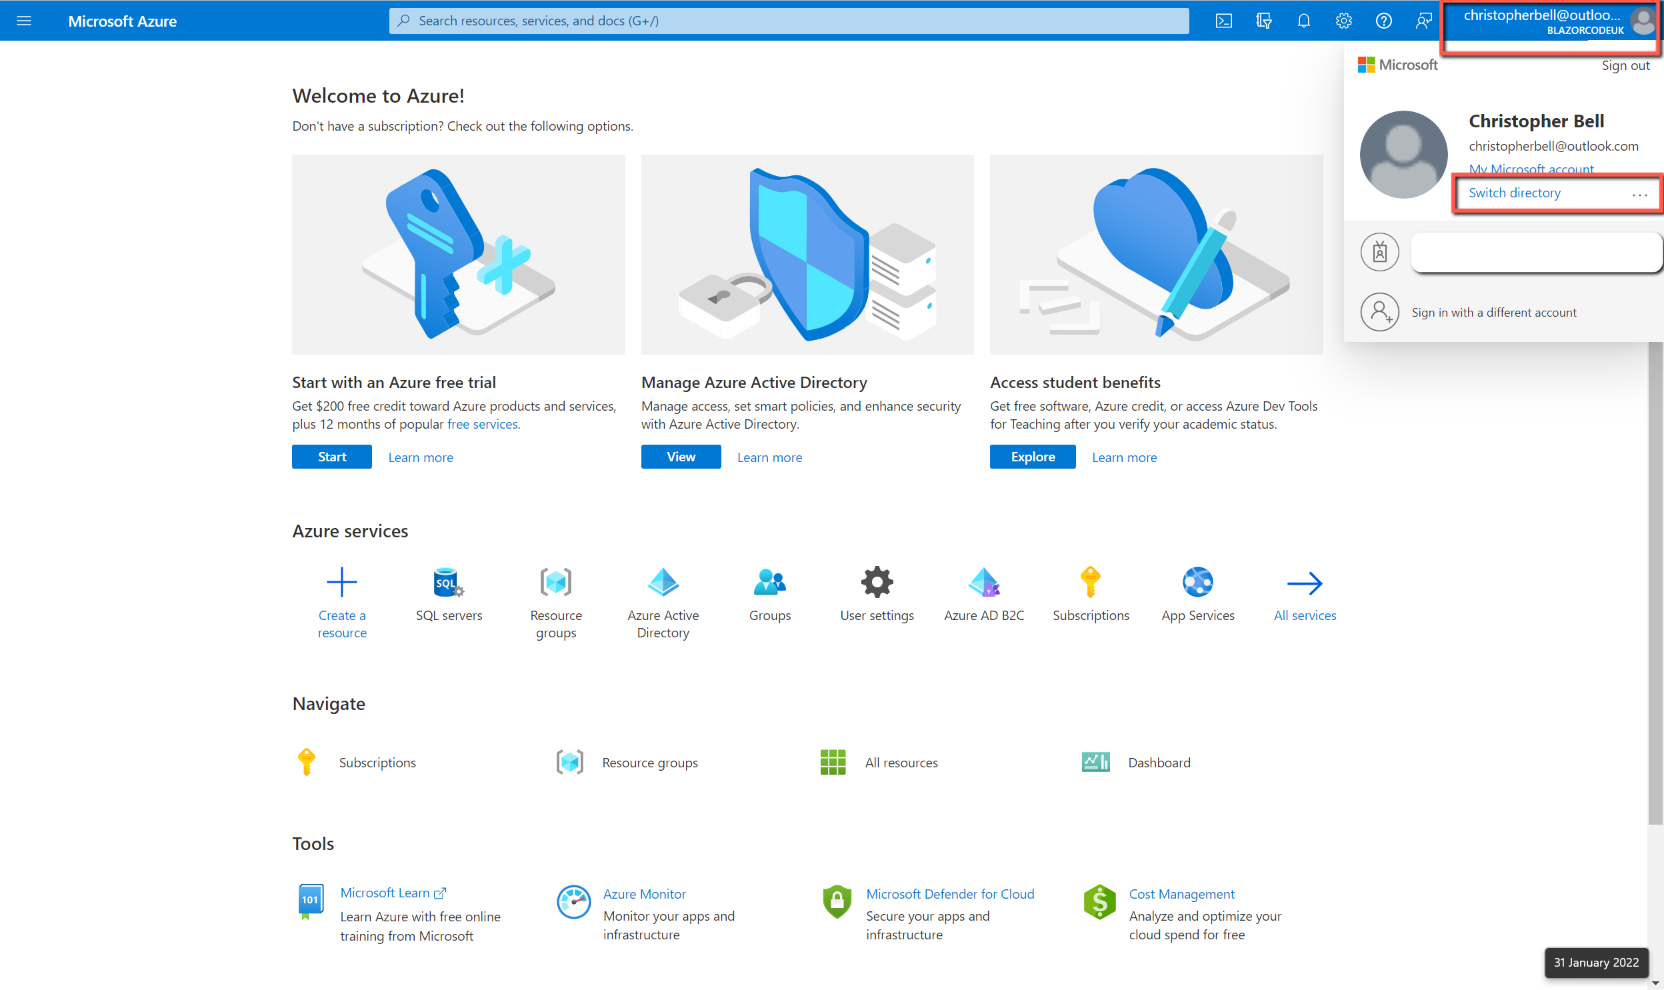
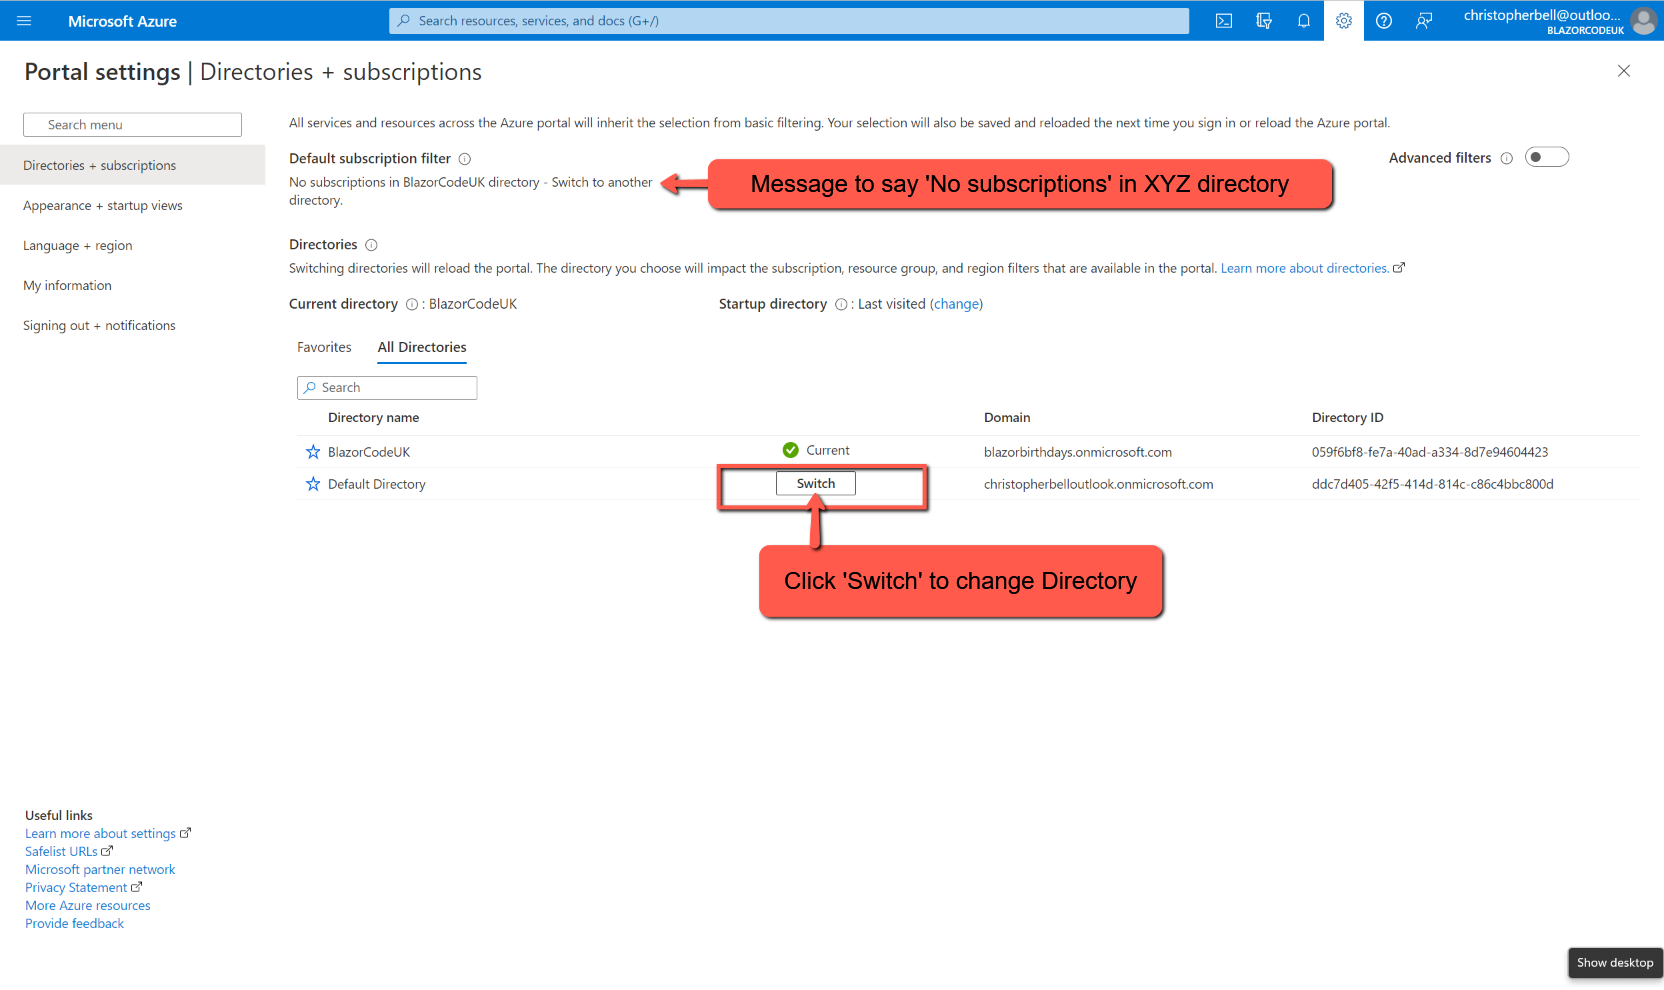
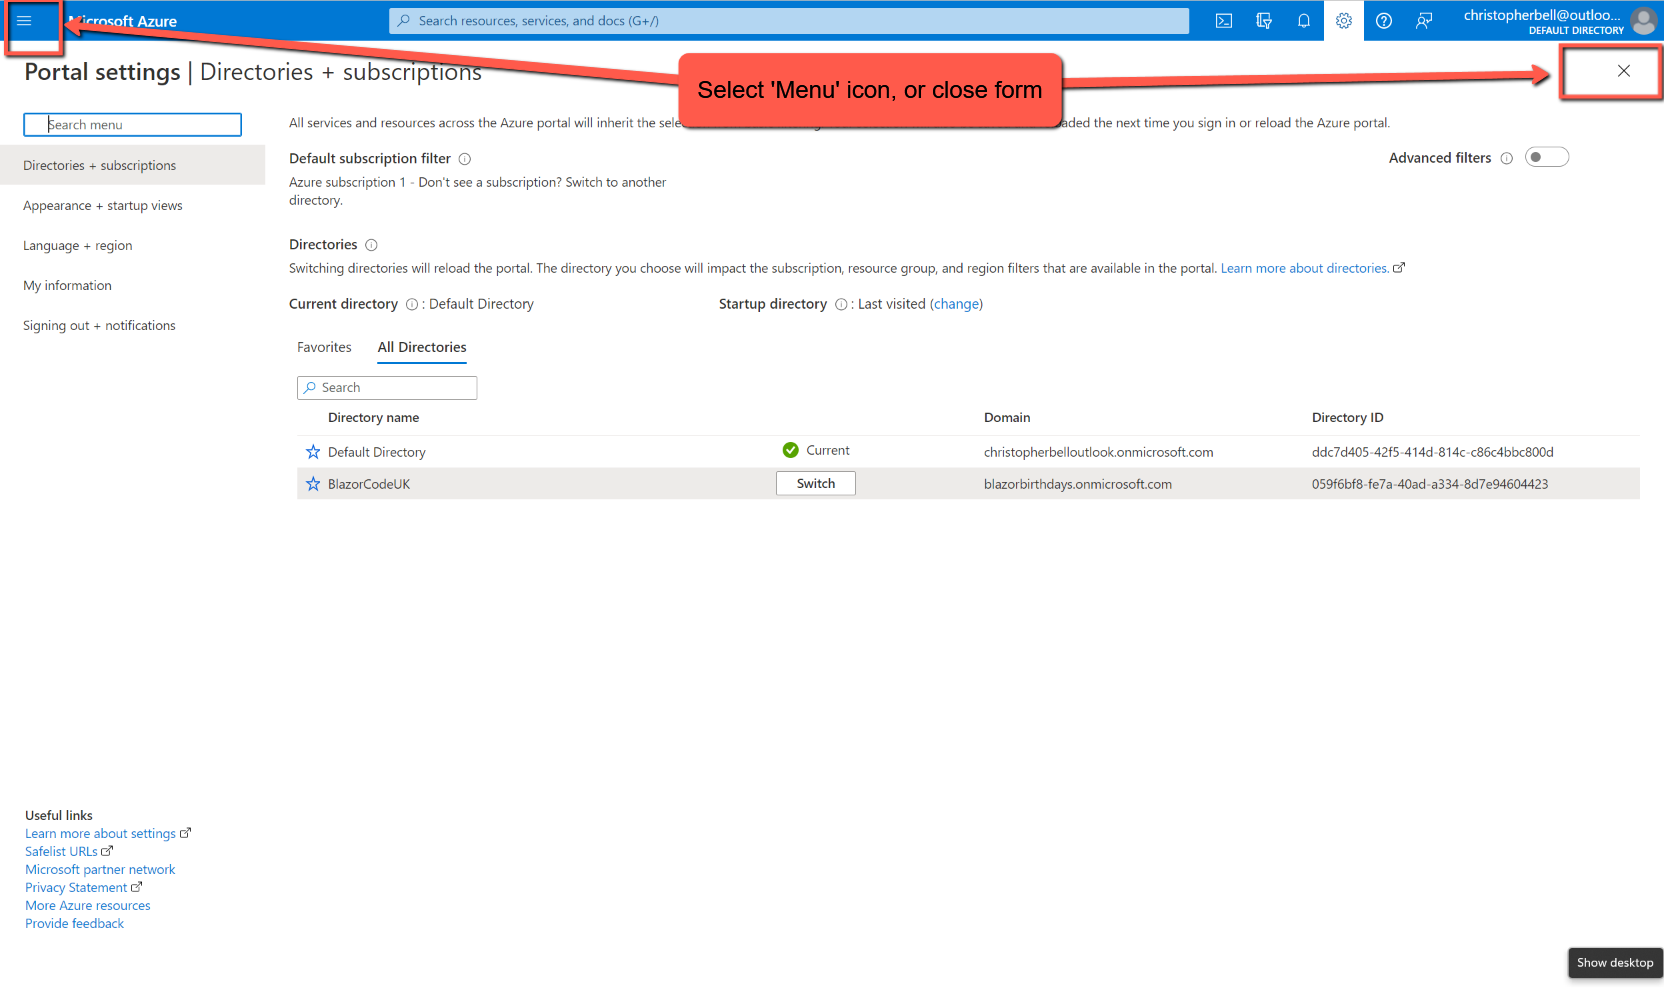
Before we start migrating the SQL database to Azure I thought it would be worth mentioning a situation that I couldn't initially understand. When I logged into the Azure Portal I was presented with a screen that implied that I hadn't started using Azure and didn't have a subscription.

It seems that when one creates an Azure B2C service a separate directory is created. You need to make sure that you are in the correct directory to add the SQL Server and Database. (As well as the App Service.) To change Directories
- Click the user icon in the top right-hand corner of the form
- Select 'Switch Directories'
- Click the 'Switch' button on the correct directory
- Close the form, or select the menu icon
Resource Group
We have already created a Resource Group when setting the Azure B2C Authentication. However, I suggest creating a new resource group for the SQL database and 'App'; if anything goes wrong it will enable us to delete the new resource group whilst leaving the Azure B2C resource group intact.
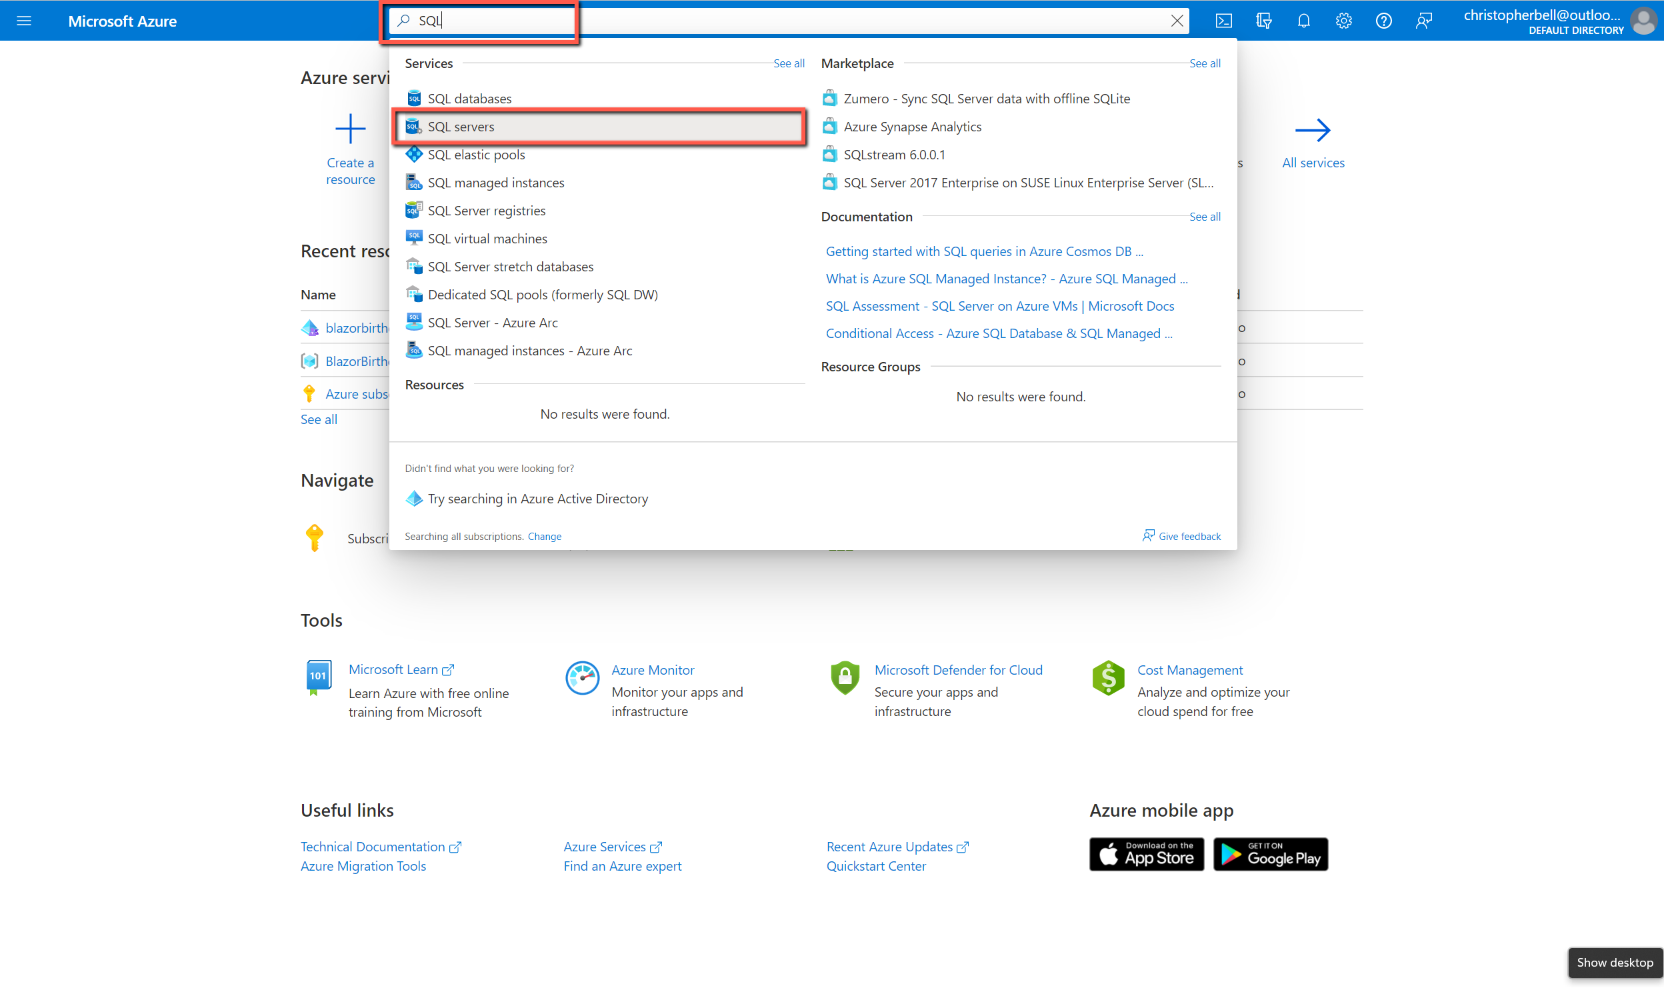
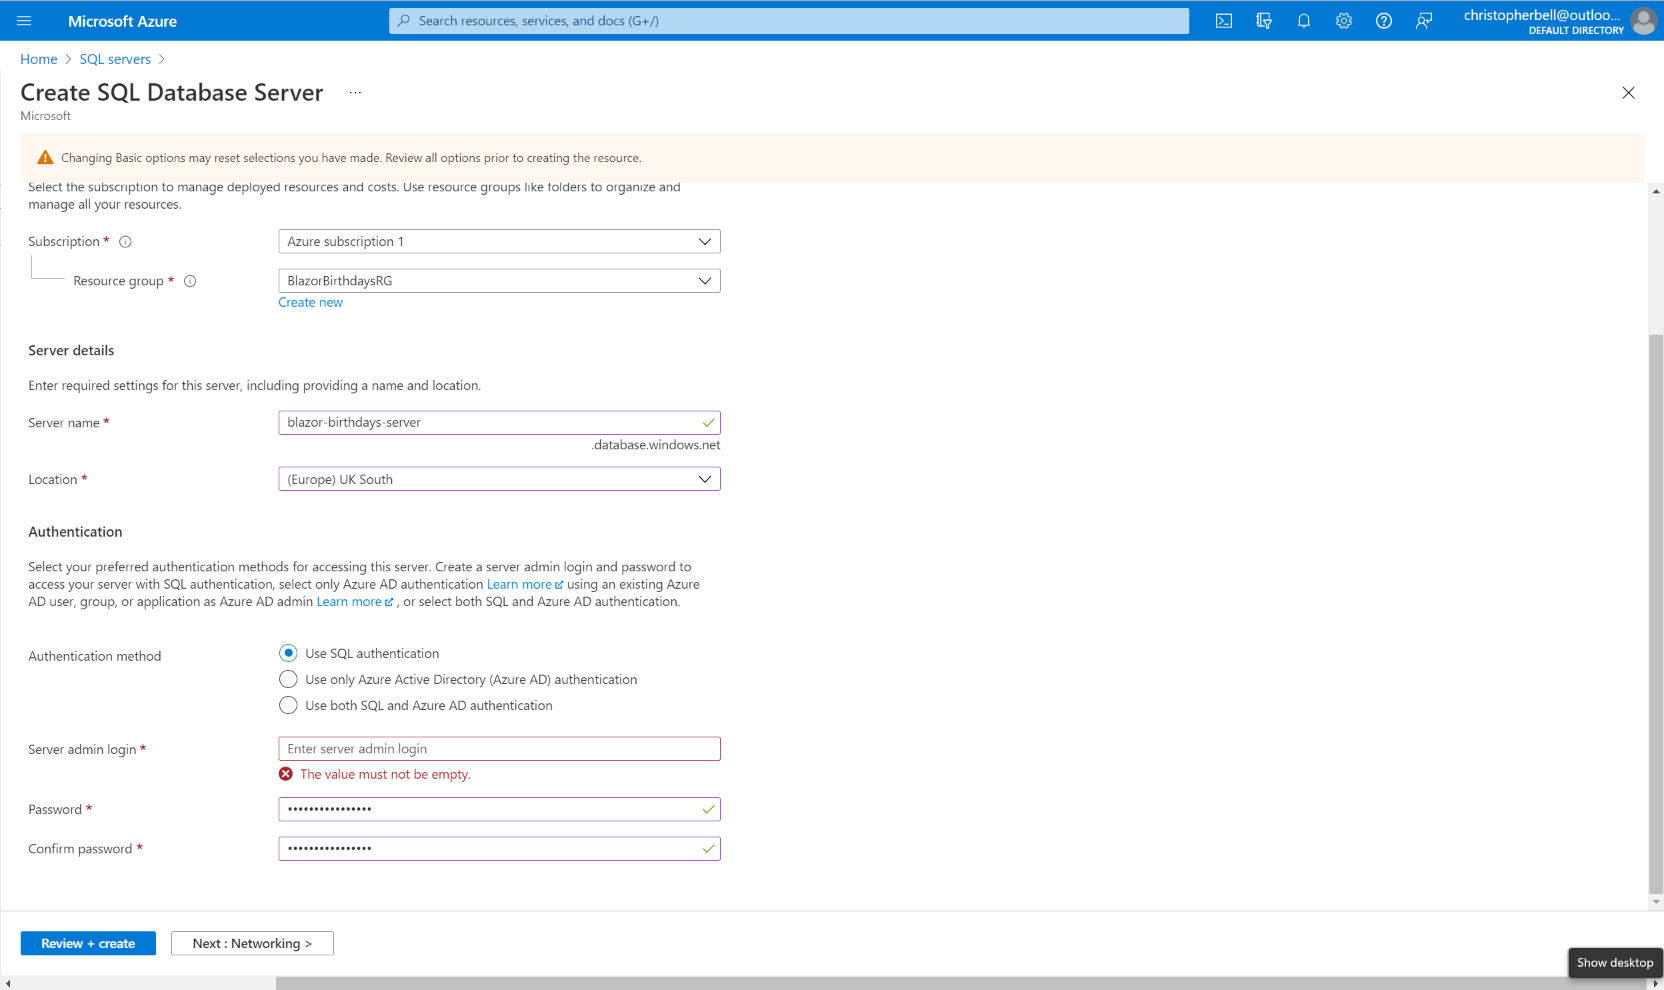
Create a SQL Server
Don't get misled by the numerous options with 'SQL' in their name (such as Azure SQL); we need to create a SQL server at this point. To do this:
- I suggest entering 'SQL server' in the search box, and select the 'SQL servers' option.
- On the 'SQL servers' page, either select the '+ Create' at the top of the form, or the blue 'Create SQL Server' in the centre of the form.
- Select 'Free Trial' from the subscriptions drop-down list. (This might be re-named if you are beyond the first 30 days.)
- Select the 'Resource group' created when setting up the B2C Authentication
- Enter a suitable name for the server. This must be lower case.
- Select a 'Location'. The same as the Resource group would make sense.
- Select 'Use SQL authentication' as the Authentication method
- Enter a 'Server admin login'.
- Enter and confirm the server admin password. This will need to be entered in our application later. By chance I entered "%\" (without the quotes) as part of my password; this caused problems as it 'escaped' the following characters - probably best to avoid "\" altogether and special characters next to each other.
- Click 'Review + create' and having reviewed the information on the next page, click 'Create'.
- The next form shows 'Deployment in progress'. This will take about 5 minutes and will eventually show 'Your deployment is complete'.
- When the deployment is complete message appears, click the 'Go to resource' button.
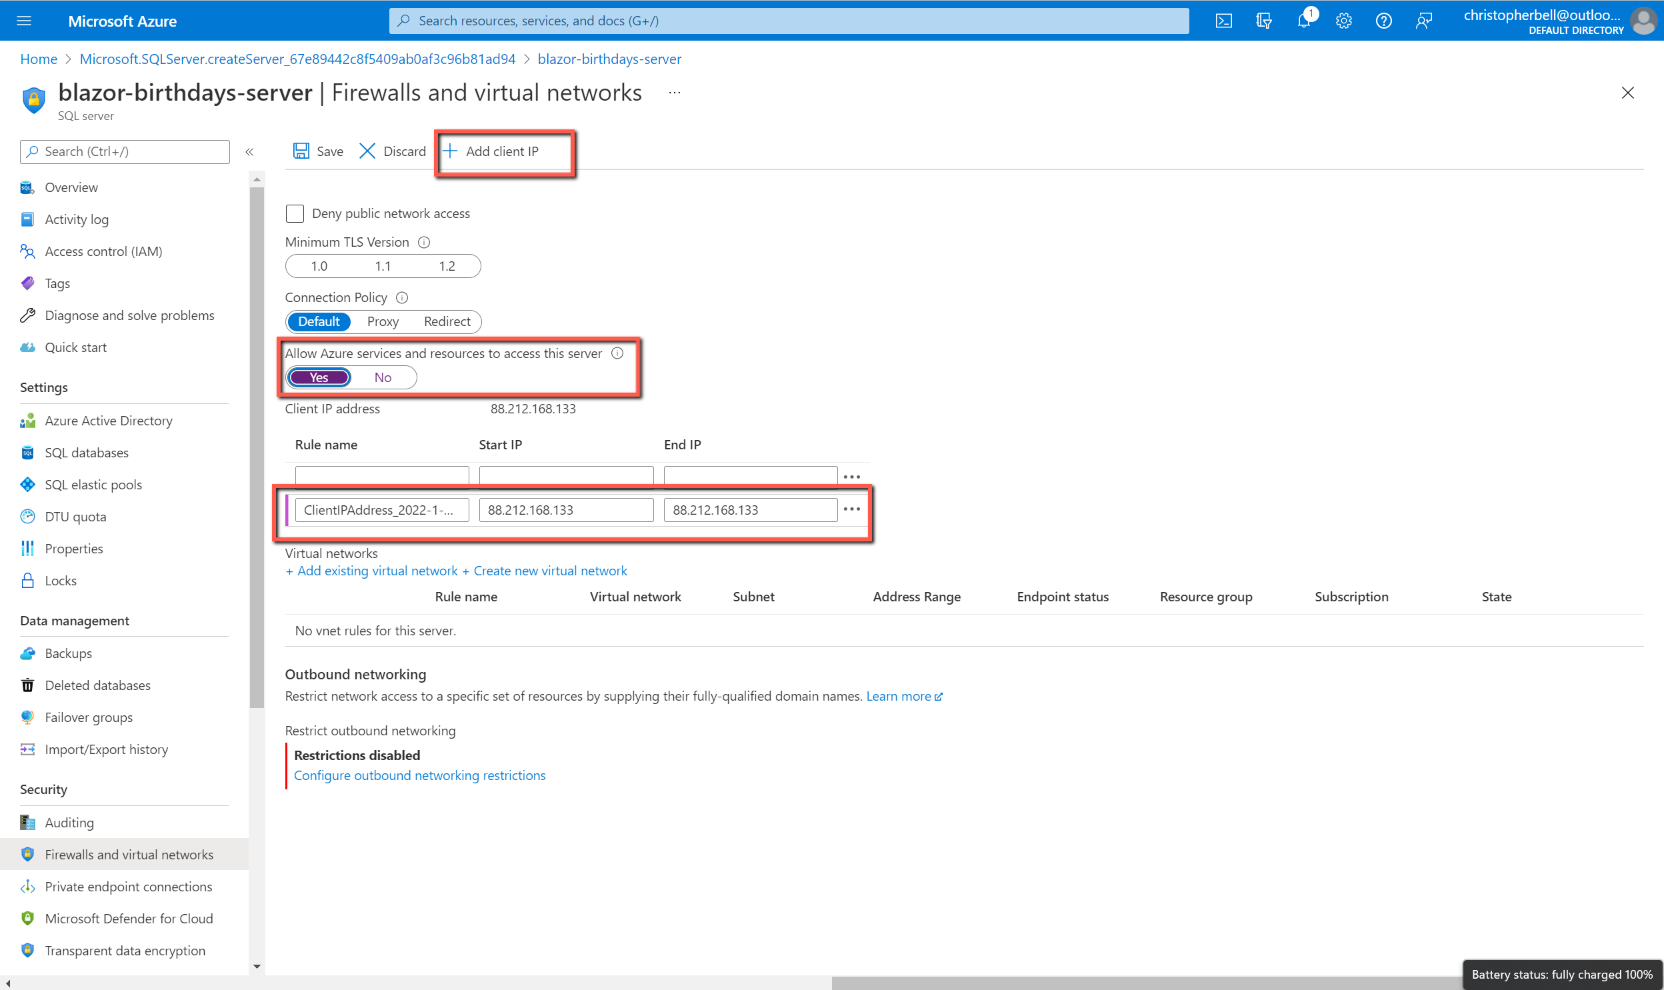
- On the SQL server overview page, click 'Show firewall settings' item in the top right quadrant of the form.
- Click '+ Add client IP' to add your IP address to the permitted IP addresses allowed access to the database. (This will allow you to gain access to the server from SQL Management Studio from your PC.)
- On the same form, click 'Yes' on the 'Allow Azure services and resources to access this server'. (This will later allow the published app to gain access to the server.)
- Click 'Save' at the top of the form.


Migrate the database to Azure
Having created the Resource group and SQL server in Azure, this part is remarkably simple; it couldn't be easier.
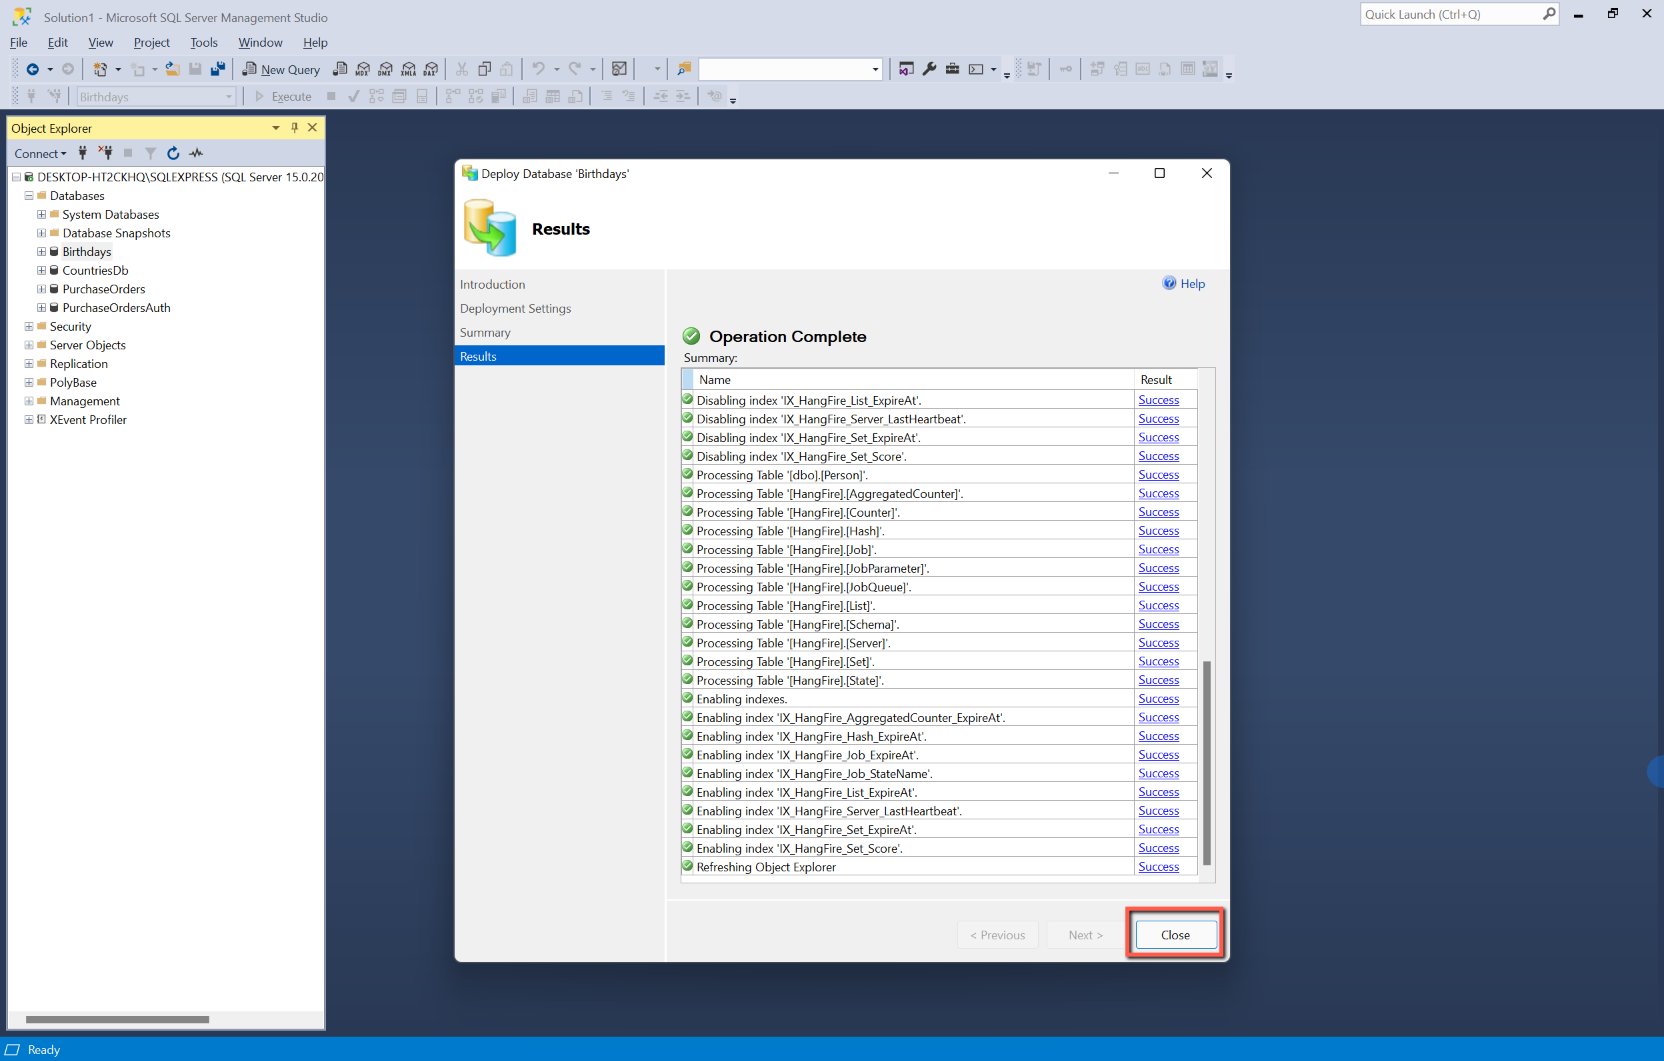
- Open SQL Management Studio on your development machine, and in 'Object Explorer' right-click on the database and select Tasks > Deploy Database to Microsoft Azure SQL Database
- On the wizard Introduction form, click 'Next'
- On the Deployment Settings form, click Connect...
- A 'Connect to Server' dialog will appear
- Manually type in the server name created in Azure, followed by '.database.windows.net'
- Select 'SQL Server Authentication' from the drop-down list
- Enter the server login and password used when creating the server
- Remember the password!
- Click 'Connect'
- In 'New database name' I suggest you use the same name as we used locally.
- In Microsoft Azure SQL Database settings, select the following ***IMPORTANT - USE THESE SETTINGS FOR THE "FREE FOR 12 MONTHS" DATABASE ***
- Edition as 'Standard'
- Maximum database size as '250'
- Service Objection as S0
- Leave the Temporary file name as the default.
- Click 'Next'
- Click 'Finish'
- A form will be displayed showing the progress of the migration. This took a few minutes to complete in my case.
- Click 'Close' when the 'Operation Complete' form appears.


Make Changes to the Code
Before we publish the application there are a few changes we need to make to the C# code to take account of the location of the Azure SQL database.
Connection Strings
Open Visual Studio and select 'appsettings.json'. We now need to replace the 'Default' connection string with the string that will connect to the Azure SQL database, but before we do that I want to keep a record of the existing connection string for the local database. Copy the existing 'Default' connection string and paste it onto the following line. On the pasted line change 'Default' to 'DefaultLocal'. (We'll come back to this later.)

To obtain the Azure SQL connection string:
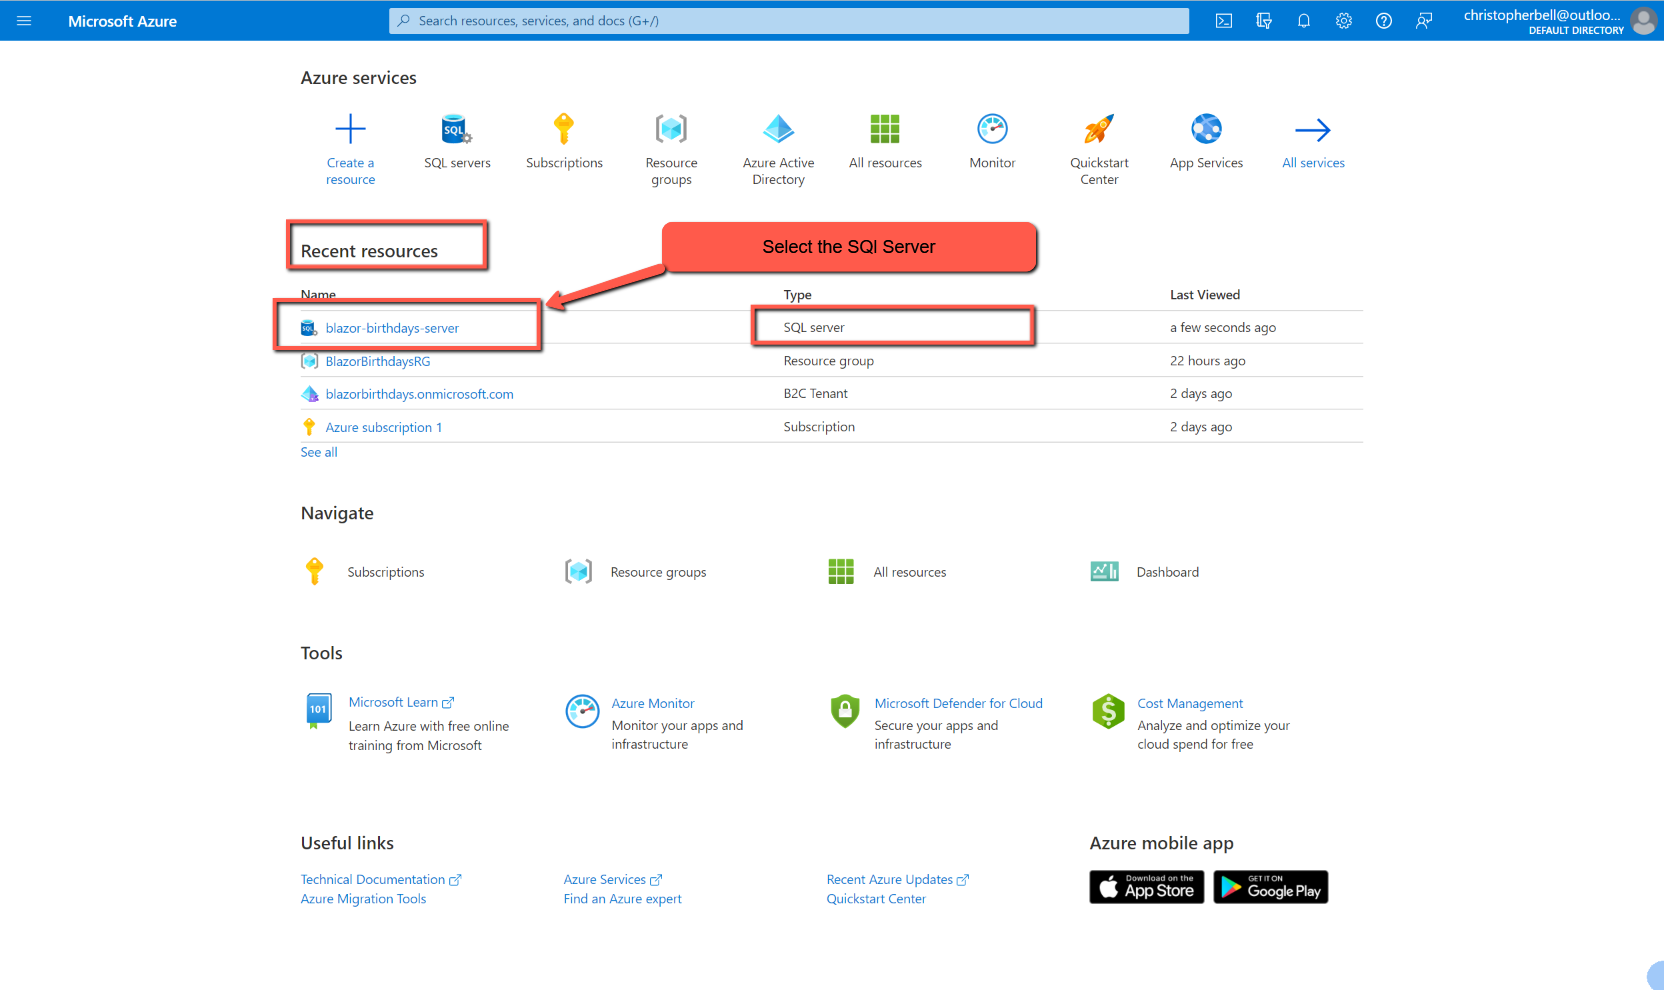
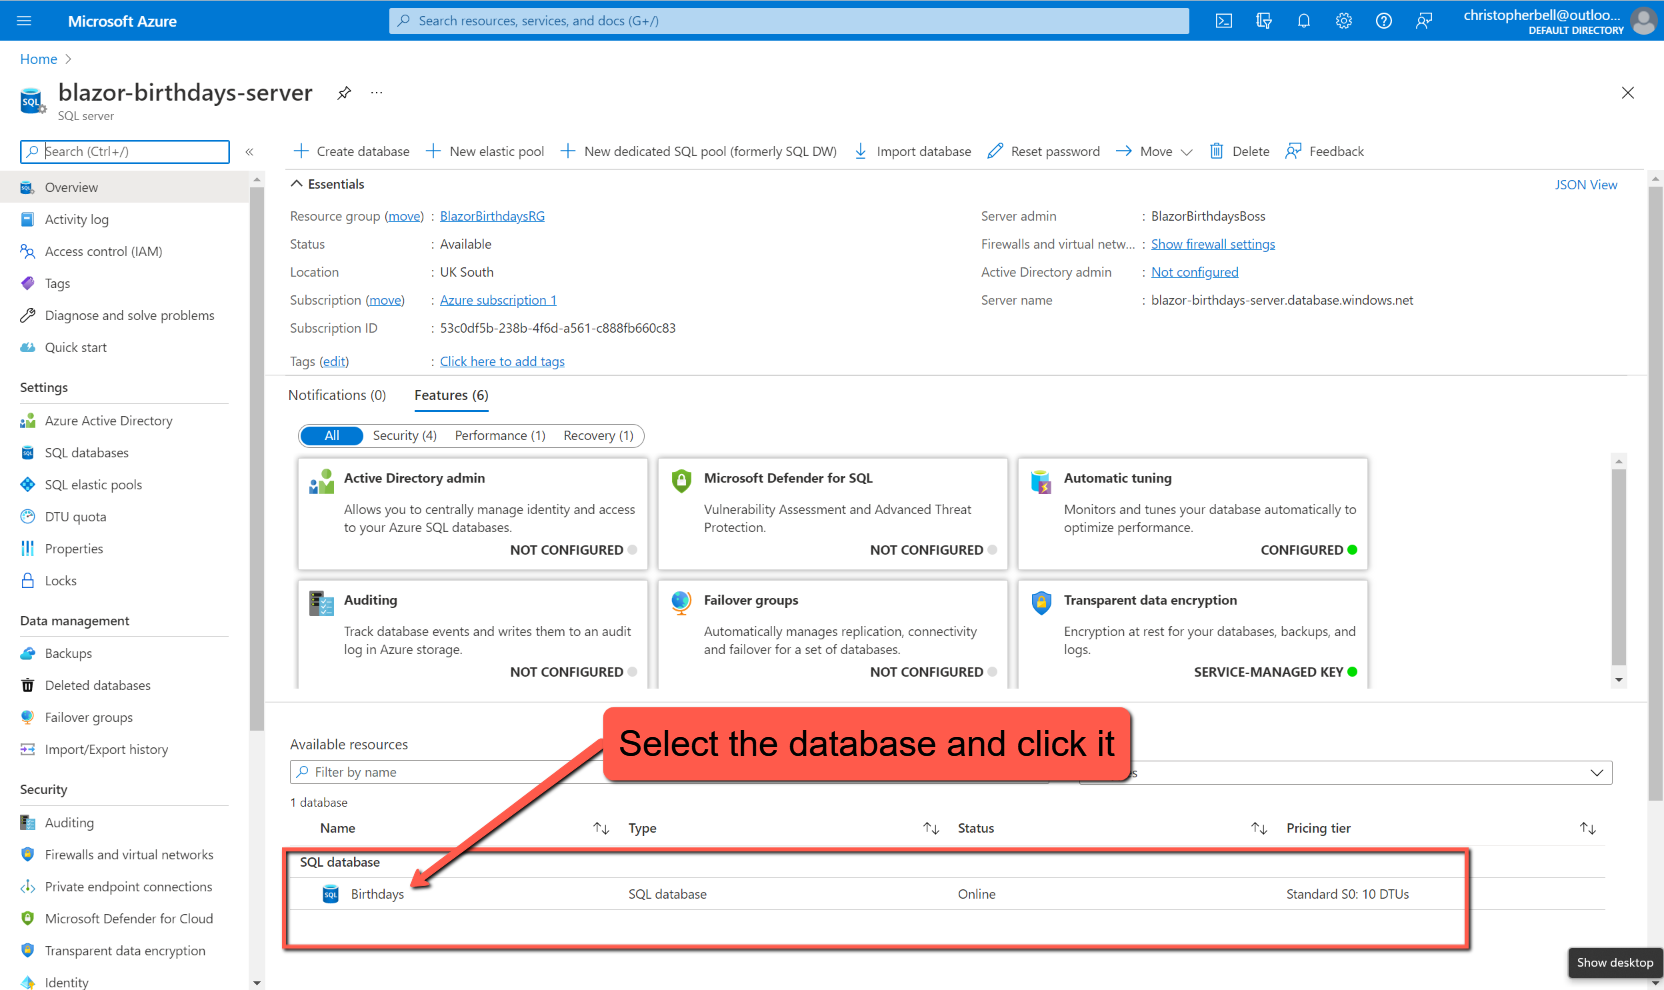
- Return to the Azure portal, and under 'Recent Resources' you should see the SQL server we created earlier. Select it.
- When the page opens, scroll down and you should see the new database we created by migrating from our local database. Click on the name of the database to open the 'SQL database' page.
- Connection strings is shown in the top right-hand quadrant; click on 'Show database connection strings'. This will open a new page with the connection string we need. Copy it to the clipboard.
Return to Visual Studio and the appsettings.json file. Replace the contents of the 'Default' with the connection string just copied from the Azure portal. Replace the part '{your_password}' with your password (including the curly brackets).


Save all files and run the application. It should run, but will now be connected to the Azure SQL database. This can be simply tested by editing a birthday or name and verifying that the change has not been made in the local database.
As an aside, you can connect the Azure SQL database to SQL Server Management Studio installed locally. In Management Studio, in Object Explorer, click 'Connect' > 'Database Engine'. Enter the server name and credentials and click 'Connect'. The Azure SQL database can then be explored just as a local database can be.


appsettings.json and appsettings.development.json
Once the application has been published there will almost certainly be a need to maintain and develop the application. In these circumstances we don't necessarily want to use the live database, for example for testing adding, editing and deleting records. To get round this problem we can use a file called appsettings.development.json. In development this file is used in preference to appsettings.json; we can therefore have an entry in appsettings.json for 'ConnectionStrings' that points to the Azure SQL database and a different entry in appsettings.development.json that points to a local database.
Before publishing it is worth double-checking the entries in appsettings.json to make sure that they are all correct and that you haven't made a change in appsettings.development.json that needs to be copied to appsettings.json.
Publishing the app
The groundwork has all now been completed (well, almost), so we can now publish the application.
- In Visual Studio save and close all files.
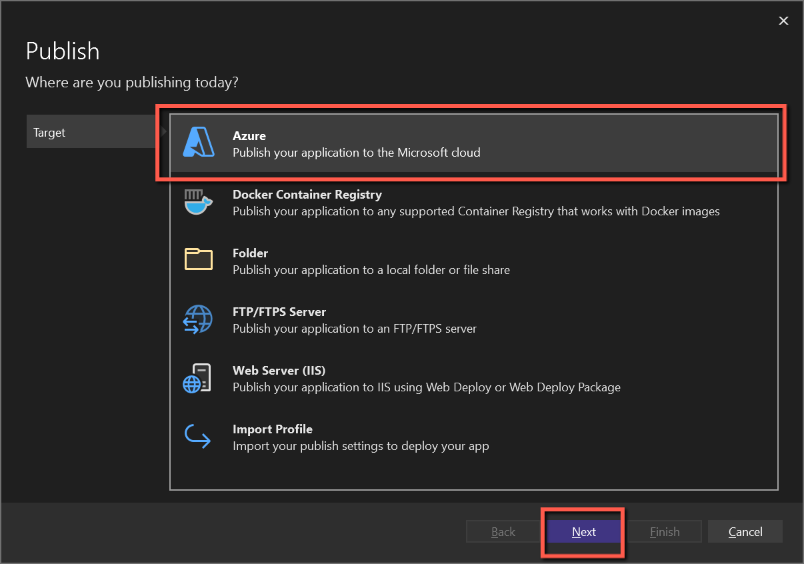
- In Solution Explorer right-click the BlazorBirthdayReminders project and select 'Publish'
- Select 'Azure' as the 'Target' and click 'Next'
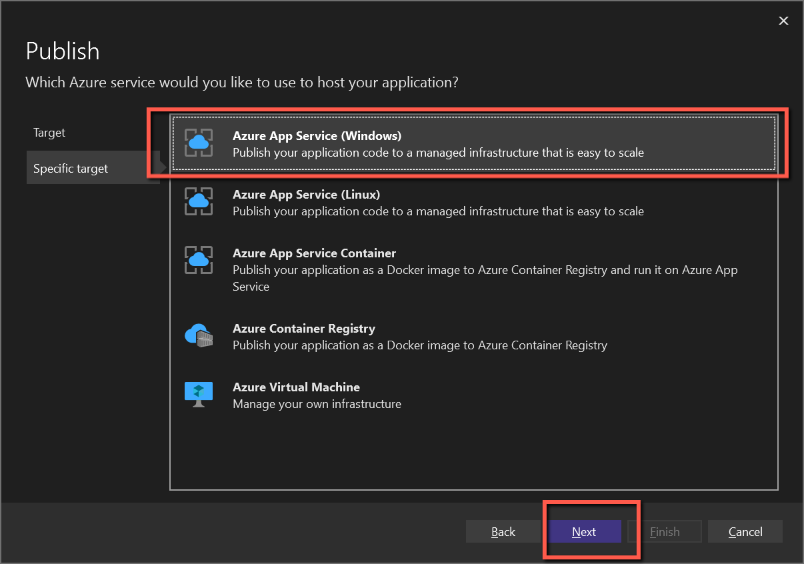
- Select 'Azure App Service (Windows)' as the 'Specific Target' and click 'Next'
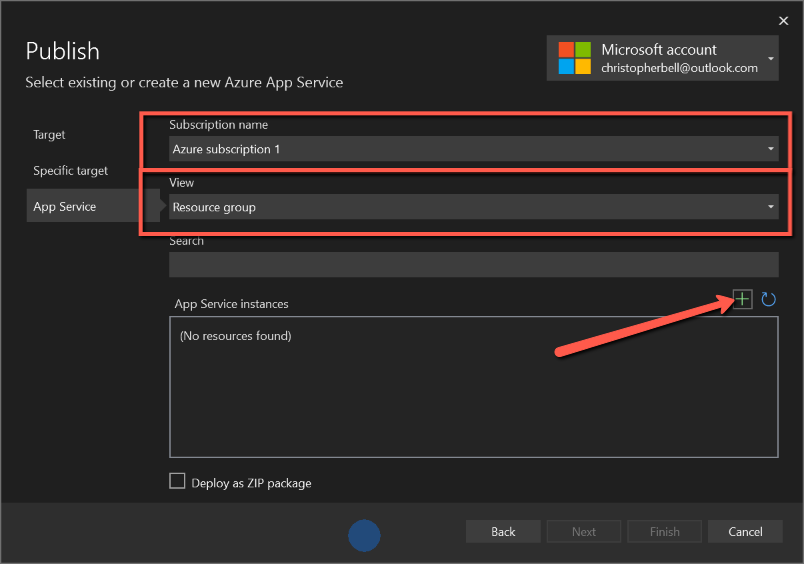
- On the App Service form
- Select the 'Subscription name' from the drop-down list ('Free Trial')
- View will have 'Resource group' - leave as is
- Leave 'Search' blank
- Click the + sign above 'App service instances'
- On the 'App Service (Windows) form
- The 'Name' will be pre-populated with a name plus date/time. This can be edited to something shorter, but I believe it must be unique across Azure, so you might need to adjust the name slightly. This is the name that will prefix ".azurewebsites.net/" to create the website name, e.g. https://birthdayreminders.azurewebsites.net/
- Make sure 'Subscription name' is populated with 'Free Trial' (or select an appropriate subscription).
- Select 'Resource group' (there should be only the one we created earlier)
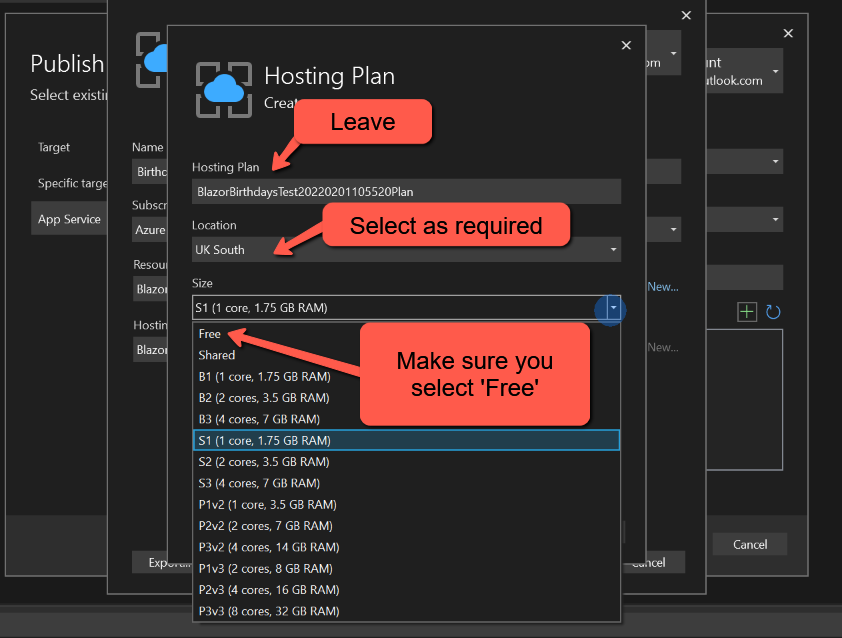
- On 'Hosting Plan' make sure you select 'New' and select a 'Free' plan with a suitable location. Edit the 'Hosting Plan' name if you want.
- Click 'Create' and you will be returned to the 'App Service' form
- On the App Service form click 'Next'
- On 'Deployment Type' select the top option, 'Publish (generates pubxml file)
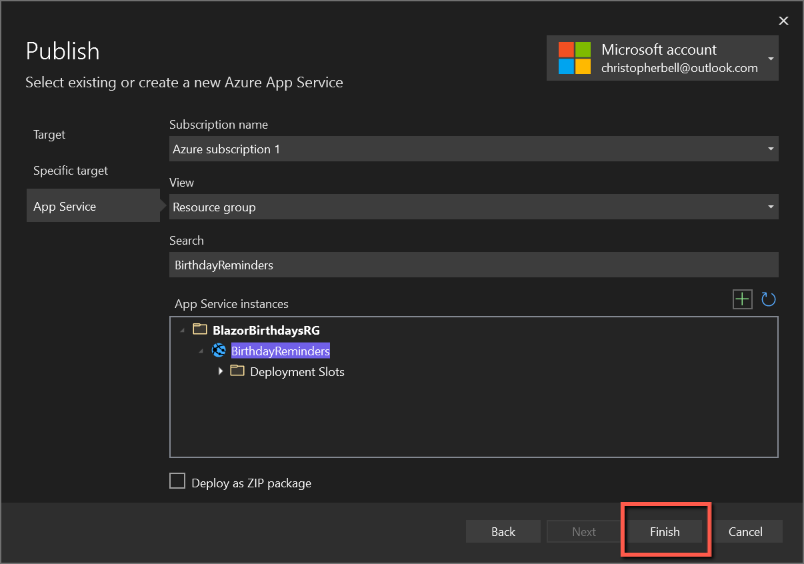
- Click 'Finish'
- You will be returned to the 'Publish' form.
- Do not configure any of the 'Service Dependencies'. There will probably be one for a 'SQL Server Database' and one for 'Signal R'. We have already dealt with the SQL database, and Signal R can be ignored for the moment.


We are nearly there, but we need to make a change to Azure B2C before testing.
We have already followed this process before to link our development application to Azure B2C, but we need to repeat the process for the live application.
Link Azure B2C to live site
Log into Azure Portal and
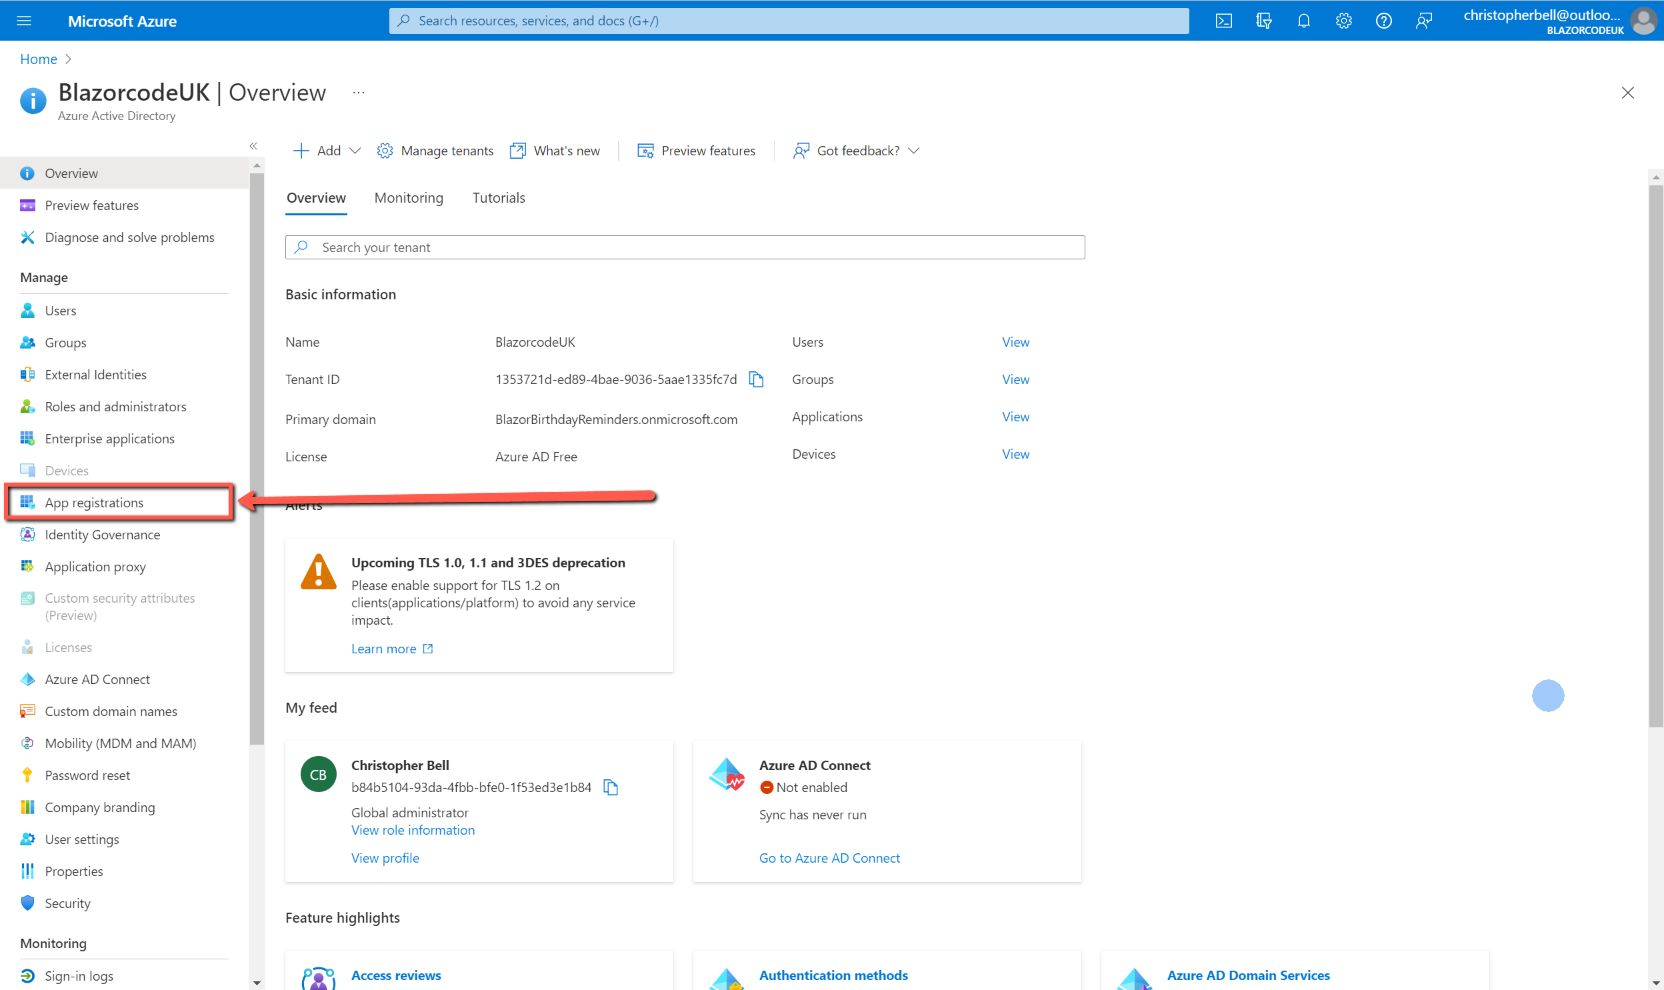
- Make sure you are in the Directory created for Azure B2C
Select
- Azure Active Directory
- App registrations
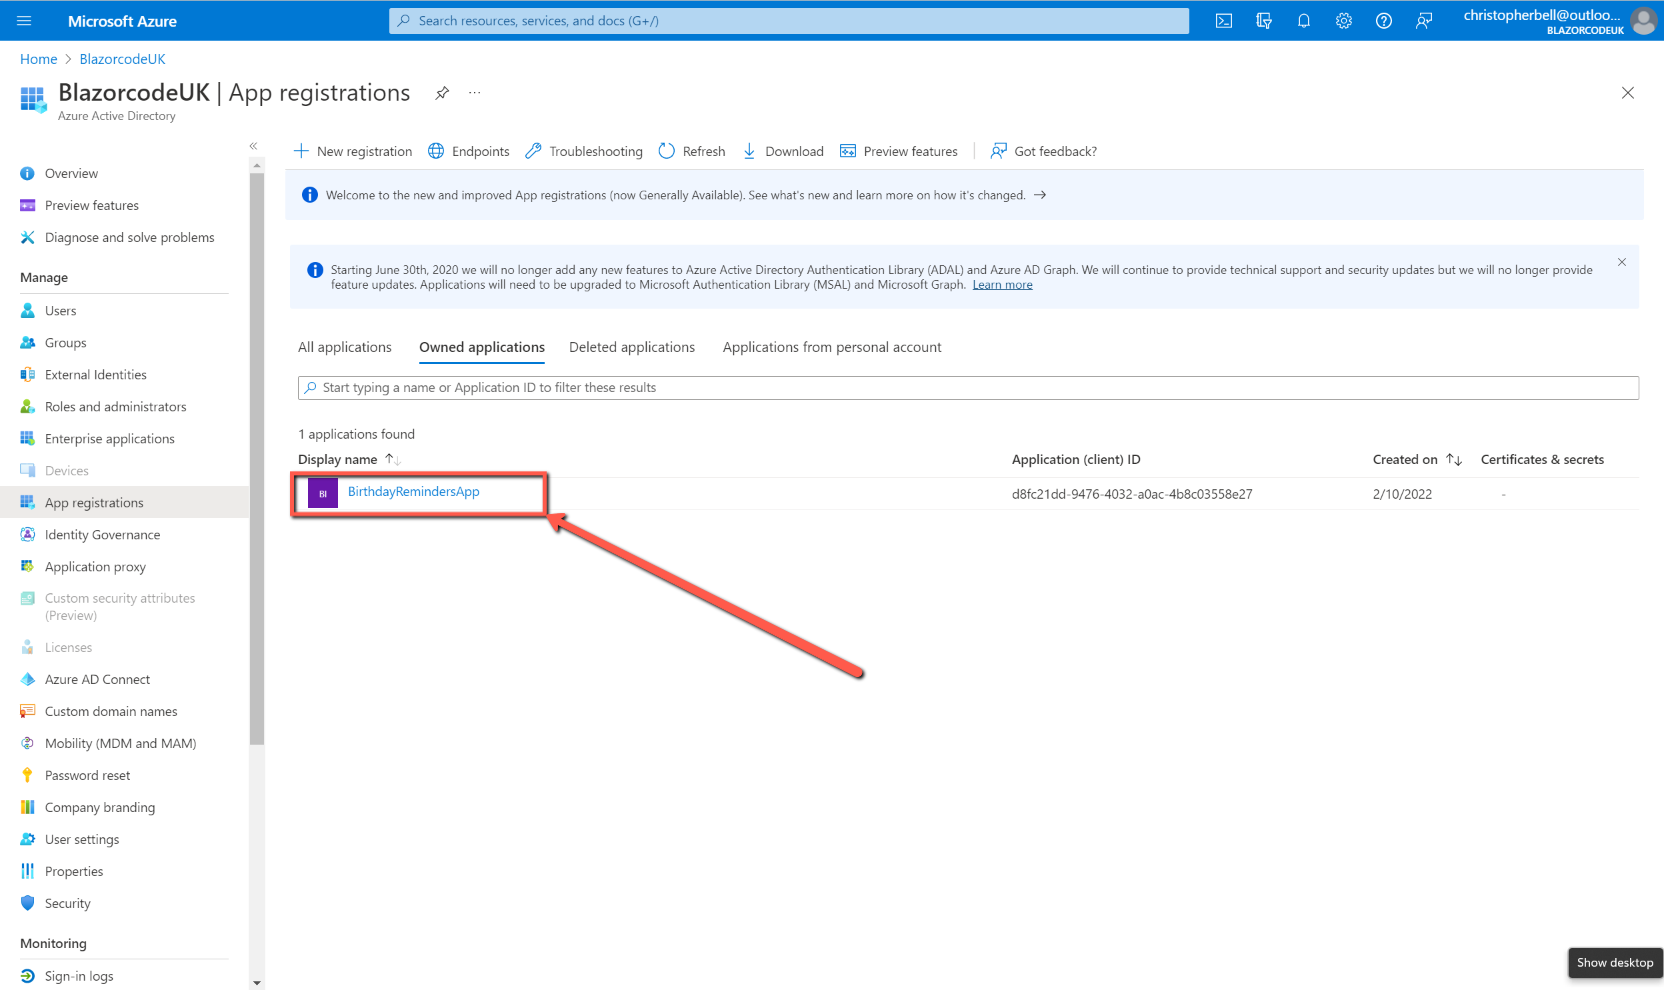
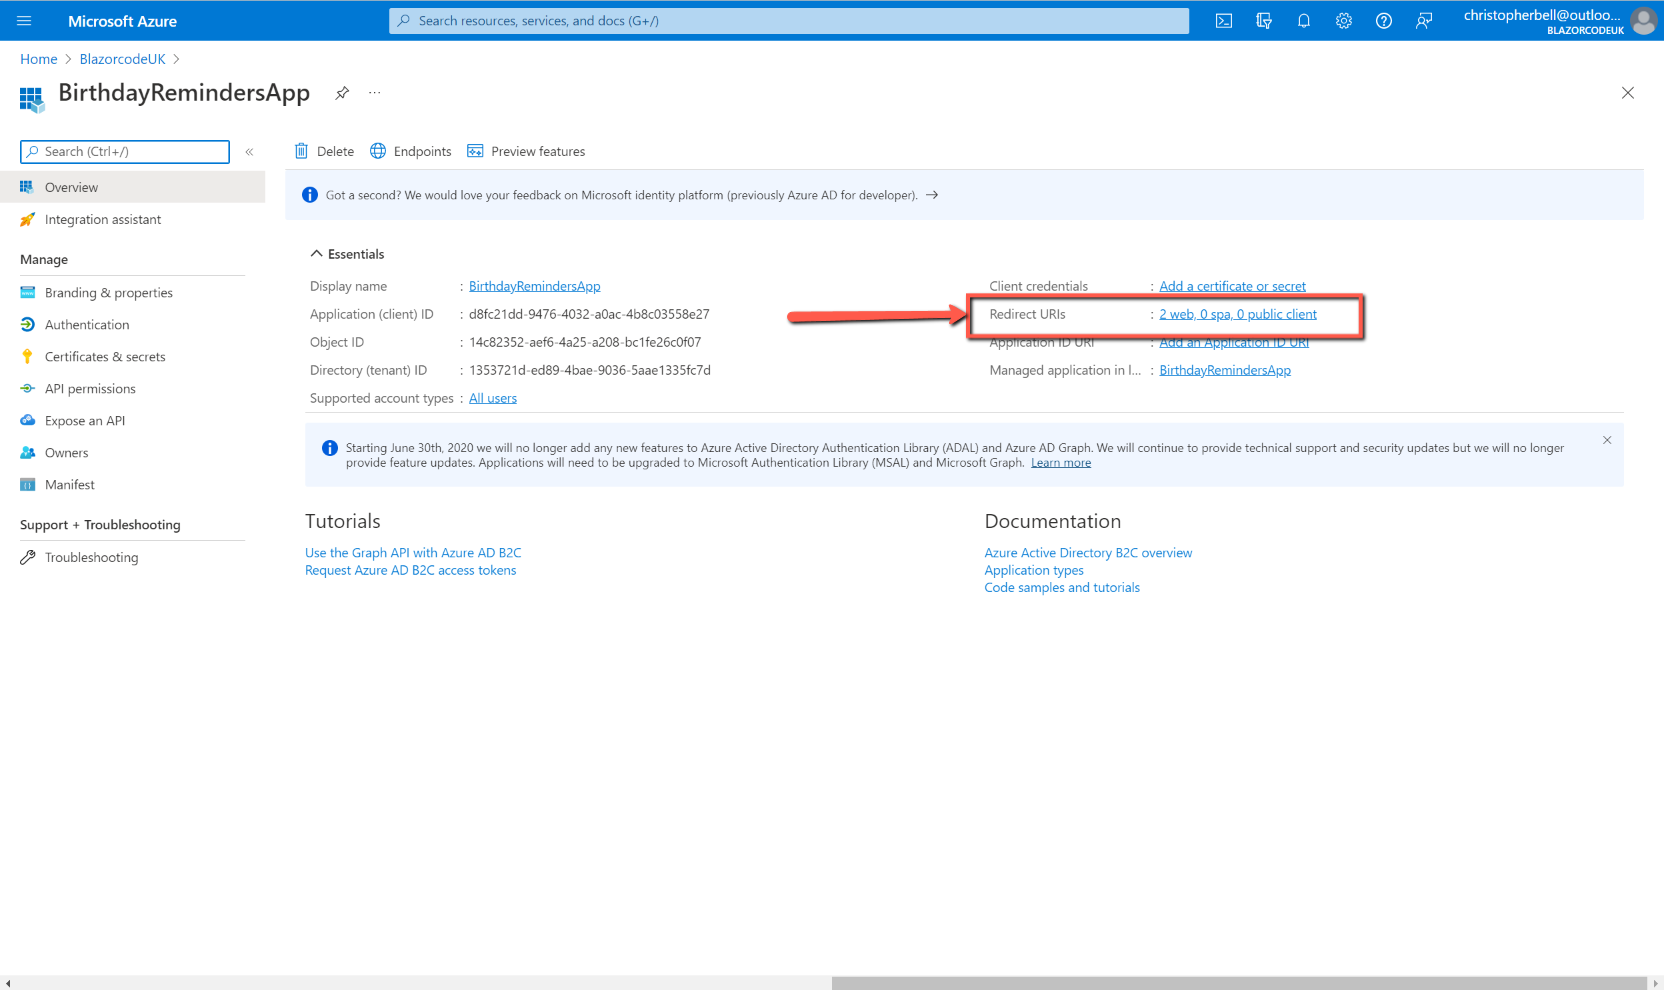
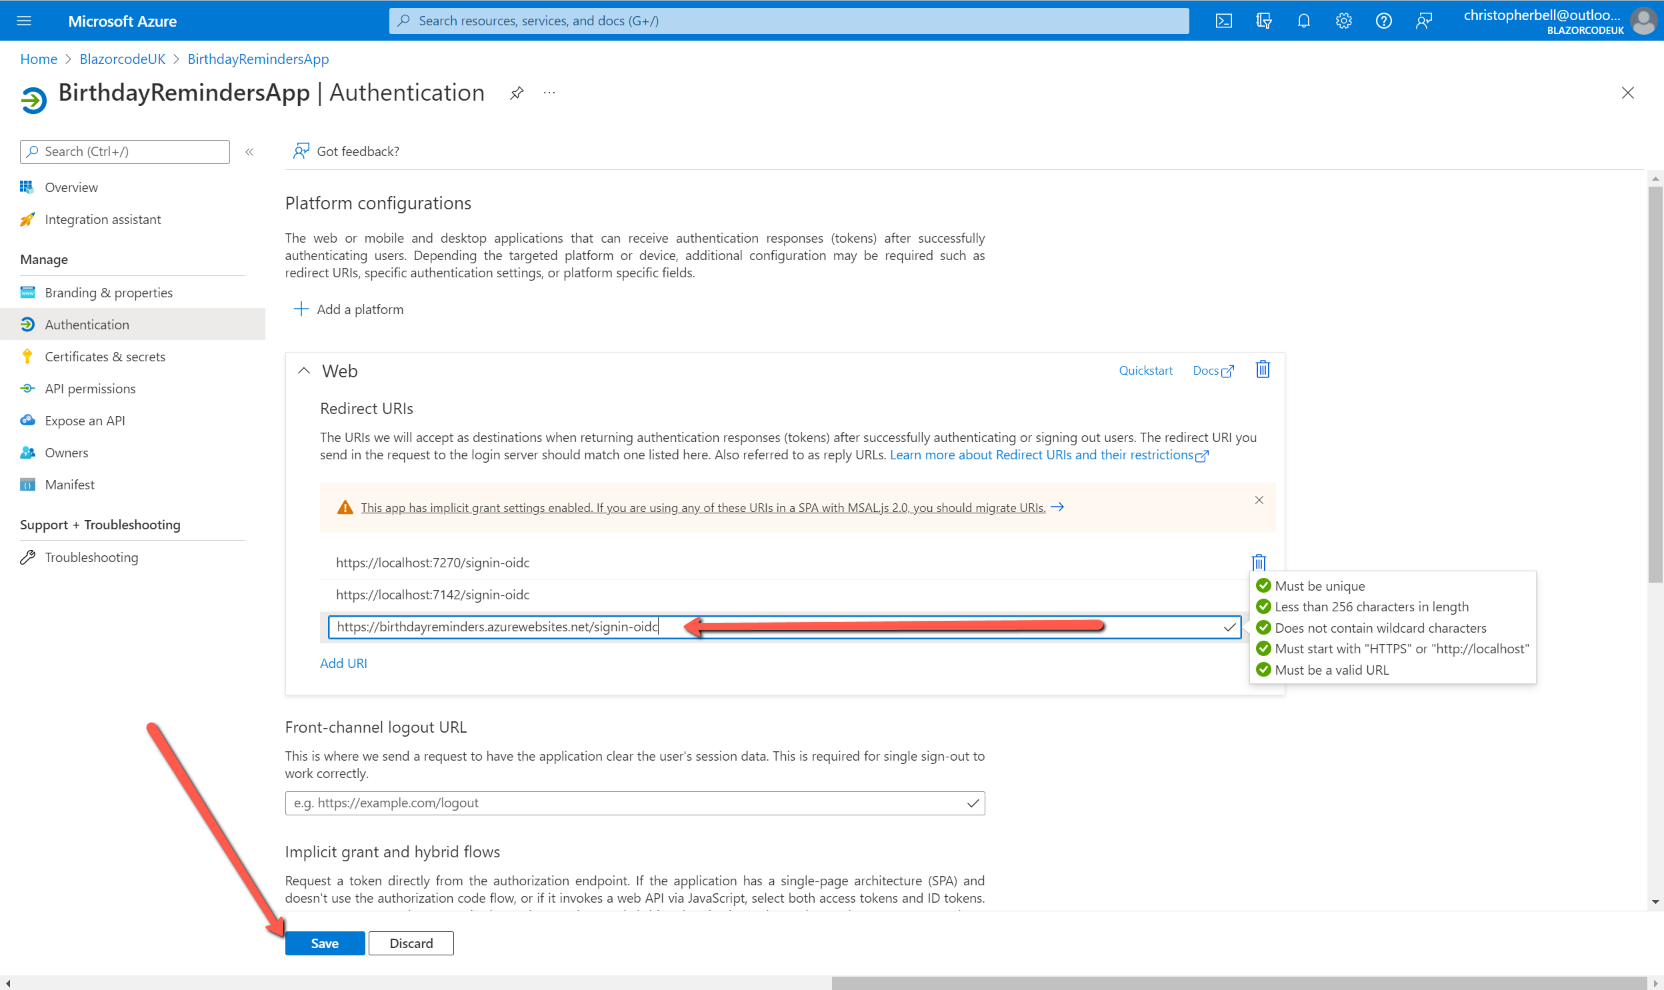
- Click on the registration for this application to open it
- Click on the link labelled 'Redirect URIs'
- Expand the 'Web' section, if not already expanded
- Click 'Add URI' at the bottom of the section
- In the 'Redirect URIs' box type in (or paste) the site address and append to it '/signin-oidc'.
- Click 'Save'


Save and test
Test the live application by entering the site address in a browser (or, from Visual Studio 2022 select 'Open site' from the Publish tab.
You should be presented with the Azure B2C login page and from there should be able to log into the application.
Depending on your location you may notice that the date format is not correct.
I had deliberately selected 'UK South' as the location of the Resource Group, SQL server, App Plan and App Service, so was a little surprised by the fact that dates were not displayed in UK format. Further investigation pointed to the application itself, rather than Azure. To fix the problem, I has to add the following two lines to Program.cs.
Localisation and Culture
The first line is added to the builder section:
builder.Services.AddLocalization();And the second after app.UseRouting();
app.UseRequestLocalization("en-GB");Re-Publish
To re-publish the app could not be simpler.
- Right-click on the project name in Solution Explorer
- Select 'Publish'
- Click the 'Publish' button at the top of the tab

Problems!
When testing the application I found that everything appeared to be working; I could add, edit, and delete people, I could send email reminders manually, but there were two problems
- The Hangfire Dashboard wasn't accessible from the web app
- The automatic email reminders appeared to work some of the time, but not always.
Hangfire Dashboard
The error message displayed by the web app (shown below) stated that I didn't have permission to view the page. It seems that this is a security 'feature' that only allows access for local viewing. I discovered a post on Stackoverflow about this, but decided not to pursue it. The reason I have not bothered is that if I run the app locally (i.e. just press F5 from Visual Studio and with the ConnectionString pointing to the SQL server on Azure I can access the Hangfire Dashboard, and it shows the state of Hangfire for the web app.

Automatic Email Reminders
This was a more serious problem that has required a less than ideal workaround.
During most of my testing the automatic reminders worked fine, but it turned out that this was because I was actively testing, constantly logging in and out of the web app. However, if I hadn't logged into the app for, say, an hour before the automatic email reminders were due to be sent, then nothing happened.
The cause of this behaviour is that the web app service 'goes to sleep' if not being accessed; this being a way of Azure minimising resources. There is an option within Azure to keep the web app 'Always on', but this is not available on the free service I am using. To view this setting:
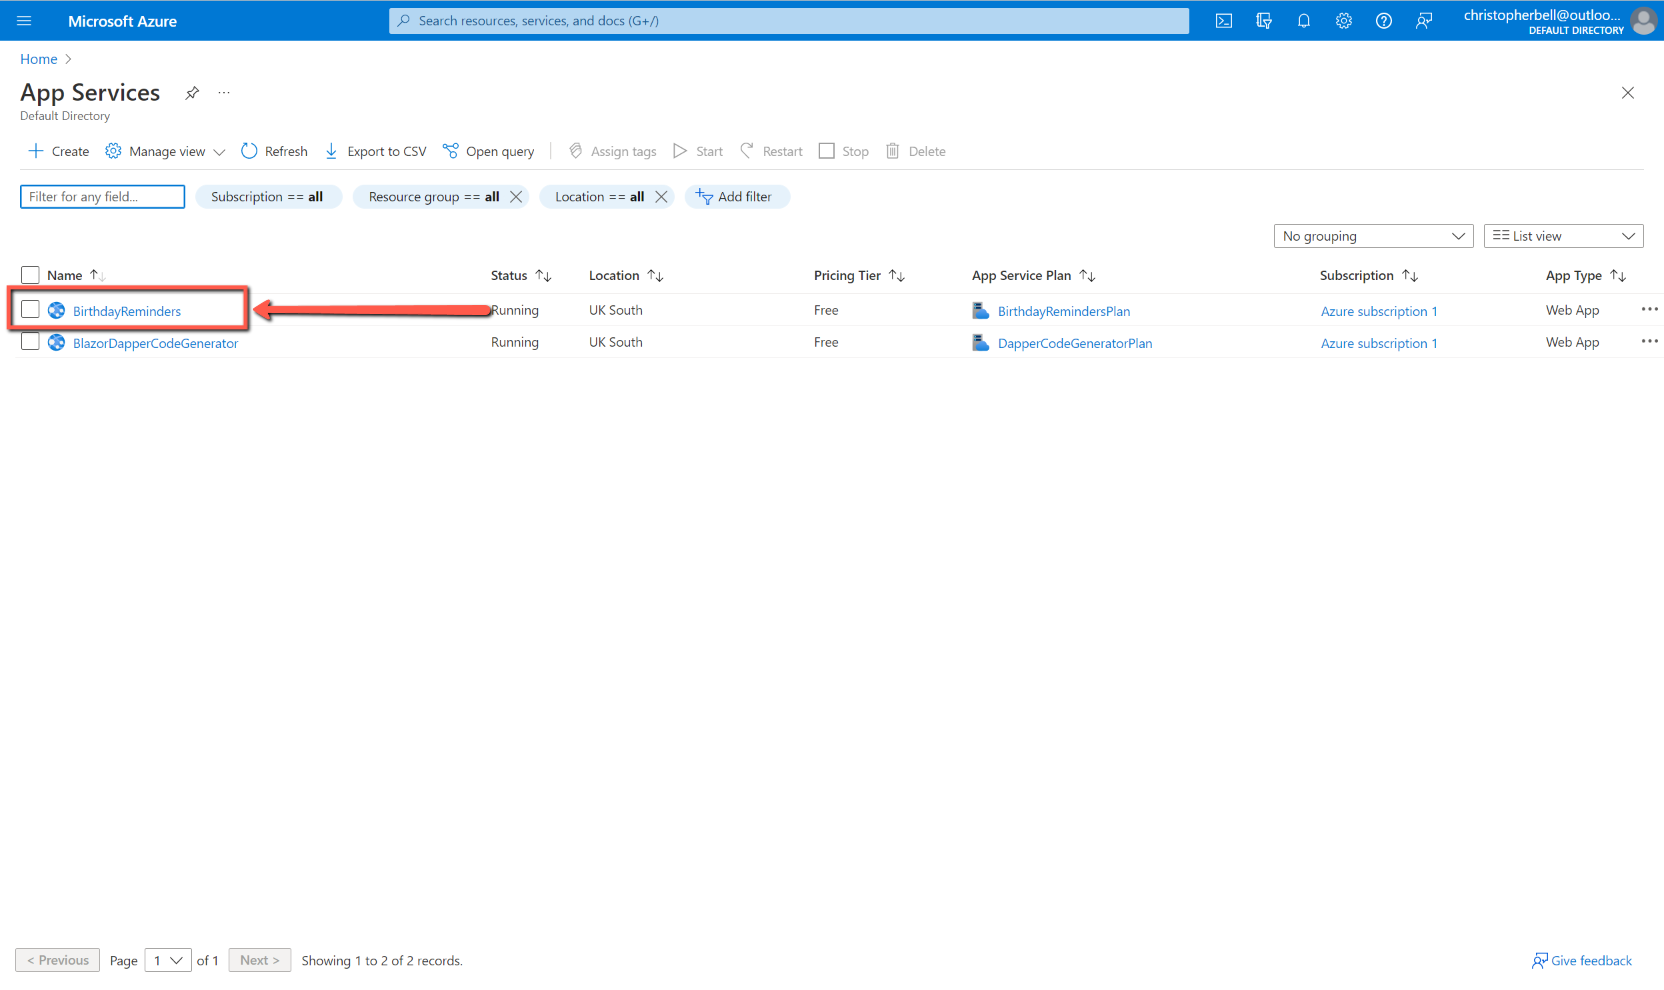
- Log into the Azure portal
- Select 'App Services'
- Select the Birthdays App Service
- Select 'Configuration'
- Select the 'General Settings' tab
- Notice that 'Always on' is greyed out


As I don't want to pay for 'Always on' this was a bit of a blow. It threatened to wreck all the work I had put into the project, so I had to come up with a workaround.
Workaround
Disclaimer - I don't guarantee that this workaround will always work; all I will claim is that at the moment it appears to work.
Since the Automatic Email Reminders worked either whilst I was logged in, or had been recently logged in, I reasoned that if I could kick the app into life the reminders would be sent and drew on my experience with my original Microsoft Access application for inspiration.
My original Microsoft Access application was installed on my desktop PC which I leave on, more or less, permanently and even if it had been switched off I could almost be sure would be switched on around lunchtime. I could also more or less rely on the fact that I wouldn't be using the PC around 13:30pm most days. I therefore used a Windows Scheduled Task to start the Microsoft Access application every day at 13:30pm; it would then search for forthcoming birthdays and send an email if any were found.
My workaround is therefore to create a Windows Scheduled Task on my desktop PC to open a browser and go to the Birthdays web app at a particular time every day, timed to open the web app a few minutes before the Hangfire recurring job is scheduled to start.
To create the Windows Scheduled Task:
- Open Windows Task Scheduler
- Select 'Create Task' either from the 'Action' menu, or from the right-hand 'Actions' pane.
- On the 'General' tab
- Enter a name for the Task.
- I left the remaining items as the defaults
- On the Triggers tab
- Click 'New'
- When the New Trigger form opens
- Select 'On a Schedule'
- Select 'Daily'
- Leave the Start Date as the current date
- Enter the Start Time to be a few minutes before the Hangfire Recurring Job time. (Be aware that daylight saving time adjustments might cause problems here - they did for me!)
- I selected to stop the task if it ran longer that 30 minutes
- Check 'Enabled'
- Click 'OK'
- On the Actions tab
- Click 'New'
- When the New Action form opens
- Leave the Action as 'Start a Program'
- In 'Program/Script' either enter the path and file name of an internet browser, or use the 'Browse' button to locate an internet browser program. (Google Chrome, Microsoft Edge, etc.)
- In the 'Add arguments' box enter the address of the Birthdays web application (you can easily copy it from the Visual Studio Publish tab.)
- Click 'OK'
- I left the 'Conditions' and 'Settings' tabs as the default values
- Click 'OK' to save the task.
That should be all that's required. As I mentioned, I created this Scheduled Task on a desktop PC that is normally always on. You might need to make some adjustment if you want to add the Task to a laptop that is likely to go to sleep as a period of inactivity.
One thing I appear to have discovered is that it is not necessary to log into the Birthdays app to activate it; simply getting the Login to open appears to be sufficient to allow the Hangfire job to fire.


Possible alternative: UpTimeRobot.com
References
- Code for this post: Deploying to Azure
- I can highly recommend watching the series of YouTube videos called "Azure tutorial for beginners" by Kudvenkat. His website is https://www.pragimtech.com
- Microsoft Docs had the answer to the localisation settings (although at the time of writing it hadn't been updated to .NET 6.
- Stackoverflow re Hangfire Error 403