Project Setup - 2
Introduction
Continuing the basic set up of the project, this time turning our attention to the SQL database, connecting it to the Visual Studio project and installing Dapper.
Summary of Tasks
- Table requirements and structure
- SQL Connection
- Install Dapper & dependencies
YouTube Video
Database
Tables
I plan to keep this as simple as possible, without being tempted to add additional tables or columns that will distract from the main purpose of emailing reminders. I think we will need only a single table:
- Person
The Person table will have the following columns:
- PersonID (GUID)
- PersonFirstName
- PersonLastName
- PersonDateOfBirth
- PersonSendReminderTo
The 'PersonSendReminderTo' will record the email address of the user adding this record. In practice this will mean that if the Person is known to multiple people there will be multiple copies of the Person record, but to keep each user's records private I think this is the only way to handle this.
I did consider keeping a separate table of 'Reminders' that would allow users to define how soon and frequently they wanted reminders to be emailed. In practice I suspect this will prove too much of an overhead for the users; most people being content with reminders 21, 14 and 7 days before the birthday.
Deleting Records
Deleting records can sometimes be a thorny issue. In some cases it might be preferable to keep the record and mark it as 'archived' or 'deleted'. With this simple system I don't think there is any need for this approach. I have therefore omitted an 'IsArchived' column from the database.
Adding the SQL Database
- Open Microsoft SQL Management Studio and connect to a Database Engine. (If using MS SQL Express, just accept the defaults.)
- Object Explorer should be visible, if not select View > Object Explorer from the menu.
- Right-click on Databases and select New Database...
- Enter a name for the database in the New Database pop-up form - I suggest 'Birthdays'. Leave all other entries as defaults and click 'OK'.
- Having created the database, highlight it, right-click and select 'New Query' or select 'New Query' from the toolbar.
- Copy the code from below (click the 'Copy' button) and paste into the 'New Query' tab in SQL.
USE [Birthdays]
GO

SET ANSI_NULLS ON
GO

SET QUOTED_IDENTIFIER ON
GO

CREATE TABLE [dbo].[Person](
	[PersonID] [uniqueidentifier] NOT NULL,
	[PersonFirstName] [nvarchar](50) NOT NULL,
	[PersonLastName] [nvarchar](50) NOT NULL,
	[PersonDateOfBirth] [date] NOT NULL,
	[PersonSendReminderTo] [nvarchar](100) NOT NULL,
 CONSTRAINT [PK_Person] PRIMARY KEY CLUSTERED
(
	[PersonID] ASC
)WITH (PAD_INDEX = OFF, STATISTICS_NORECOMPUTE = OFF, IGNORE_DUP_KEY = OFF, ALLOW_ROW_LOCKS = ON, ALLOW_PAGE_LOCKS = ON) ON [PRIMARY]
) ON [PRIMARY]
GO

ALTER TABLE [dbo].[Person] ADD  CONSTRAINT [DF_Person_PersonID]  DEFAULT (newid()) FOR [PersonID]
GO
Click the 'Execute' button on the toolbar to run the code. You should see a confirmation message to say the command has completed successfully.
The 'CREATE TABLE' section creates the Person table, whilst the 'ALTER TABLE' section ensures a new GUID is added automatically to the PersonID whenever a new record is added to the table.
- Close the 'New Query' tab; there is no need to save the query.
- If you wish, you can expand 'Birthdays' and then Tables to show the new table (or will probably need to right-click 'Tables' and 'Refresh' to display the table. Right-clicking on the Person table and selecting 'Design' will open a pane showing the column names and their attributes.


The database has now been created.
SQL Connection
We need to link our Visual Studio project with the Birthdays SQL database. This is achieved by ascertaining a 'Connection String' for the SQL database and then entering this into appsettings.json and making a couple of other configuration changes.
SQL Connection String
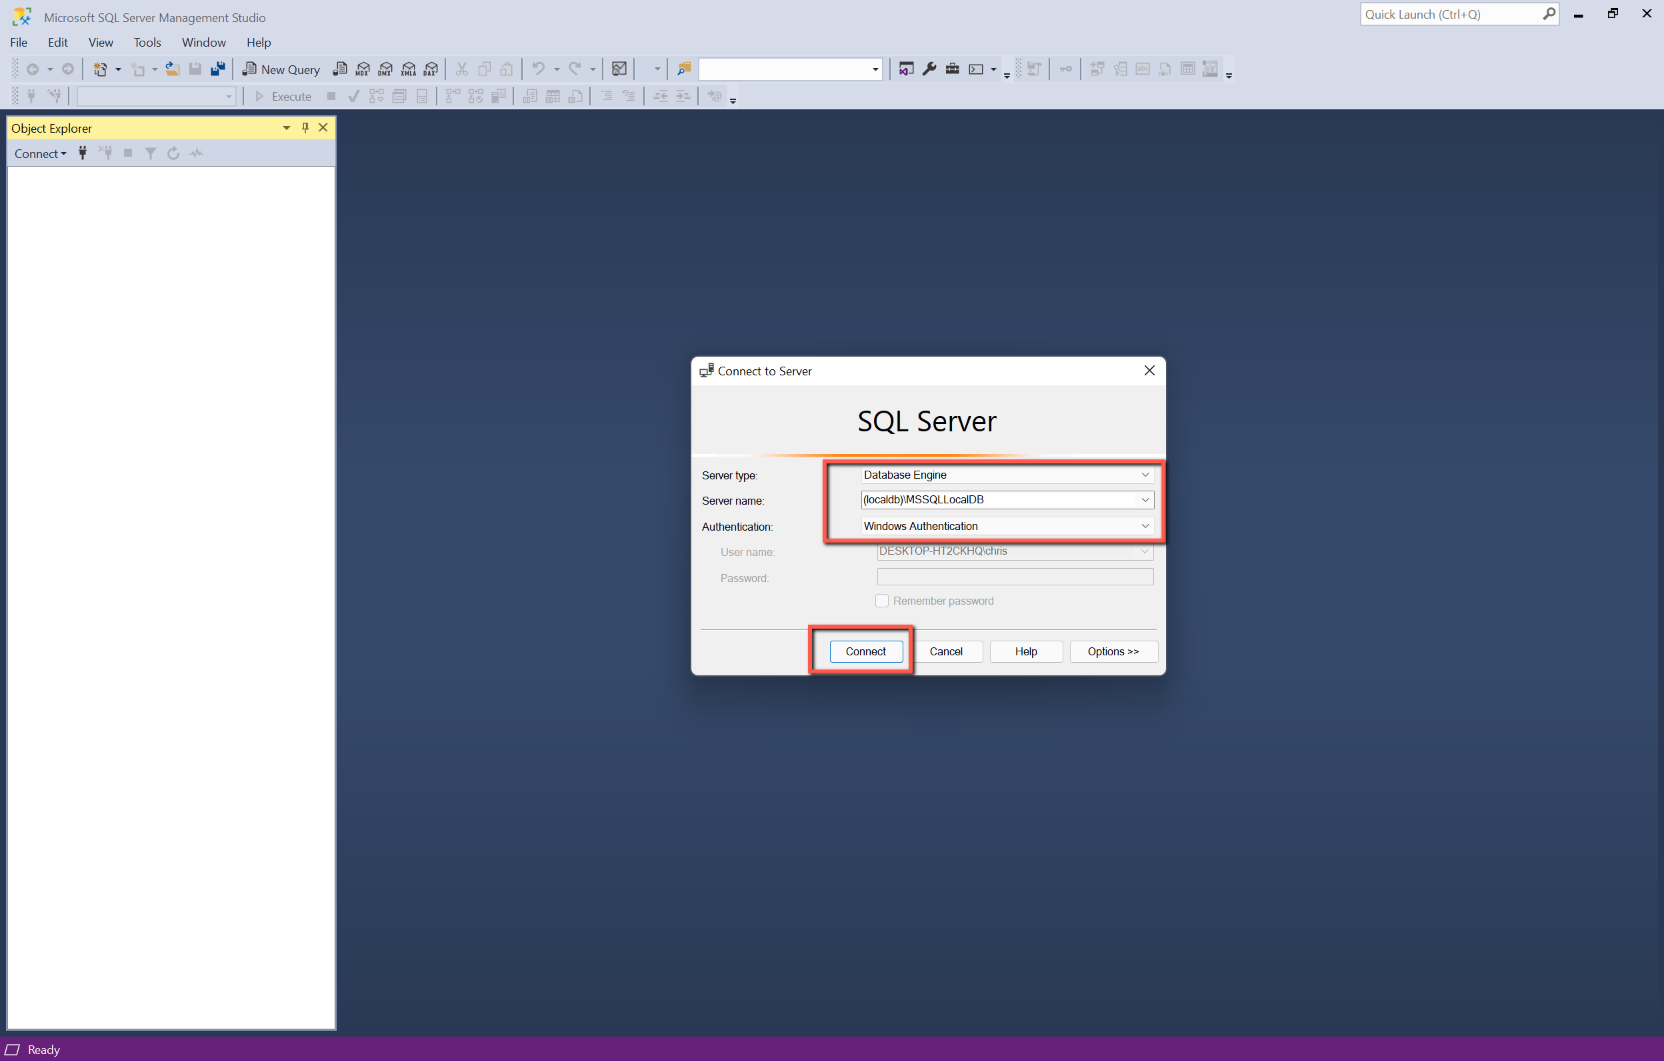
- Open Visual Studio and open the BlazorBirthdayReminders project (if not already open).
- Select View > SQL Server Object Explorer.
- Select the appropriate SQL Server (the one with the Birthdays database).
- In the SQL Server Object Explorer, expand the tree and select the 'Birthdays' database.
- Right-click on the Birthdays database, and select 'Properties'.
- From the Properties pane copy the whole of the 'Connection String' and paste, temporarily, into Notepad.
- Close the SQL Server Object Explorer.
Open 'appsettings.json' and enter the following, after the AzureAd section. (The exact position doesn't matter, but it needs to be in its own section.)
"ConnectionStrings":{
  "Default": "Your Connection String"
  },


Add Dapper
Dapper
To add Dapper
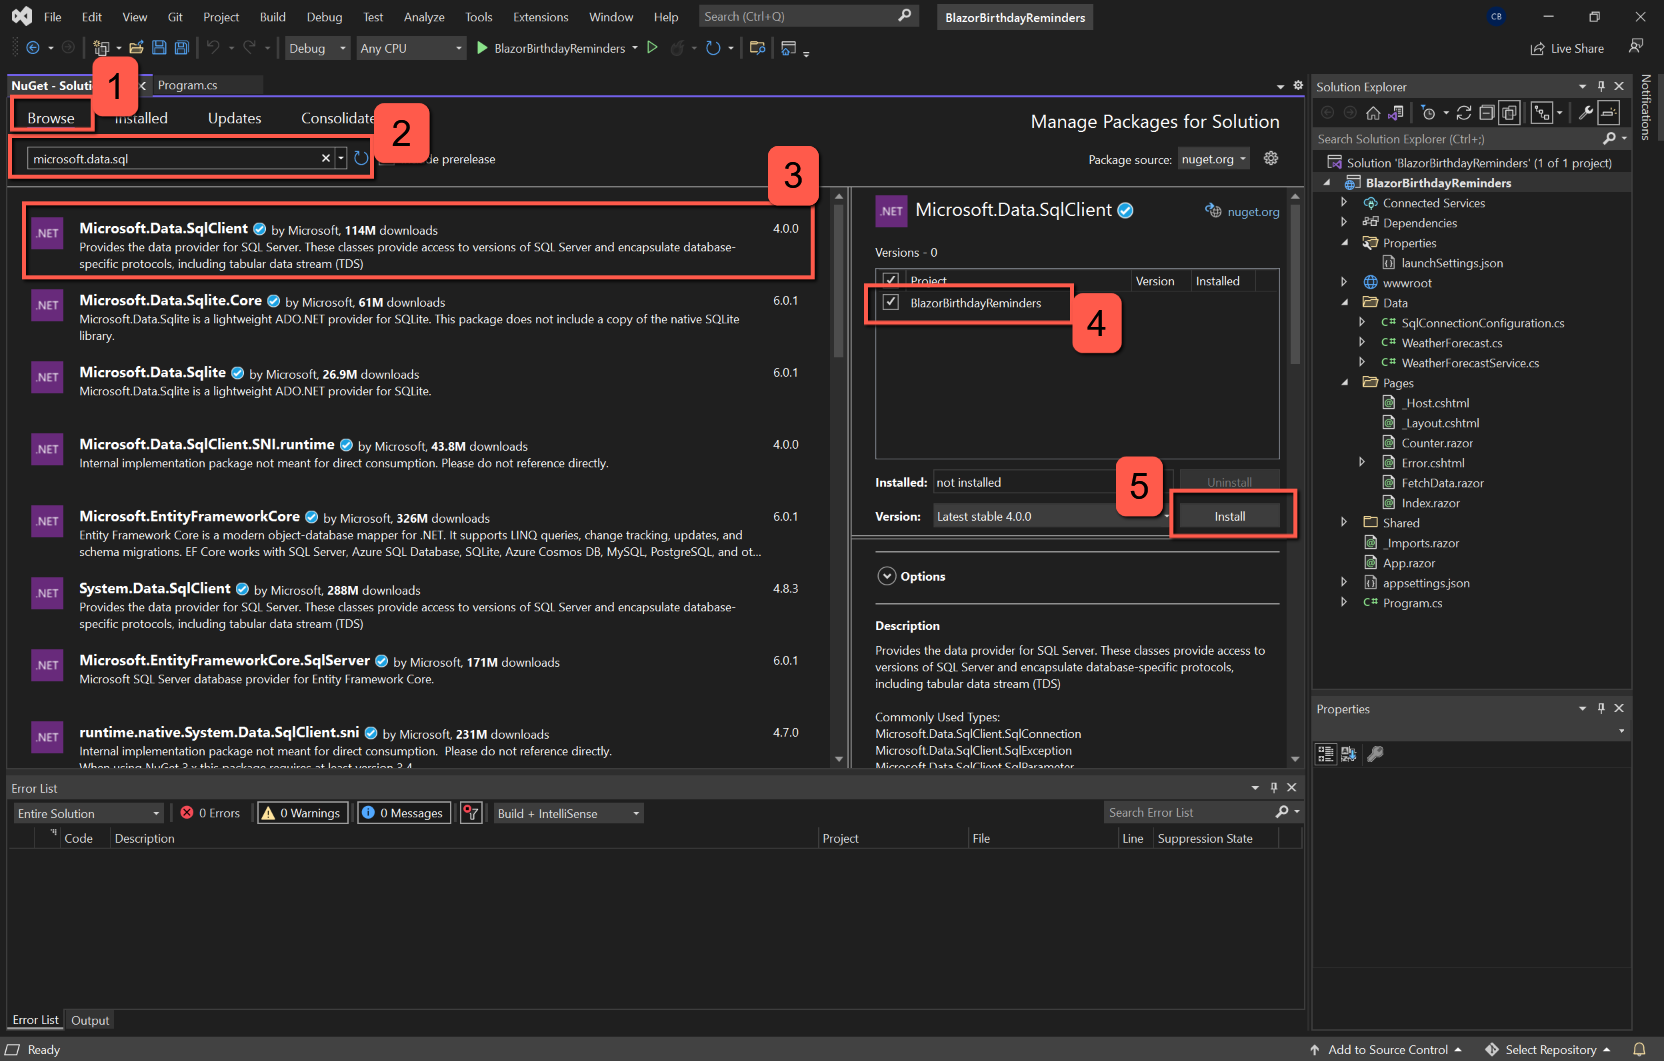
- Select Project > Manage NuGet Packages... from the top menu.
- Select the Browse tab.
- Enter 'Dapper' in the Search box.
- Dapper should be the top package, highlight it to show the details in the right-hand pane.
- Click the 'Install' button. Dapper should install and no errors should be shown in the Errors pane. A green tick will also appear next to Dapper in the Browse tab.
Microsoft.Data.SqlClient
Once Dapper is installed, stay in Manage NuGet Packages and repeat the process, this time searching for 'Microsoft.Data.SqlClient'. Select 'Install' and accept the licence. (Note that in his YouTube video Tim Corey installs 'System.Data.SqlClient'. Both appear to work, but I believe 'Microsoft.Data.SqlClient' is preferred.)
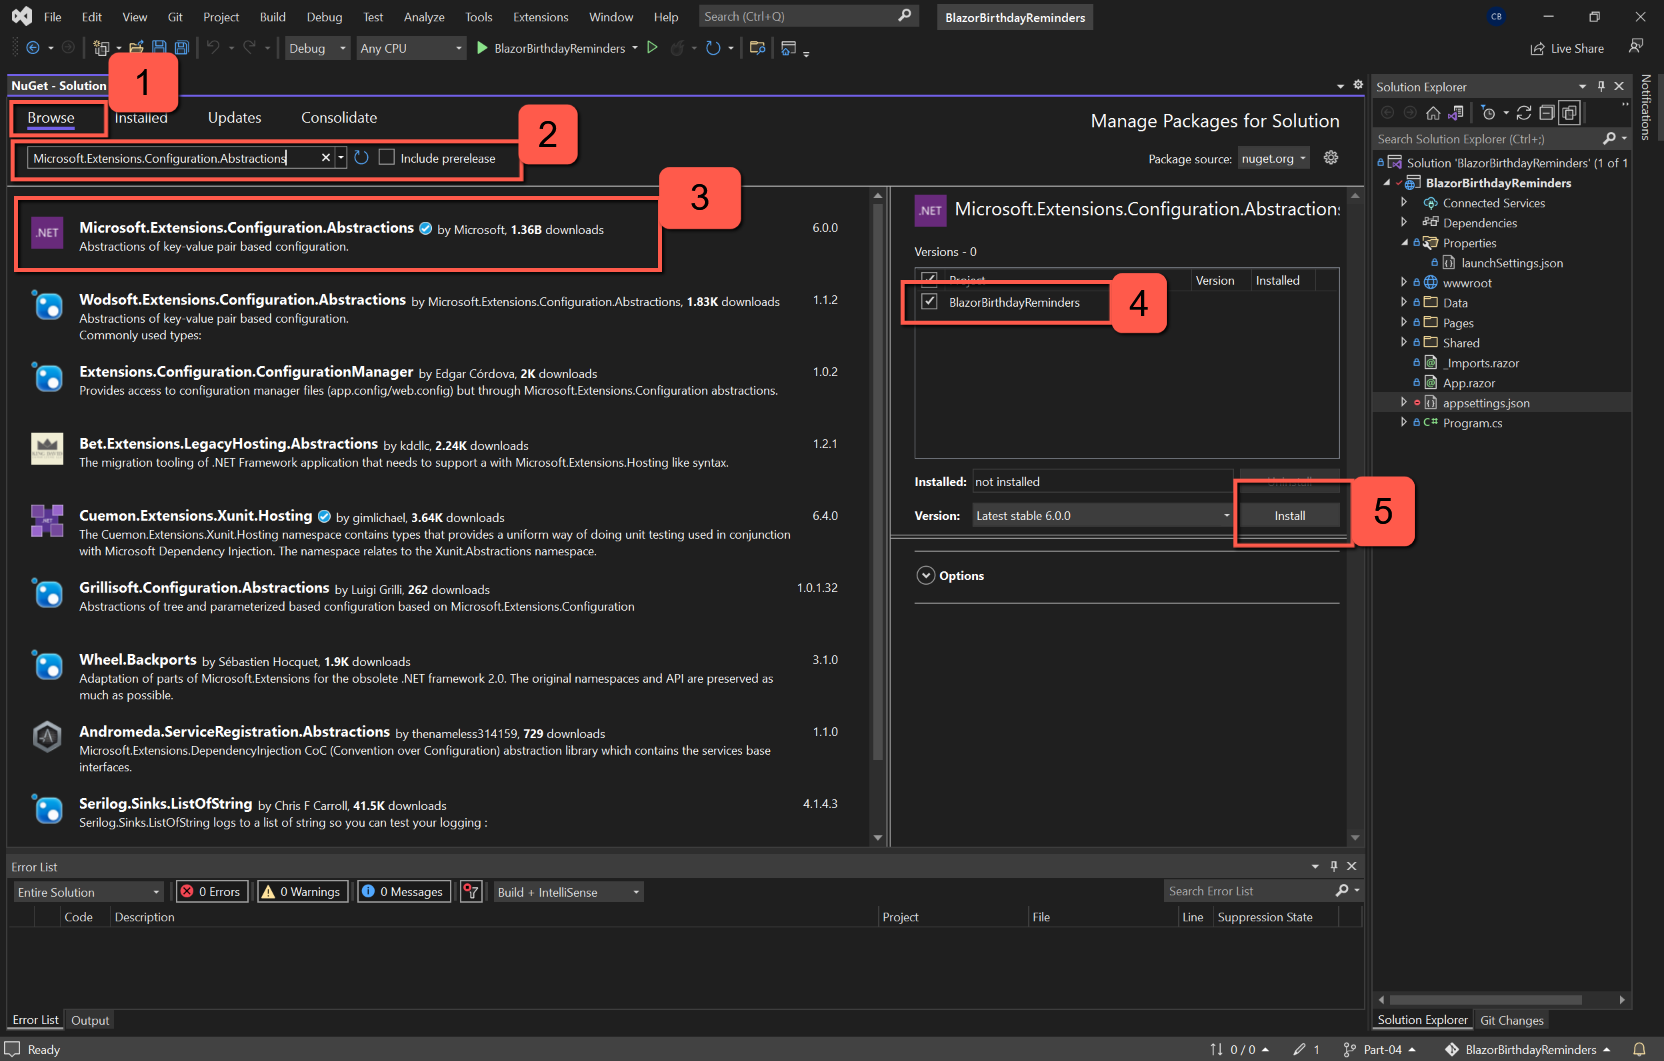
Microsoft.Extensions.Configuration.Abstractions
Stay in Manage NuGet Packages and repeat the process, this time searching for 'Microsoft.Extensions.Configuration.Abstractions'. Select 'Install' and accept the licence.
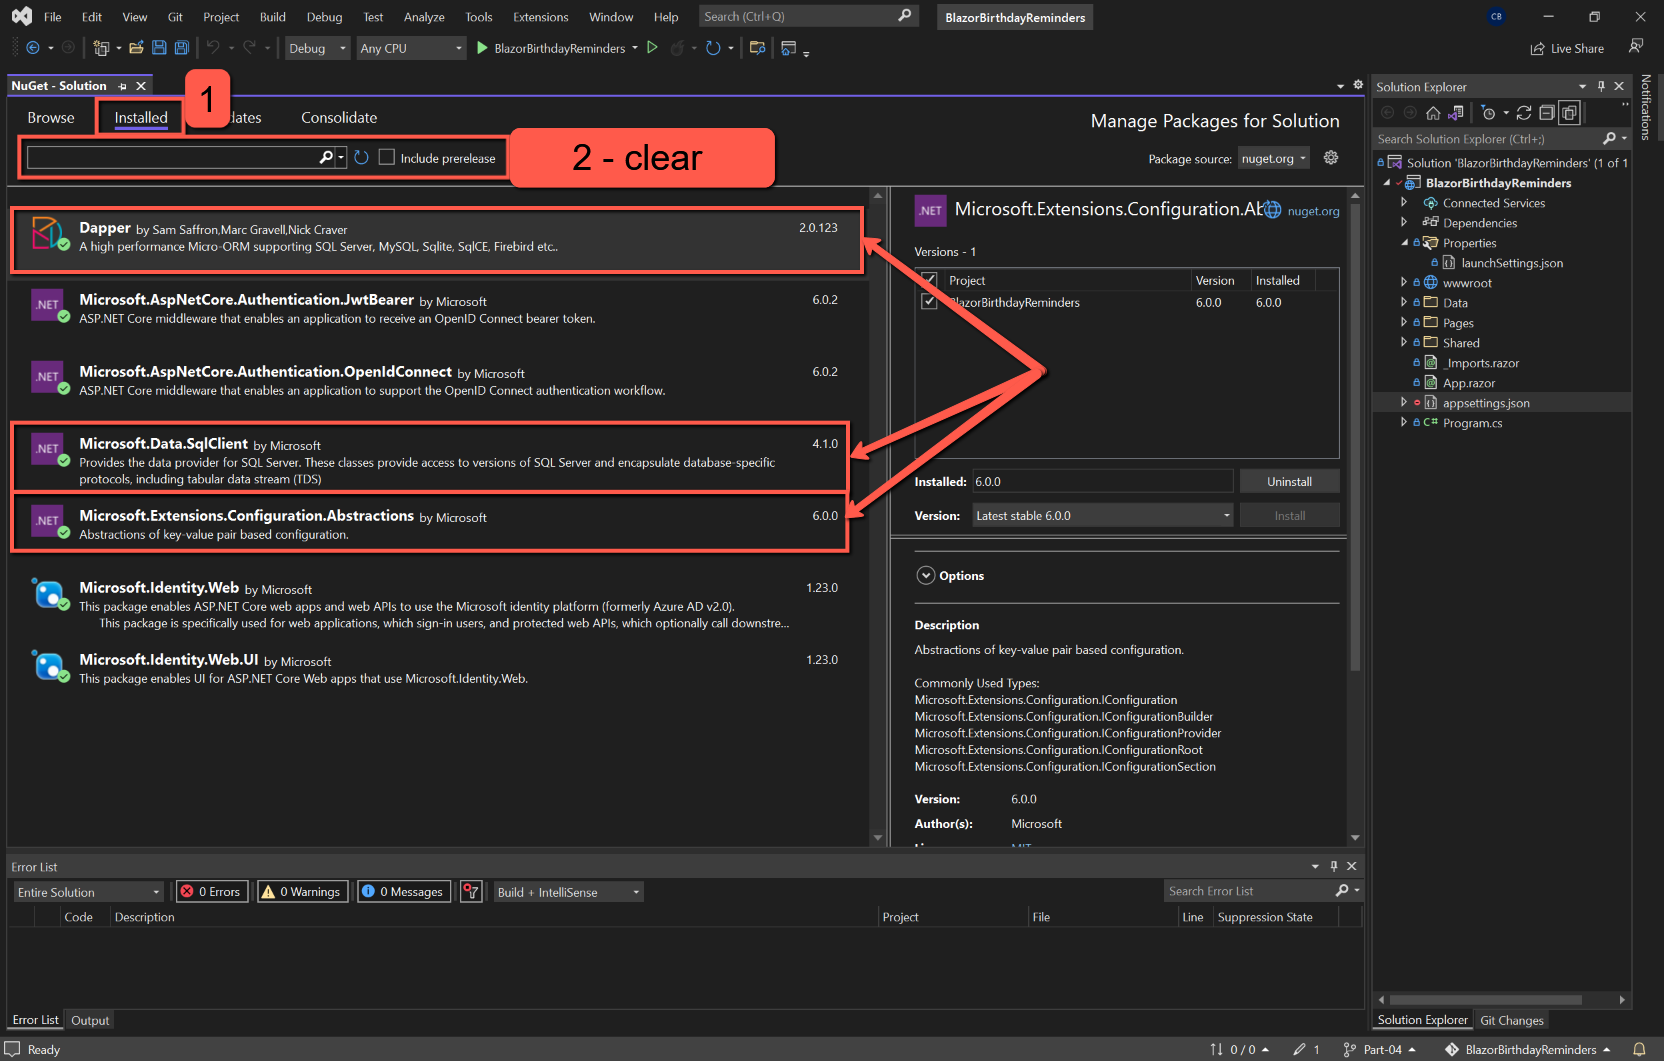
To confirm that all packages have been installed, clear the search box and select the 'Installed' tab. (Note that other packages will have also been installed as part of the Authentication option.)

References
Microsoft SQL Server Express - Download
Microsoft SQL Server Management Studio - Download