Can you keep a secret?
When creating a web application there is almost always information that can be considered to be secret. Examples of this type of information are API keys, connection strings for databases and product keys, amongst others.
For Blazor applications how these secrets are going to be kept needs to be considered from the very start of a project. This is particularly so if the code is going to be put into source control - I'm thinking of GitHub in this case.
If source control isn't going to be used and the application is only ever going to be run locally as a personal project, then safeguarding secrets is not absolutely vital, but in all other cases it should be a top priority.
YouTube Video
The Problem
In a Blazor application the 'default' place to store database connection strings, API keys, etc. is in appsettings.json, but the big problem is that appsetings.json is included with other files when committing to GitHub for the first time. In theory one can add appsettings.json to .gitignore, but by that stage it is too late, appsettings.json has already been committed to the repository and un-doing it is not straightforward. I know, I've done it more than once (but not more than twice!!)
Background
We'll start by creating a very basic application, storing secrets in appsettings.json and then reading them back and displaying them on screen (not very secret!)
Using Visual Studio 2022, create a new Blazor Web App, setting 'Authentication type' to 'None', 'Interactivity' to 'Server', 'Interactivity location' to 'Global' and 'Include sample pages' to 'checked'.


appsettings.json
Change appsettings.json to the following. This adds a section for a connection string (commonly used to connect to databases), and a section called 'MySecrets', with 2 secrets.
{
  "Logging": {
    "LogLevel": {
      "Default": "Information",
      "Microsoft.AspNetCore": "Warning"
    }
  },
  "AllowedHosts": "*",
  "ConnectionStrings": {
    "Default": "MyProductionConnectionString"
  },
  "MySecrets": {
    "Secret1": "Secret1 from appsettings.json",
    "Secret2": "Secret2 from appsettings.json"
  }
}
appsettings.Development.json
appsettings.Development.json is read preferentially by the system whilst in development and will use information from this file in place of appsettings.json. When published the application ignores this file. This gives the flexibility, for example, to use a different database whilst developing and testing, leaving the production database intact.
{
  "Logging": {
    "LogLevel": {
      "Default": "Information",
      "Microsoft.AspNetCore": "Warning"
    }
  },
  "ConnectionStrings": {
    "Default": "MyDevelopmentConnectionString"
  },
  "MySecrets": {
    "Secret1": "Secret1 from appsettings.Development.json",
    "Secret2": "Secret2 from appsettings.Development.json"
  }
}
Home.razor
To demonstrate the above, amend Home.razor, replacing the template with the following:
@page "/"
@inject IConfiguration _config;
<PageTitle>Home</PageTitle>
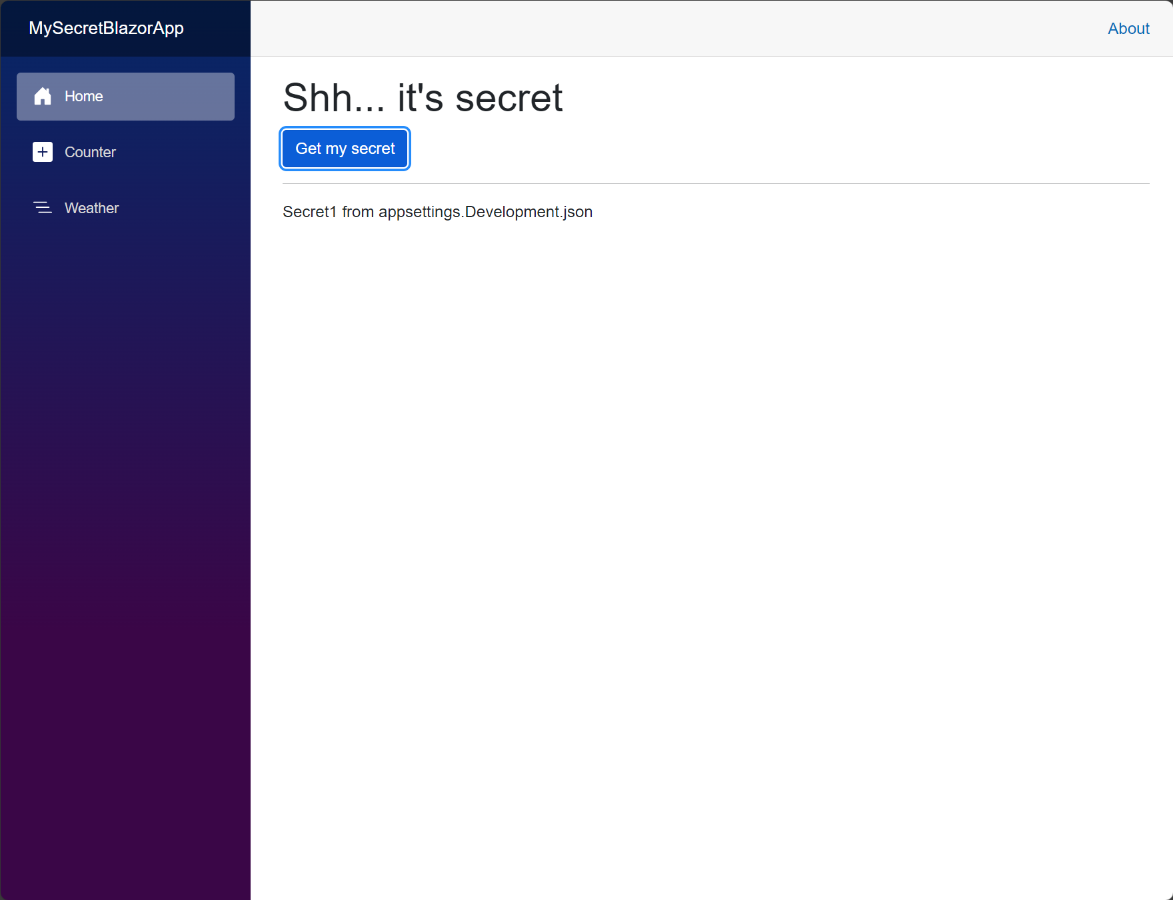
<h1>Shh... it's secret</h1>
<button class="btn btn-primary" @onclick="GetMySecret">Get my secret</button>
<div>
<hr />
<p>@secret</p>
</div>
@code {
public string secret = string.Empty;
public void GetMySecret()
{
secret = _config.GetValue<string>("MySecrets:Secret1") ?? "Not found...";
}
}

This code
- injects the IConfiguration interface allowing us to use the built-in configuration methods (which can read appsettings.json, secrets.json, etc.)
- has a button that calls a method called "GetMySecret"
- a placeholder to display the secret, once it has been obtained.
- in the code section, declares a variable of type 'string' and sets it to an empty value
- a method called 'GetMySecret' that uses IConfiguration to get "MySecrets.Secret1". (The "??" is called "null-coalescing" operator and is used to return the value to the right if the value to the left is null.)
Save all files and run the application. Click the 'Get my secret' button. The app should display 'First Development Secret'. Note that this is coming from appsettings.Development.json.
We will contrast this later with secrets that come from elsewhere.
secrets.json
As mentioned earlier we might not want to save secrets in either of the appsettings.json files. An alternative, in development only, is to use secrets.json.
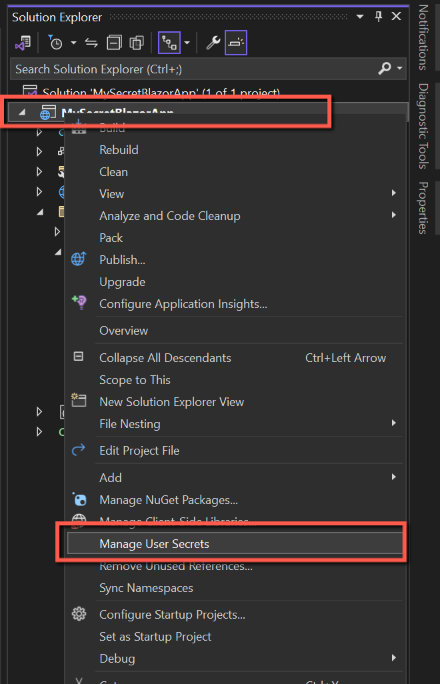
To add secrets to secrets.json, right-click on the project name in the Solution Explorer and select 'Manage user secrets' (about half way down the list). This will open a json file in edit mode in the main pane. Enter the code below:
{
  "MySecrets": {
    "Secret1": "Secret1 from secrets.json",
    "Secret2": "Secret2 from secrets.json"
  },
  "ConnectionStrings": {
    "Default": "MyConnectionString from secrets.json"
  },
}


For information, if you open the project file you will notice a new item called 'UserSecretsId'; this is the location of secrets.json in this path:
%APPDATA%\Microsoft\UserSecrets\{UserSecretsId}\
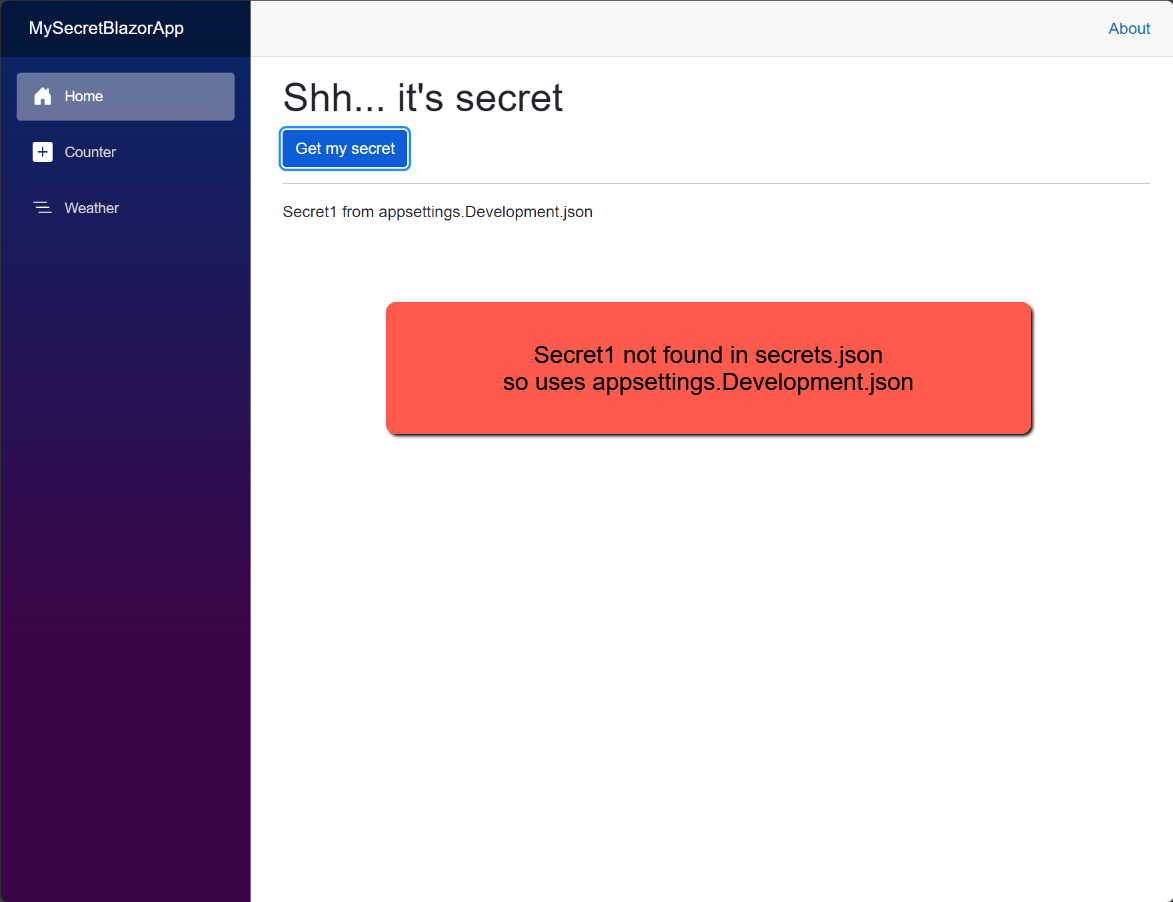
Run the application and click the 'Show my secrets' button. Notice that the secret has come from secrets.json and that appsettings.Development.json has been ignored.

Secrets Hierarchy
Whilst in development the hierarchy for getting secrets is:
- secrets.json
- appsettings.Development.json
- appsettings.json
To check this edit each of the above files in turn, starting with secrets.json, changing the key name 'Secret1' to, say, 'SecretX' and run the application.


Next, edit Home.razor changing the line to get 'Secret2' instead of Secret1:
secret = _config.GetValue<string>("MySecrets:Secret2") ?? "Not found...";Re-run the application again. Note that the first place 'Secret2' is found is in secrets.json.

And to complete these permutations, change Home.razor again so that the secret being obtained is the connection string and re-run the application:
secret = _config.GetValue<string>("ConnectionStrings:Default") ?? "Not found...";
What happens if we publish the application?
Before we move on, change secrets.json, appsettings.Development.json and appsettings.json back so that we have 'Secret1' instead of 'SecretX', and change the GetMySecret on Home.razor so that it gets 'MySecrets.Secret1'.
How to publish
I have an Azure subscription (basic, pay-as-you-go account) and so I can publish the application to Azure Web Services. Once an Azure account has been created publication can be accomplished from within Visual Studio 2022 completely.
Before beginning the publication process
- Make sure you are logged into Visual Studio 2022 with the same account as you use for Azure.
- Make sure you are using the same Azure Service Authentication.
To check you are logged into Visual Studio with the same account as you use for Azure, click the 'Sign in' logo in the top right hand corner of Visual Studio. Change account if necessary.


To check you have the correct Azure Service Authentication, select Tools > Options and then 'Azure Service Authentication' and change if necessary.


To publish the application:
- Right-click on the project name
- Select 'Publish'
- Select 'Azure'
- Select 'Azure App Service (Windows)
- Double-check you're logged in with the correct account
- Select the Subscription (if necessary)
- Click the + symbol to create a new App Service
- On the next screen I suggest
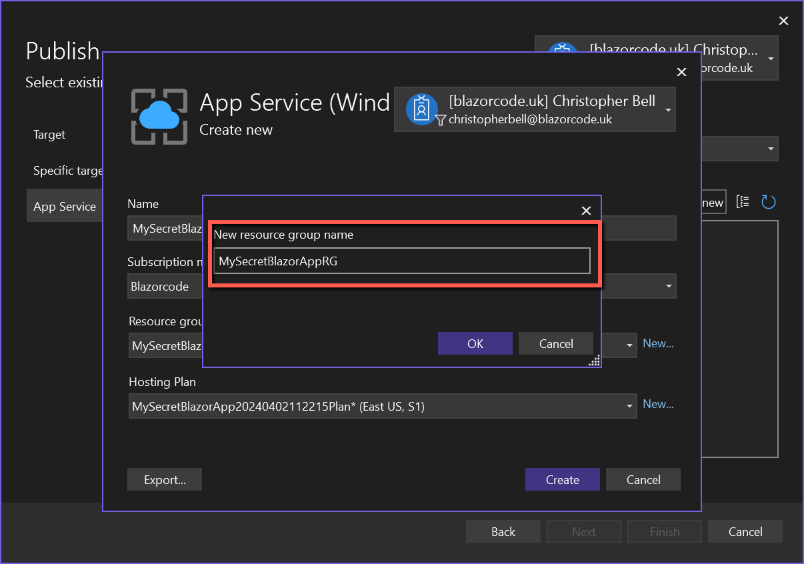
- Re-naming the 'Name' to get rid of the date/time part. This name needs to be unique across the whole of Azure so you might need to try a few to make sure it's unique
- Click 'New' next to 'Resource Group'. Re-name to make more concise
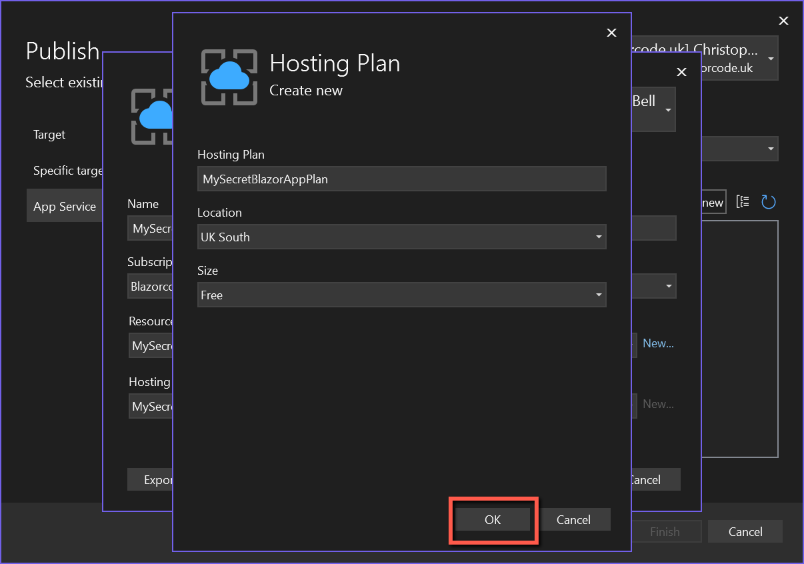
- Click 'New' next to 'Hosting Plan' ***IMPORTANT***
- Re-name to make the Hosting plan name more concise
- Select a suitable location
- Select 'Free' from the Size drop-down list (otherwise you might/will incur costs)
- Click 'OK'
- Review the data on the "App Service" form and click 'Create'
- Review the data on the "Publish" form and click 'Finish'
- Another form will pop-up showing progress and will have a green tick against the 'Publish profile' once complete. Click 'Close'
- We are nearly there...
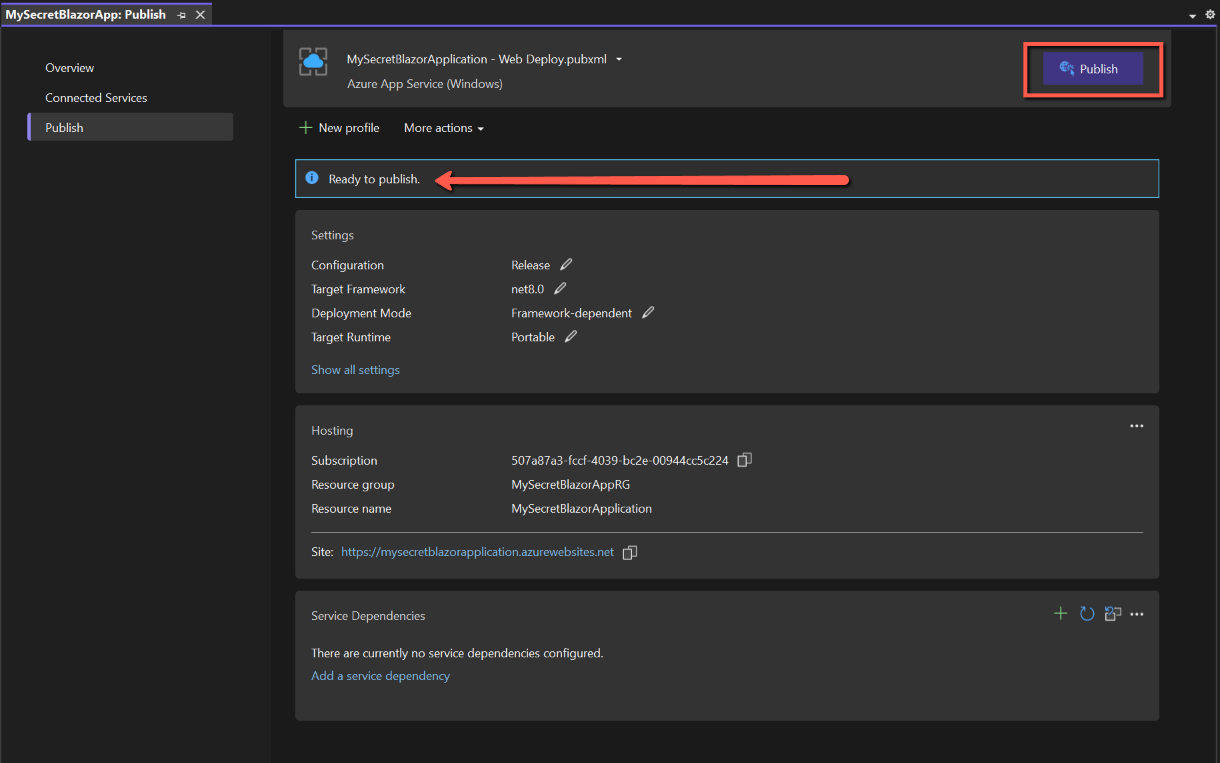
- Click 'Publish' to publish the app.
- Once published a 'Publish succeeded message with a green background will be displayed, together with a link to the app. (The app may open automatically anyway.)


The published app
If the app doesn't open automatically, click the link, or copy the link to the site and paste into a browser. The Home page should look like this:

The important part here is that if you click the 'Get my Secret' button the secret displayed is the one that has been recorded in appsettings.json in preference to both appsettings.Development,json and secrets.json.
Azure Key Vault
The problem with secrets.json is that it doesn't get published. The problem with appsettings.json is that there is a risk that any secrets could be exposed in source control unless steps are taken to prevent it.
A better option is probably Azure Key Vault. A few words about Azure Key Vault:
- Obviously to use Azure Key Vault you must have an Azure account (although a free account is sufficient - but there will be costs... eventually.)
- Azure Key Vault can store three types of entity
- Secrets
- Keys
- Certificates
To store secrets, such as connection strings, API keys and product licences it is only necessary to use Azure Key Vault 'Secrets'. If using just 'Secrets' the costs are fairly minimal, I think about £0.03 per 10,000 transactions. (I am ignoring the cost of Keys and Certificates as I won't be using these - see Azure website for details.)
Adding a secret to Azure Key Vault
There are two ways of adding an Azure Key Vault: either through Visual Studio or directly in the Azure Portal. The simplest method is through Visual Studio.
(The alternative method by adding the Key Vault through the Azure portal is explained here.)
Visual Studio Method
- In Solution Explorer, right-click 'Connected Services'
- Select 'Add'
- Select 'Azure Key Vault'
- On the 'Connect to dependency' form
- Select the appropriate Azure subscription
- Click 'Create new' icon above the Key vaults grid
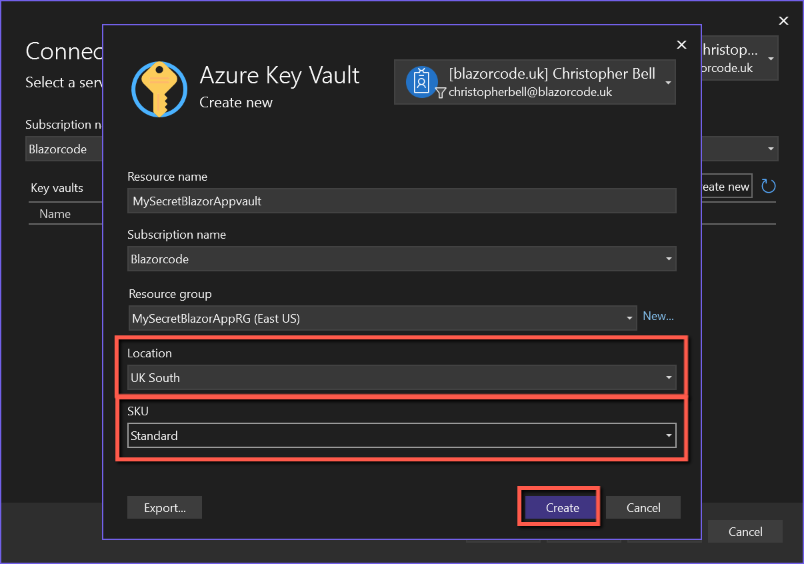
- On the Azure Key Vault form
- Leave the Resource name as the default (or edit if required)
- Leave the Subscription name (should be the same as the previous form)
- Leave the Resource Group as the default
- Leave the SKU as 'Standard'
- Click 'Create'
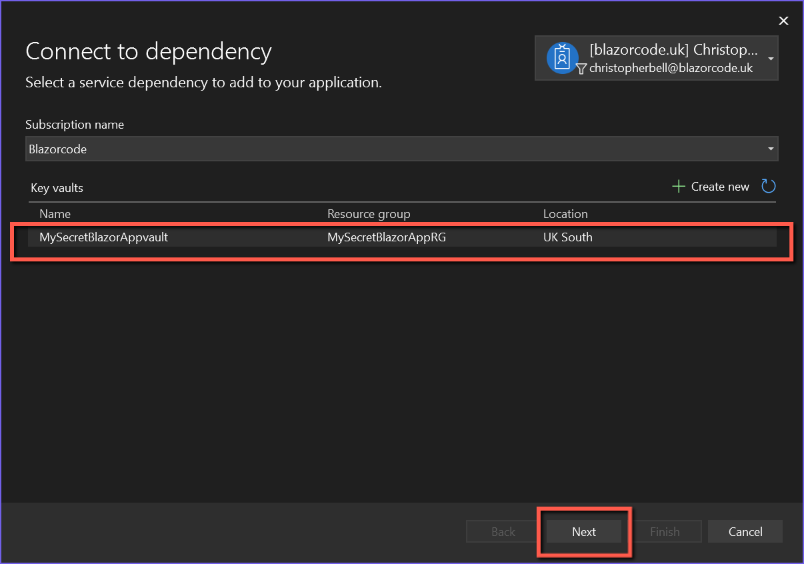
- After a few seconds you will be returned to the 'Connect to dependency' form
- Click 'Next'
- The form will be re-displayed showing an 'Environment variable name' and 'Connection string value'. View the 'Connection string value' (it should make sense) and copy and paste it to Notepad
- Click 'Next'
- A 'Summary of changes' will be displayed, showing what will take place automatically.
- Click 'Finish'
- A final 'Dependency configuration progress' form will be displayed and should complete in a few seconds with a final green tick.
- Click 'Close' to complete the Key Vault setup.


By using the Visual Studio method, the process makes a number of changes to the application, including
- Code to enable the new dependency
- Adding 2 NuGet packages
- LaunchSettings.json will be changed to ensure correct local behaviour
These were the changes I found:

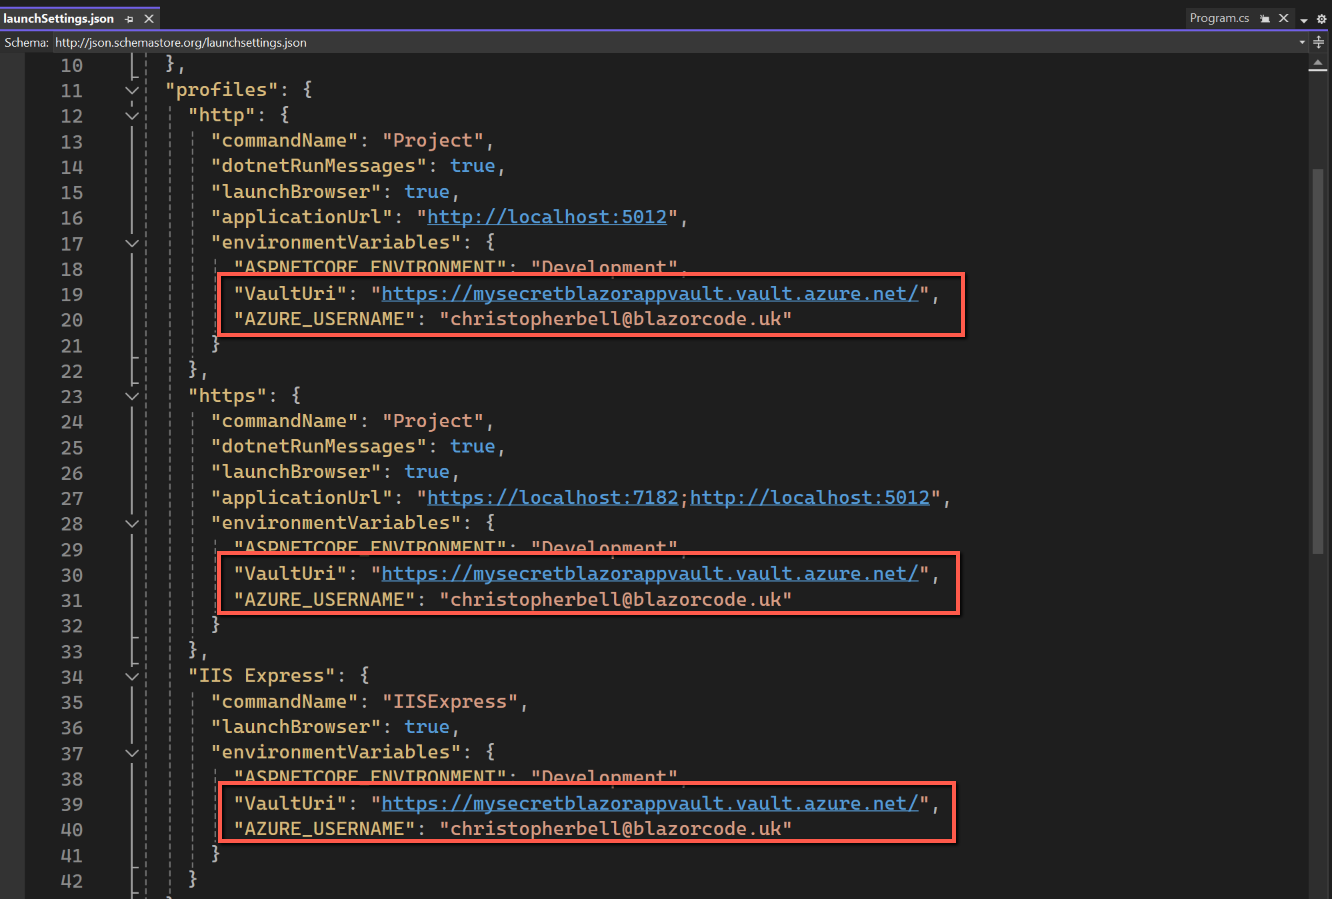


Save all files and run the application (locally).
To start with I could not get this to work... Arghhh... I always got the error shown below:

I think this was caused by my Azure accounts. Somehow I had ended up with two accounts, probably caused by me having two Microsoft accounts at one point, a personal Microsoft 365 account (which had been cancelled at this point) and another Microsoft 365 Business Standard subscription. No matter what I did I could not resolve the problem. In the end I had to cancel and delete both Azure subscriptions and start again. Fortunately I didn't have any critical applications in Azure.
When it does run, clicking the 'Get my secret' button should show the secret from secrets.json.
Adding a Secret to Azure Key Vault
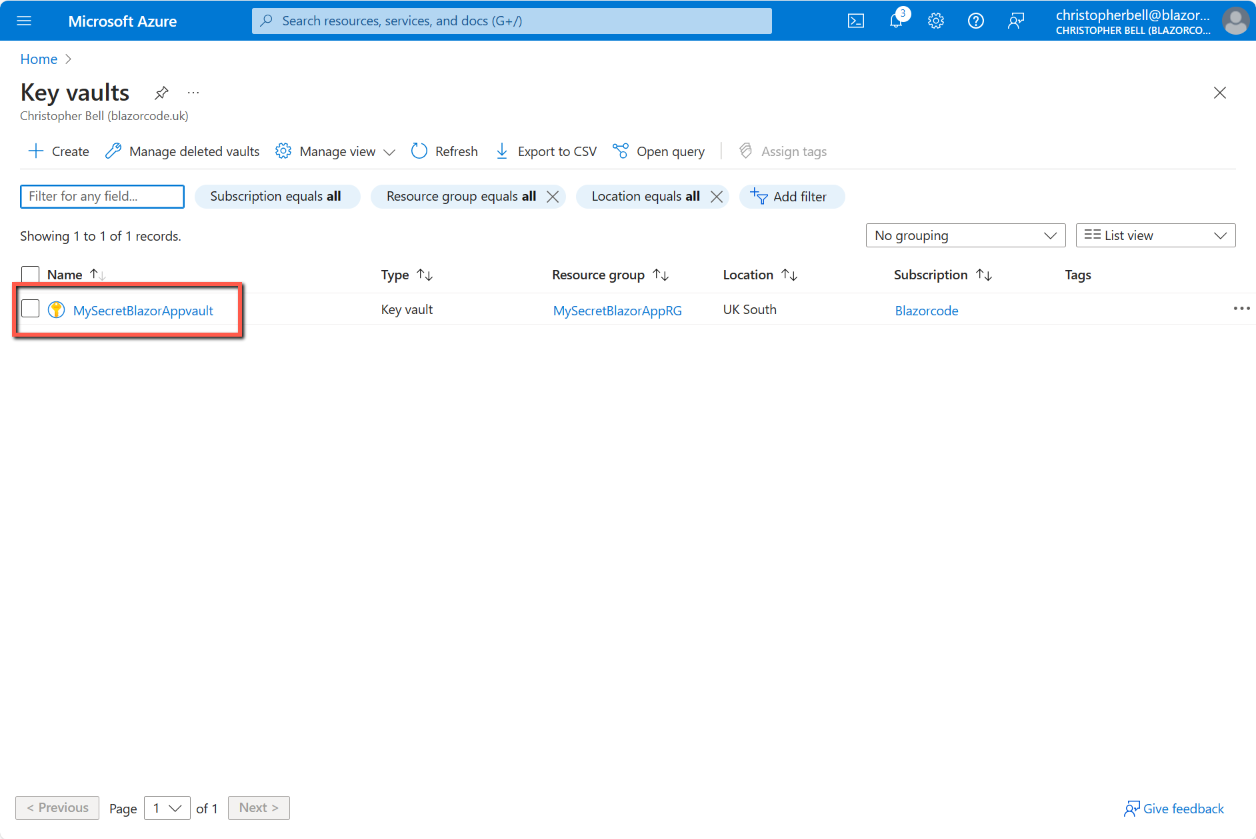
Having created the Key Vault the next stage is to add a secret. In the Azure Portal
- Select the 'Key vaults' to display the list of key vaults
- Select the Key vault from the list by clicking on its name
- Select 'Secrets' from the left-hand pane
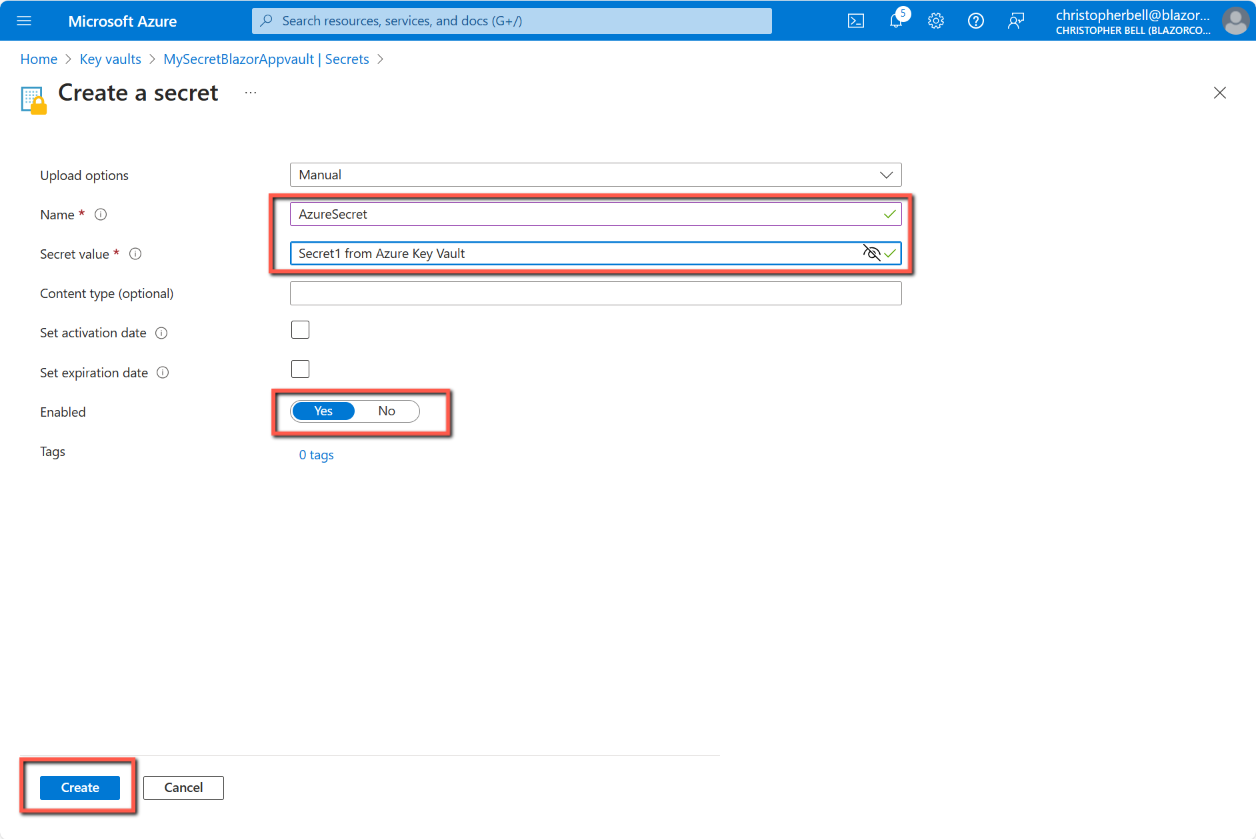
- Select 'Generate/Import from the top menu bar
- Leave 'Upload options' as 'Manual'
- Enter a name for the secret, e.g. 'AzureSecret'
- Enter a value for the secret, e.g. 'Secret1 from Azure Key Vault'
- Leave the other options blank, but make sure 'Enabled' is set to 'Yes'.
- Click 'Create'


Getting a secret from Azure Key Vault
NuGet packages
When we linked to an Azure Key Vault two NuGet packages were installed:
- Azure.Extensions.AspNetCore.Configuration.Secrets
- Azure.Identity
However the method I have chosen to get secrets from Key Vault requires an other package. Manually add the following NuGet package
- Azure.Security.KeyVault.Secrets

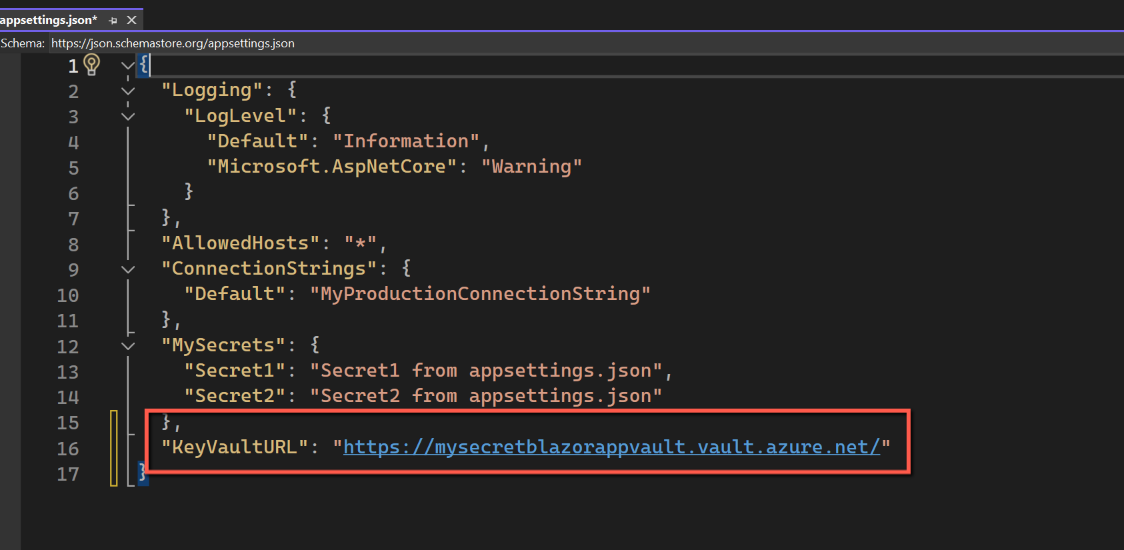
appsettings.json
We need to record the location of the Azure Key Vault in appsettings.json.
- Open the Azure portal
- Select your Key Vault and then Overview.
- Copy the 'Vault URI' to the clipboard.
- Back in Visual Studio
- Open appsettings.json
- Add a section with the following, replacing the URL with the 'Vault URI' from the clipboard:
"KeyVaultURL": "Your Key Vault URI"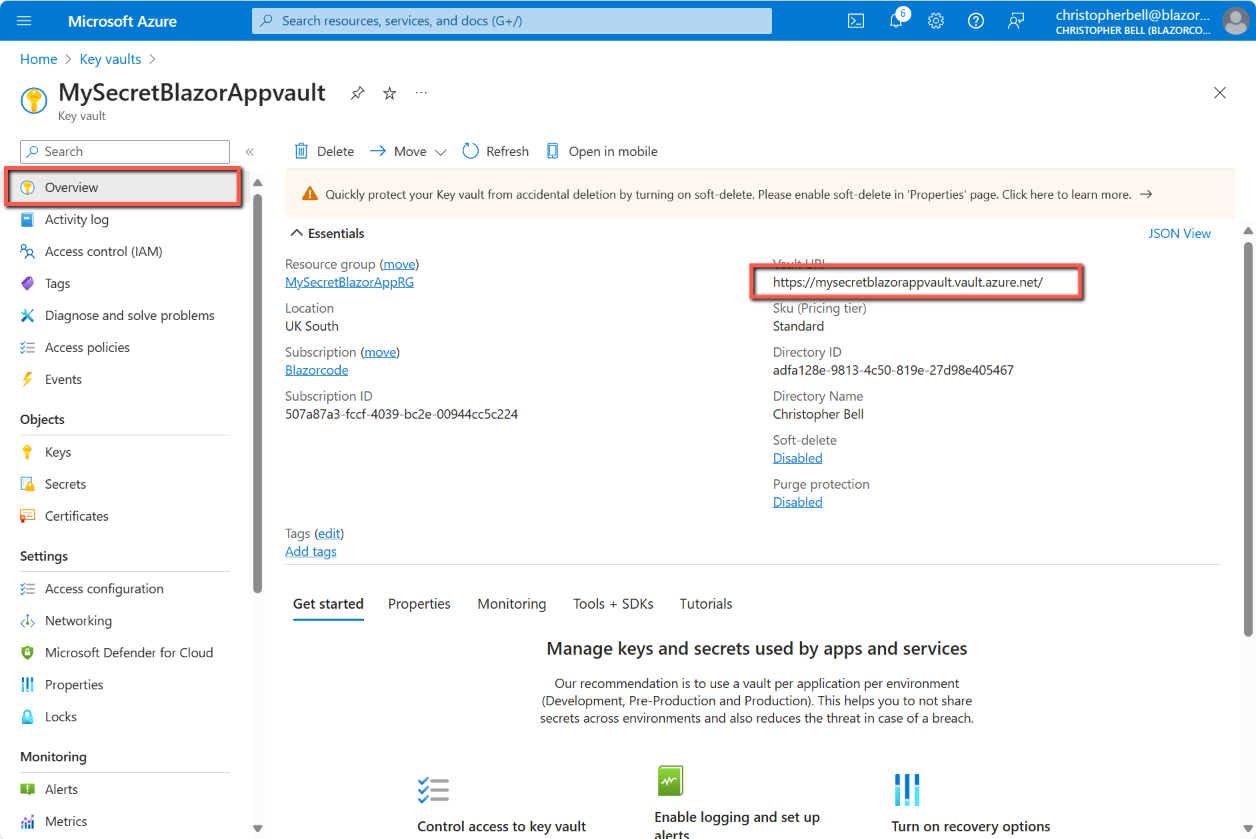
Home.razor
Change the code for Home.razor by adding the following statements at the top of the code:
@using Azure.Identity
@using Azure.Security.KeyVault.Secrets
@inject IConfiguration _config;
Azure.Security.KeyVault.Secrets is not installed automatically when adding an Azure Key Vault, or linking to one, using Visual Studio, so if you haven't already it needs to be installed using the NuGet package manager.
Change the 'GetMySecret' method by replacing all code with this;
public void GetMySecret()
{
    var vaultURL = _config.GetSection("KeyVaultURL").Value!;
    var azureCredential = new DefaultAzureCredential();

    var client = new SecretClient(new Uri(vaultURL), azureCredential);

    KeyVaultSecret secretFromVault = client.GetSecret("AzureSecret").Value;

    secret = secretFromVault.Value;
}
A brief explanation of the above code is probably called for.
- We have injected IConfiguration so we can use the built-in interface to get the value of the Key Vault URL from appsettings.json.
- Alternatively we could have used "
_config.GetSection("KeyVaultURL").Value" - Next we declare a variable and assign the DefaultAzureCredential to it.
- We are using 'Azure.Security.KeyVault.Secrets' to create a new 'SecretClient' object passing into it the Key Vault URL (obtained in step 1) and a 'DefaultAzureCredential'. This credential relies, at this stage in development, on you being logged into Visual Studio with the same credentials as you use for Azure - otherwise you will hit problems!
- Step 4 is create a 'KeyVaultSecret' object using the 'client.GetSecret' method, passing in the name of the Azure Key Vault secret.
- The last step is to assign the value of the secret to the string variable we use in the form.
Run the application. It should work and if you click the 'Get my secret' button you should see the value of the secret being retrieved from the Azure Key Vault. BUT, as it is being run locally, it will be SLOW. Be patient...
Re-publish the application
If we choose to re-publish at this point we will hit two problems.
- The 'DefaultAzureCredential()' is not available to the app once published (i.e. our Visual Studio / Azure credentials). To get round this problem we will create a 'Managed Identity' in Azure. (There are other more complex approaches - but I'm not proposing to explore those.)
- When adding Azure Key Vault from within Visual Studio some code was added to Program.cs to allow us to run the application locally that will now interfere if we publish.
To create a 'Managed Identity':
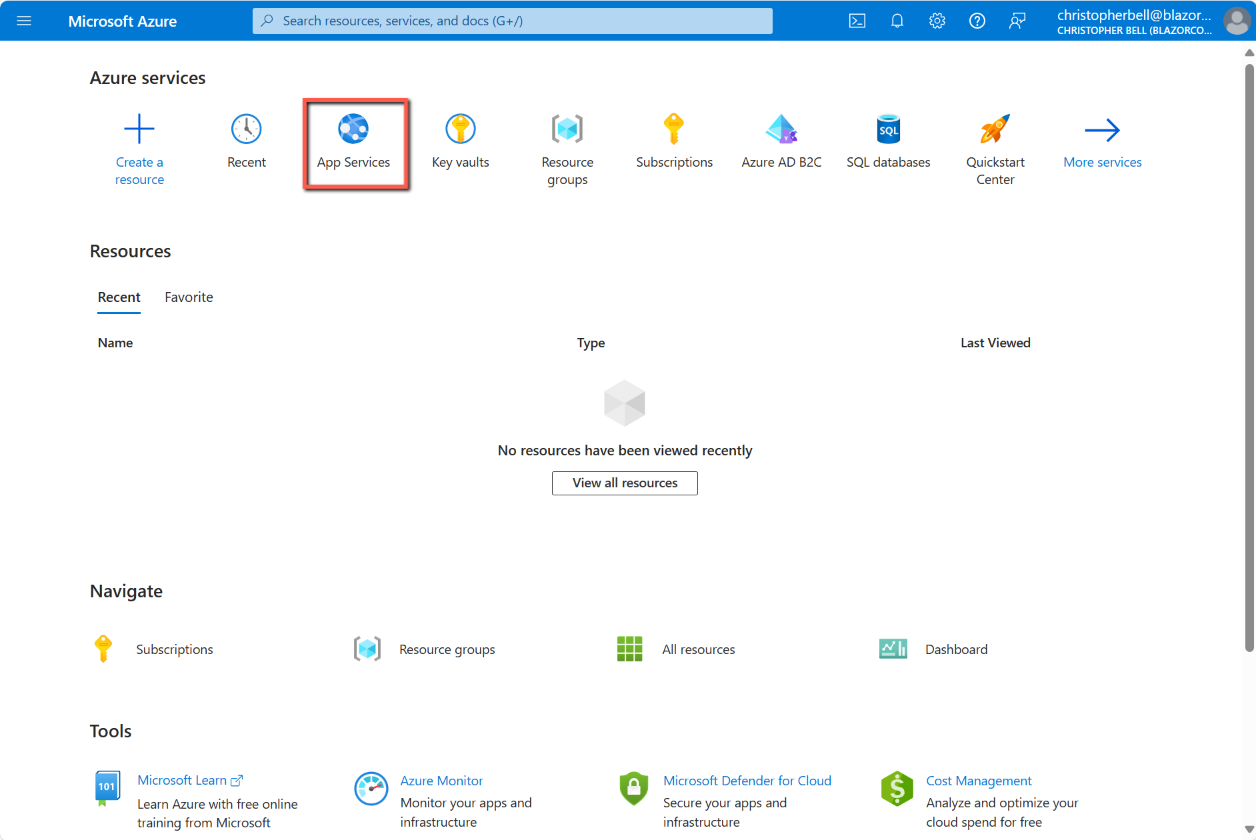
- Log into your Azure portal
- Browse to the web application (App Services)
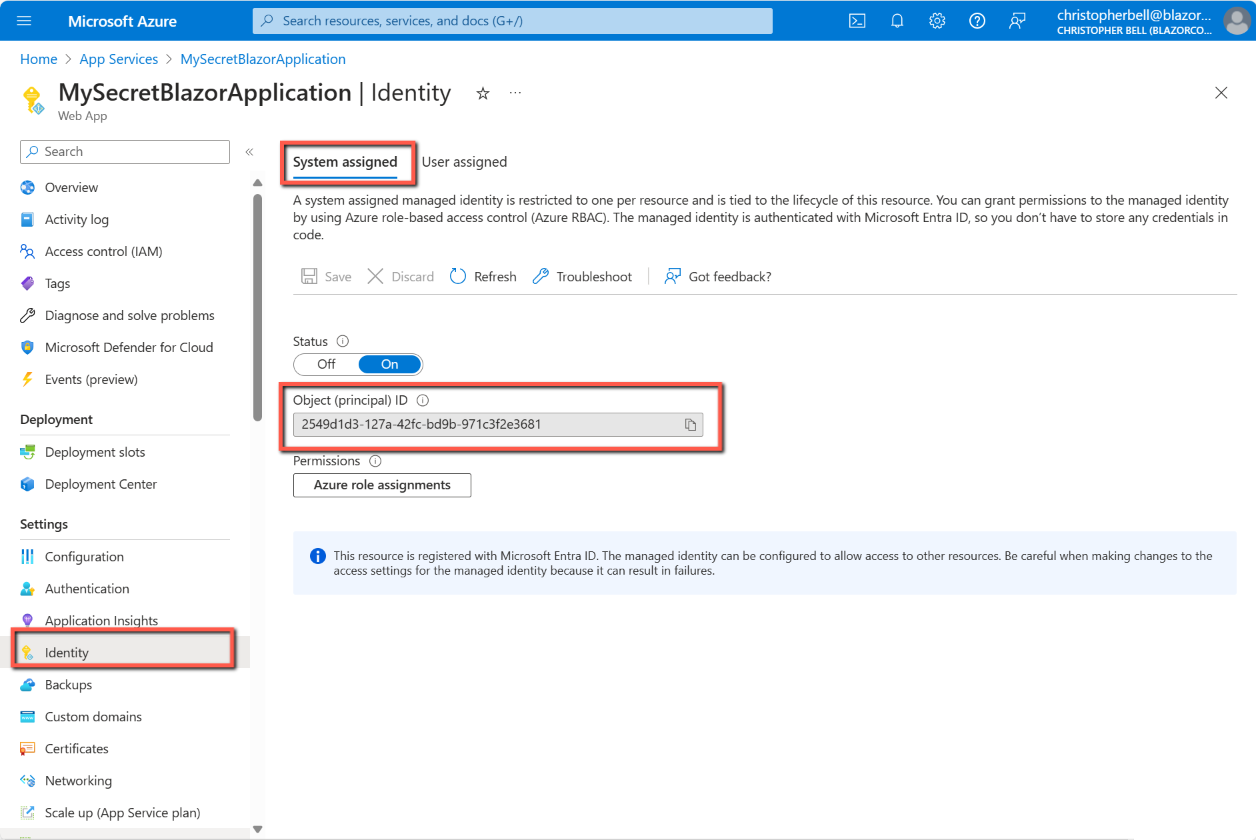
- In the left-hand pane select 'Identity'
- Select 'System assigned' tab at the top of the form
- If it isn't already selected, change the 'Status' to 'On'
- Click 'Save' (if necessary)
- Copy the 'Object principal' to the clipboard
- Return to the Portal Home form
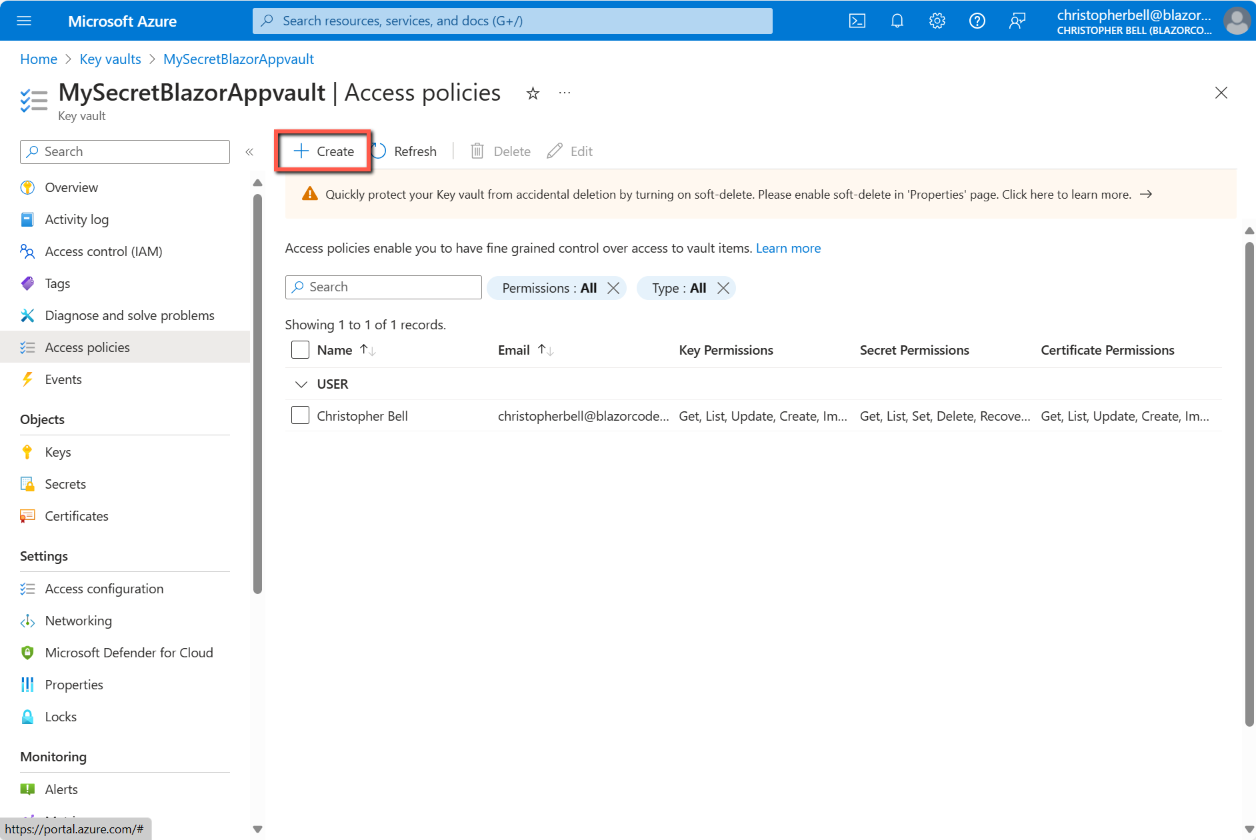
- Browse to the Key Vault
- In the left-hand pane select 'Access Policies' (not Access Control)
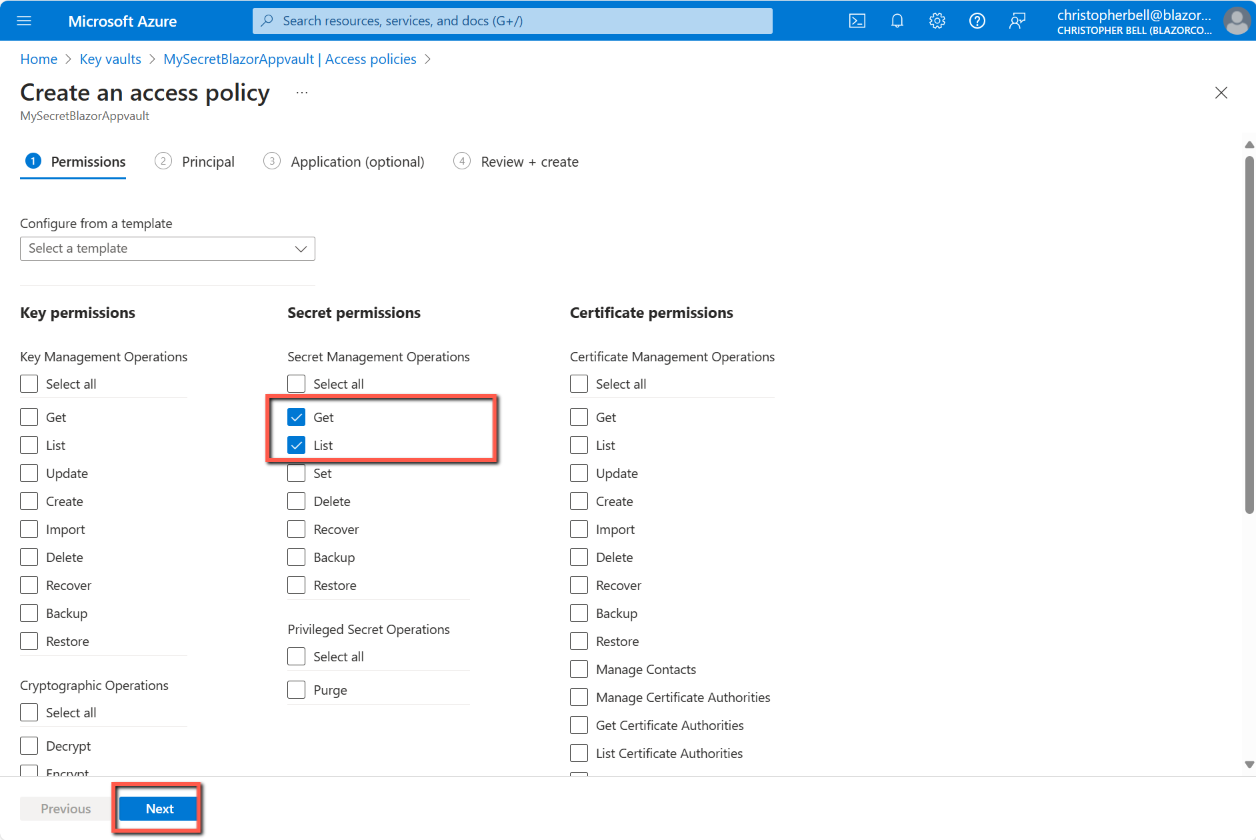
- Select 'Create' on the top menu bar
- In the 'Secrets permissions' column tick 'Get' & 'List'
- Click 'Next' at the foot of the page
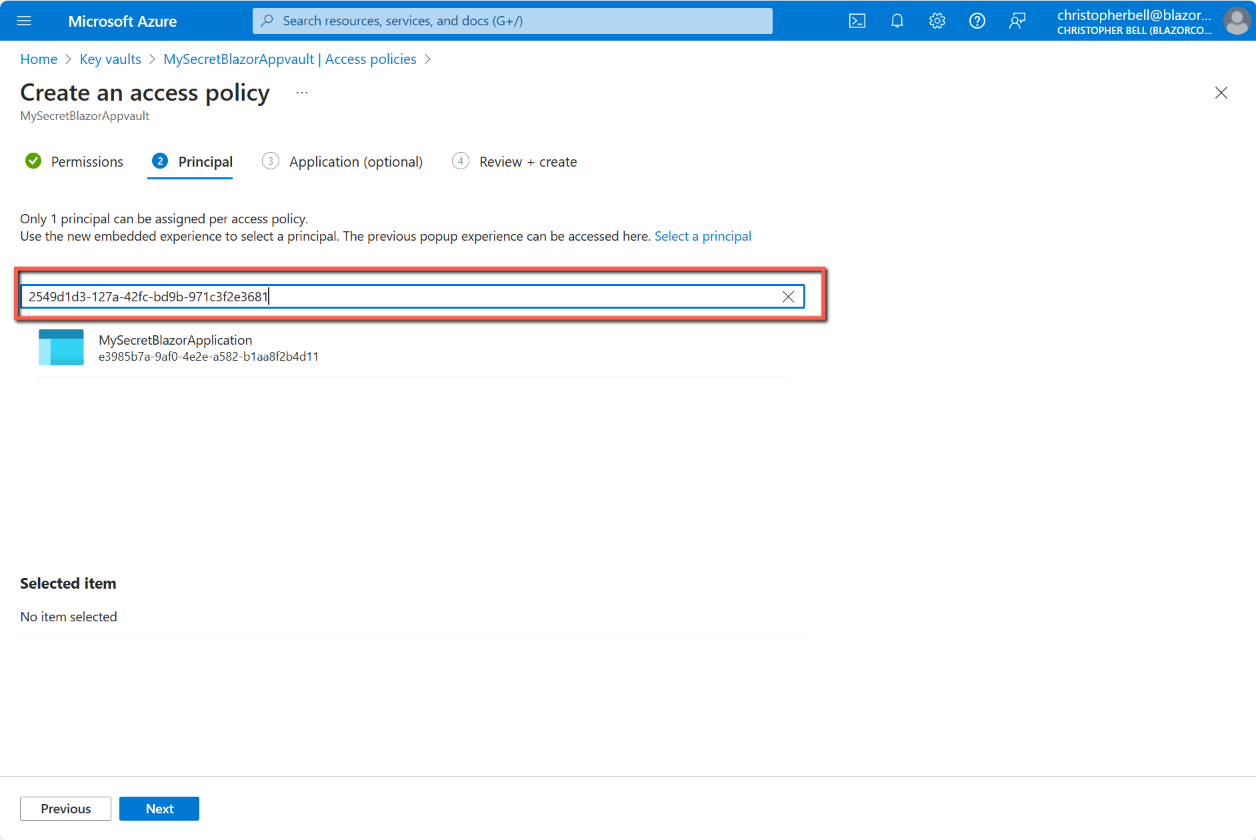
- Paste in the 'Object principal id' copied in the previous stage into the search box. It should result in one object being found (the application)
- Select the application
- Click 'Next'
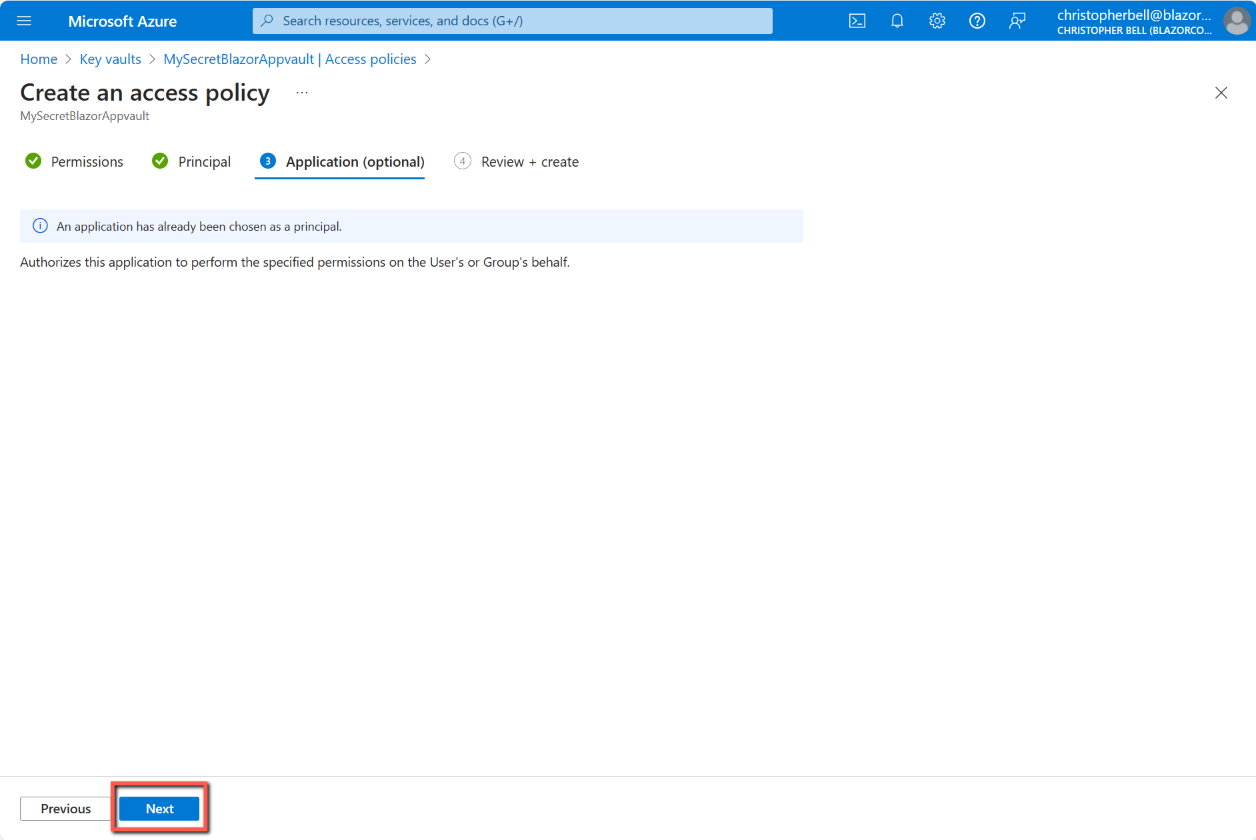
- Click 'Next' again on the 'Application (optional) form
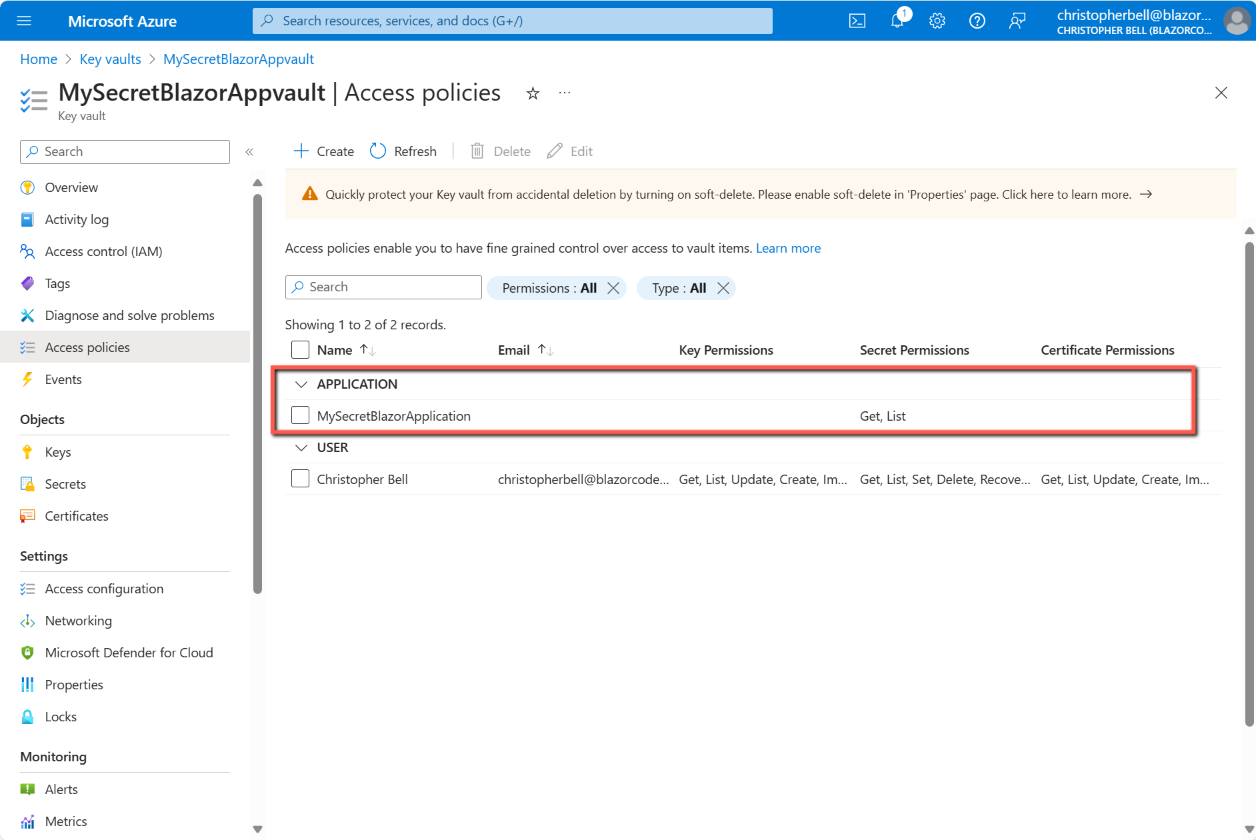
- Click 'Create' on the last tab


Program.cs
When adding the Azure Key Vault using Visual Studio, the following code was added to Program.cs.
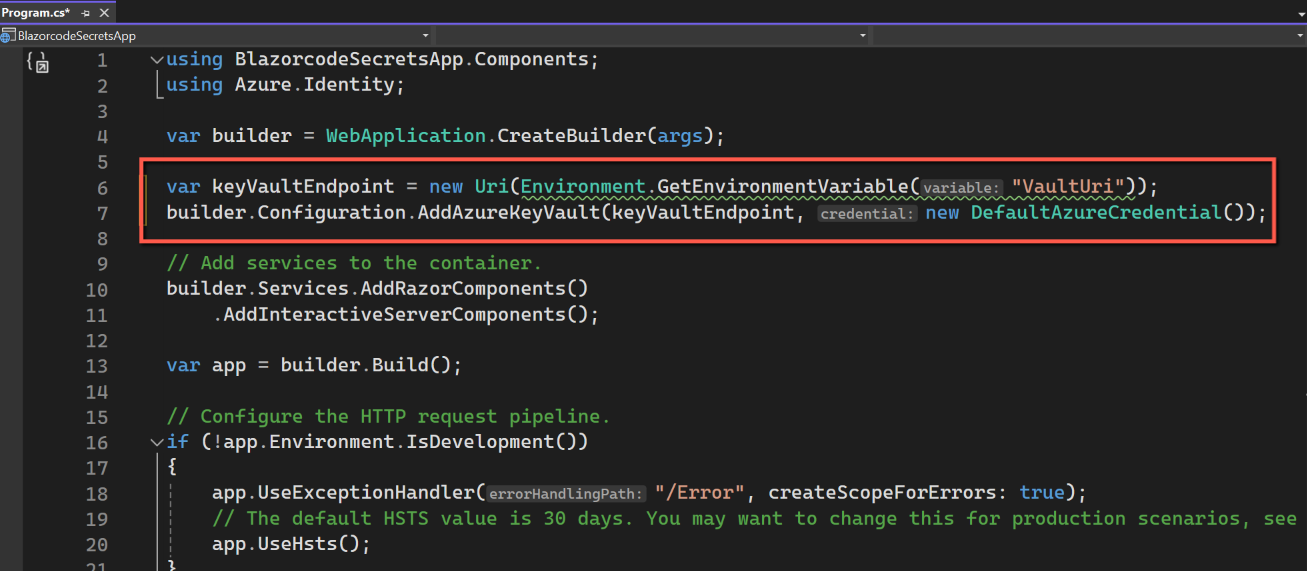
If published with this code still present the application appears to fail because it cannot resolve the environment variable "VaultUri". To avoid the problem comment out these two lines. You should be able to run the application locally, but it will also allow the application to run when published.
To test, re-publish by right-clicking on the project in Solution Explorer and clicking 'Publish' in the top right-hand corner of the form.
Once re-published, click the link to run the deployed application. This time it should run much more quickly and the retrieval of the secret almost instantaneous.
Program.cs
In the above example I have used Home.razor to retrieve and display secrets. In most applications, licence keys, API keys and connection strings are read into the application at start up using Program.cs. (As an aside this will reduce the number of visits to Azure Key Vault, so minimising costs.)
To read secrets in Program.cs we can use the following template code:
var keyVaultUrl = new Uri(builder.Configuration.GetSection("keyVaultURL").Value!);

var azureCredential = new DefaultAzureCredential();

builder.Configuration.AddAzureKeyVault(keyVaultUrl, azureCredential);

var myConnectionString = builder.Configuration.GetSection("AzureConnectionString").Value;
As a side note, the ! operator after 'Value' is used as the null-forgiving operator. It is a postfix operator that has no effect at runtime but tells the compiler to disregard null safety checks for the associated expression. (From Copilot.)
Good Luck!
References & Resources
dotnet.amsterdam: Sander ten Brinke - Keep it secret, keep it safe with .NET!
Storing secrets CORRECTLY in .NET using AWS Secrets Manager
Microsoft Learn: Azure Key Vault configuration provider in ASP.NET Core
Use Azure Managed Identities and Azure Key Vault to Protect Your .NET API Secrets!
Codewrinkles: Stop Putting Your Asp.Net Core Secrets at Risk - Use Azure Key Vault!
Microsoft Azure Key Vault Pricing