Project Aviation - Preparation
Introduction
For this project I wanted to explore reading and displaying data in a Blazor application from an external api, preferably one using api keys. To find a suitable api I carried out a Google search for 'free api' and after going down this rabbit hole I eventually found 'Amadeus for Developers'. This seems to fulfil my requirement of being free for development and testing purposes and provides some interesting looking data.
Getting started
I'm going to be using Visual Studio 2022. At this stage, at the start of the project, I don't anticipate needing a database, but should it become necessary later I will probably opt for SQLite. I do, however, plan to use some external presentation tools, for objects like data grids, combo boxes, etc. and for this I will use Syncfusion; the reason for this that I am familiar with Syncfusion and the fact that it, too, is free for small organisations.
Setting up the project
- Create a new Blazor Web App using Visual Studio 2022, setting 'Interactive render mode' to 'Auto (Server and WebAssembly' and 'Interactivity location' to 'Per page/component'. Include the sample pages.


Because I don't want appsettings.json ever to get uploaded to GitHub I'm going to delete them at this stage, create a GitHub repository, edit .gitignore, and then re-create appsettings.json in our project.
- Delete 'appsettings.json (and appsettings.Development.json). Note that both the server and .Client projects have appsettings.json.
- Create a GitHub repository and commit and push the 'empty' project


- Select Git > Open in File Explorer
- Edit .gitignore to exclude appsettings.json and appsettings.Development.json (see screenshot below)
- Commit and Push change (modified .gitignore)
- Add back appsettings.json and appsettings.Development.json to both server project and client/wwwroot.
- This appears to delete a couple of lines from BlazorAviation.Client.csproj, but I have ignored this. (itemGroup for wwwroot.)
- Make a simple change to Home.razor (to enable new commit and push).
- Commit and Push change
- Check appsettings.json files aren't in GitHub and that Home.razor has been changed.


Install Syncfusion
We might as well install Syncfusion for Blazor at this stage, although it could be added later.
Install Syncfusion Blazor
In Visual Studio
- Select Tools > NuGet Package Manager > Manage NuGet Packages for Solution
- Select Browse and search for 'Syncfusion.Blazor'
- Select 'Syncfusion.Blazor' from the available packages and install in both the server and client projects
- Repeat, searching for 'Syncfusion.Licensing' and install in both projects


Register Syncfusion Blazor Service
In _Imports in both the server and client projects add the following:
@using Syncfusion.Blazor

We will need to add any individual components to _Imports that we end up using, e.g. Grids, DropDowns, Lists, Popups, etc., but at this stage these are unknown.
In Program.cs in both the server and client projects add the following:
....
using Syncfusion.Blazor;
....
builder.Services.AddSyncfusionBlazor();
....

Add stylesheet and script resources
In ~/Components/App.razor add the following:
<head>
    ....
    <link href="_content/Syncfusion.Blazor/styles/bootstrap5.css" rel="stylesheet" />
</head>
....
<body>
    ....
   <script  src="_content/Syncfusion.Blazor/scripts/syncfusion-blazor.min.js"  type="text/javascript"></script>
</body>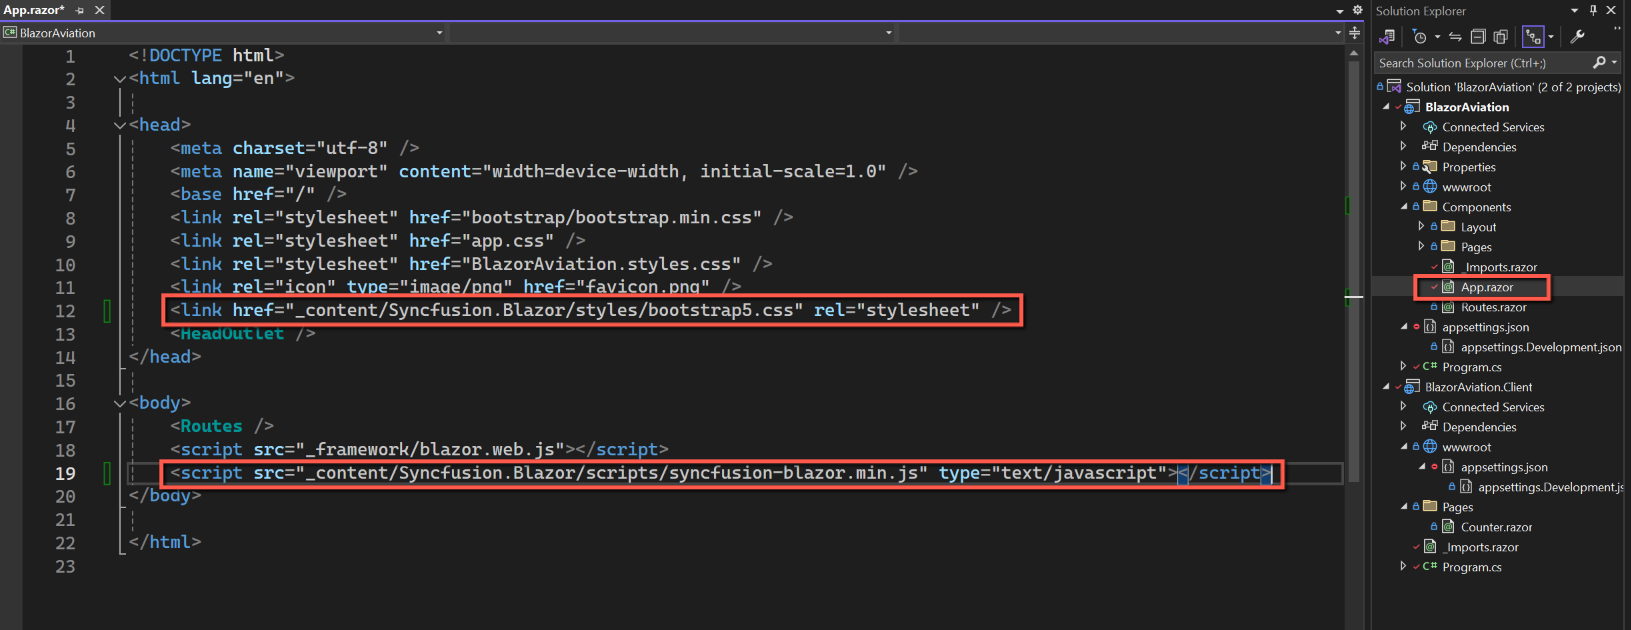
Add Syncfusion Licence
To obtain a licence:
- Open the Syncfusion web page - https://www.syncfusion.com
- Create an account if you don't already have one, and log into your account.
- Select 'My Dashboard' by clicking on your user name in the page header.
- Select 'License & Downloads', followed by 'Downloads & Keys'.
- Select 'Get License Key' and follow the instructions.
The Syncfusion instructions say that the licence key should be included in some code to be added to Program.cs. However, I don't want to expose the licence key in GitHub, so will, instead, add it to appsettings and read it from there. (I might even save the licence key in Azure Key Vault at a later stage.)
Add the following to appsettings.json in the main, server, project, replacing 'Your Syncfusion Licence Key' with the actual licence key obtained above.
"SyncfusionLicenceKey": "Your Syncfusion Licence Key"Now add the following to Program.cs, again in the main, server project.
//Register Syncfusion license
var SyncfusionLicenceKey = builder.Configuration["SyncfusionLicenceKey"];
Syncfusion.Licensing.SyncfusionLicenseProvider.RegisterLicense(SyncfusionLicenceKey);
Test
To check the installation of Syncfusion, amend Home.razor (in main project / Components / Pages) to the following:
@page "/"
@using Syncfusion.Blazor.Calendars
@rendermode InteractiveServer

<PageTitle>Home</PageTitle>

<h1>Hello, world!</h1>

Welcome to Project Aviation.

<SfCalendar TValue="DateTime" />
This adds a Syncfusion calendar object to the Home page. Note that there are two @using statements at the top of the code; The '@using Syncfusion.Blazor.Calendars' allows the use of the Syncfusion calendar (we could alternatively added this using statement to _Imports), whilst '@rendermode InteractiveServer' allows interaction between the user and the calendar. If this was omitted the calendar would be displayed but nothing would happen if the user clicked on it.
Save and run the application. A calendar should be displayed.

As a double-check that a web assembly page will work correctly, modify Counter.razor (in the client project / Pages folder) to:
@page "/counter"
@using Syncfusion.Blazor.Calendars
@rendermode InteractiveAuto

<PageTitle>Counter</PageTitle>

<h1>Counter</h1>

<p role="status">Current count: @currentCount</p>

<button class="btn btn-primary" @onclick="IncrementCount">Click me</button>

<hr />

<SfCalendar TValue="DateTime" />


@code {
    private int currentCount = 0;

    private void IncrementCount()
    {
        currentCount++;
    }
}
Save and run the application again to check the Counter page behaves correctly.

Adding Azure Key Vault
This step can be omitted, but I feel obliged to include it after advocating it in previous articles and videos.
Adding the Azure Key Vault using Visual Studio
We will create an Azure Key Vault, initially to store the Syncfusion Licence Key, but it will also come in useful for storing API keys.
Start by making sure you are logged into Visual Studio with the same credentials as your Azure account and that 'Azure Service Authentication' (Tools > Options > Azure Service Authentication) is also set to use the same account.


- In Solution Explorer, right-click 'Connected Services'
- Select 'Add'
- Select 'Azure Key Vault'
- On the 'Connect to dependency' form
- Select the appropriate Azure subscription
- Click 'Create new' icon above the Key vaults grid
- On the Azure Key Vault form
- Leave the Resource name as the default (or edit if required)
- Leave the Subscription name (should be the same as the previous form)
- Leave the Resource Group as the default
- Leave the SKU as 'Standard'
- Click 'Create'
- After a few seconds you will be returned to the 'Connect to dependency' form
- Click 'Next'
- The form will be re-displayed showing an 'Environment variable name' and 'Connection string value'. View the 'Connection string value' (it should make sense) and copy and paste it to Notepad
- Click 'Next'
- A 'Summary of changes' will be displayed, showing what will take place automatically.
- Click 'Finish'
- A final 'Dependency configuration progress' form will be displayed and should complete in a few seconds with a final green tick.
- Click 'Close' to complete the Key Vault setup.


Save all the files and check that the application locally.
Add Syncfusion Licence Key to Azure Key Vault
In the Azure Portal
- Select the 'Key vaults' to display the list of key vaults
- Select the Key vault from the list by clicking on its name
- Select 'Secrets' from the left-hand pane
- Select 'Generate/Import from the top menu bar
- Leave 'Upload options' as 'Manual'
- Enter a name for the secret, e.g. 'SyncfusionLicenceKey'
- Enter the Syncfusion Licence Key (take care to ensure it's correct.)
- Leave the other options blank, but make sure 'Enabled' is set to 'Yes'.
- Click 'Create'


Getting Syncfusion Licence Key from Azure Key Vault
We need to record the location of the Azure Key Vault in appsettings.json.
- Open the Azure portal
- Select your Key Vault and then Overview.
- Copy the 'Vault URI' to the clipboard.

- Back in Visual Studio
- Open appsettings.json (in both main and client projects)
- Add a section with the following, replacing the URL with the 'Vault URI' from the clipboard:
"KeyVaultURL": "Your Key Vault URI"Open Program.cs (in the main project) and insert the following after 'builder.Services.AddSyncfusionBlazor()':
var keyVaultUrl = new Uri(builder.Configuration.GetSection("keyVaultURL").Value!);
var azureCredential = new DefaultAzureCredential();
builder.Configuration.AddAzureKeyVault(keyVaultUrl, azureCredential);

//Register Syncfusion license
var SyncfusionLicenceKey = builder.Configuration["SyncfusionLicenceKey"];
Syncfusion.Licensing.SyncfusionLicenseProvider.RegisterLicense(SyncfusionLicenceKey);
And comment out the following two lines
//var keyVaultEndpoint = new Uri(Environment.GetEnvironmentVariable("VaultUri"));
//builder.Configuration.AddAzureKeyVault(keyVaultEndpoint, new DefaultAzureCredential());
The top of Program.cs should look like this:

Note that the 'Syncfusion.Licensing.SyncfusionLicenseProvider' line is now before 'var app = builder.Build();'
Save all files and test by running locally.