Orders - Part 1
Introduction
The addition of a page to display and add purchase orders is going to be an evolution, rather than presenting the finished project as a whole.
It would be worthwhile reminding ourselves roughly what we are aiming at. The original outline sketch of the purchase order input form was:
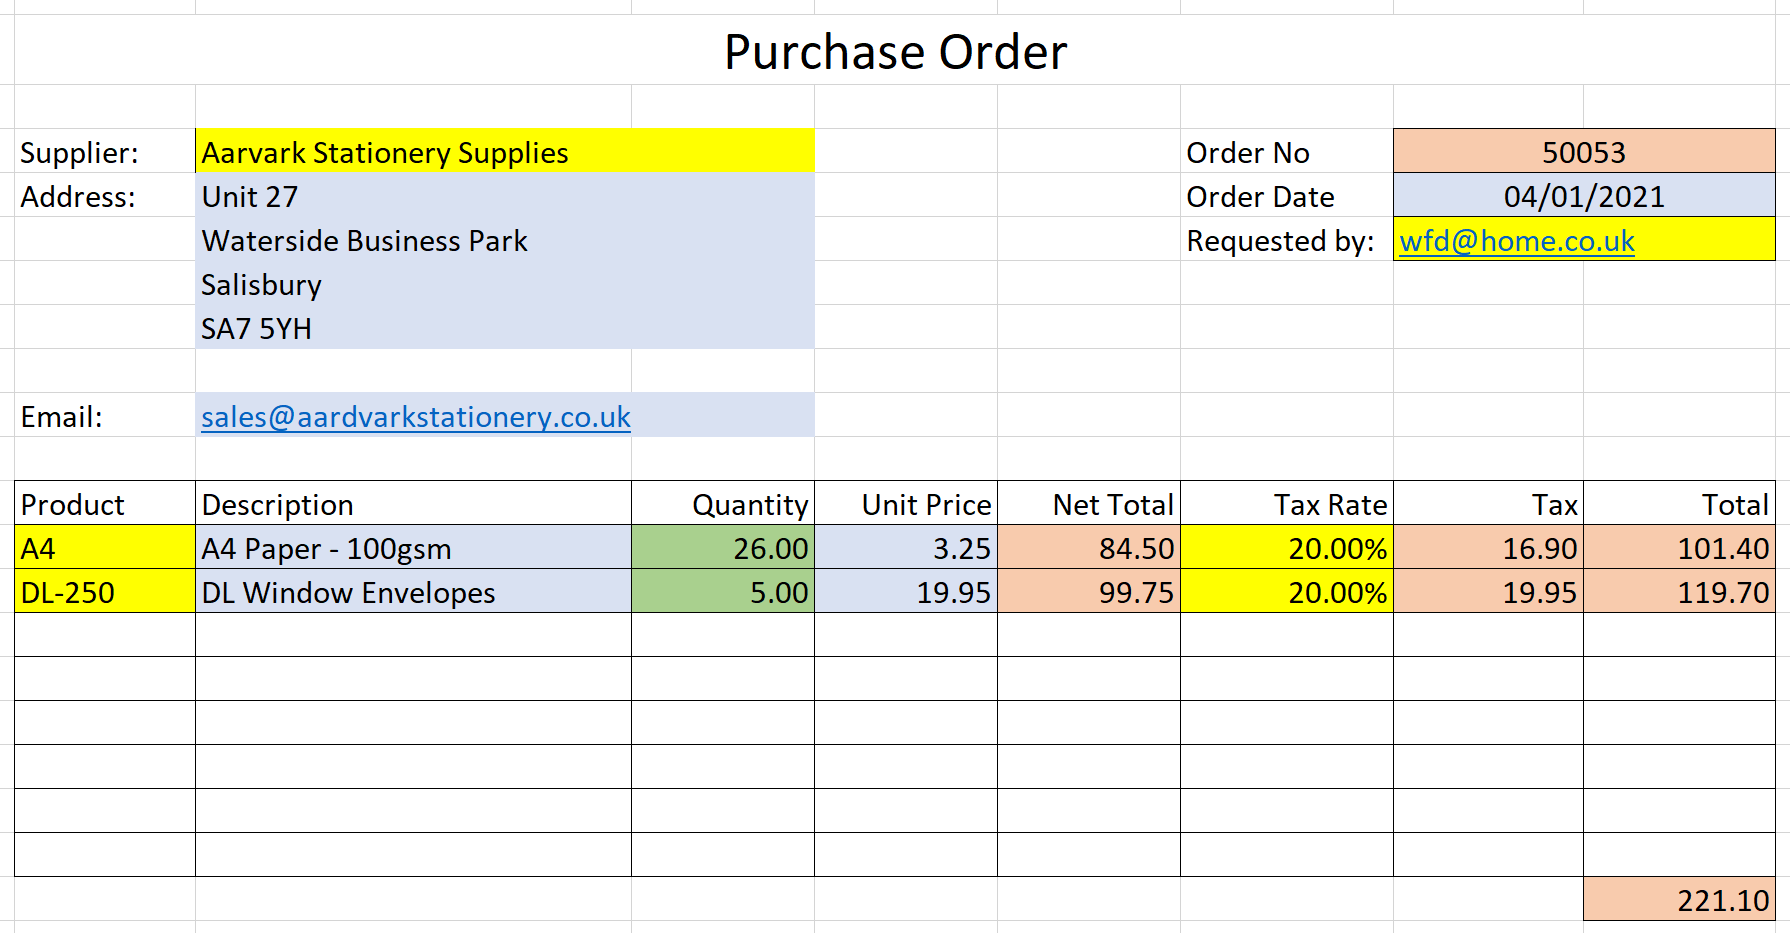
But, to give the user access to this form we will follow the pattern used for the lookup data by providing a 'list' view of existing orders with the ability to add or edit orders. Perhaps something like this:

I have left the 'Add', 'Edit' and 'Delete' options we had on the lookup data forms, but I'm not sure of the logic of being able to edit purchase orders; maybe we ought to have some restrictions in place so they can only be edited before that are 'committed' - perhaps only before they are emailed? Similarly, the delete option might be redundant; for audit purposes we will probably want a contiguous order number sequence - perhaps a status of 'cancelled' would be more appropriate. These are all things for the future, but we will start with the purchase orders list.
SQL
Before we start on the C# code, there are a couple of changes to be made to the SQL database. In my preparatory work I found myself fighting against the foreign key constraints we created when we added the database. Rather than work out why these were causing problems I decided to delete them. (Finding out why they caused me problems is a job for another day!)
The other clash that I encountered was that we originally defined POHeaderOrderDate to be of type 'Date'. Again, for unknown reasons, I found the Syncfusion 'DatePicker' to work better with a data type of 'DateTime'. I have taken the easy course of action and changed the database so that POHeaderOrderDate is 'DateTime'.
The SQL for both these changes is shown below (which also deletes any records in POHeader and POLine - just in case any have crept in!):
ALTER TABLE [Product] DROP CONSTRAINT IF EXISTS FK_Product_Supplier;
GO

ALTER TABLE [POHeader] DROP CONSTRAINT IF EXISTS FK_POHeader_Supplier;
GO

ALTER TABLE [POLine] DROP CONSTRAINT IF EXISTS FK_POLine_POHeader;
GO

ALTER TABLE [POLine] DROP CONSTRAINT IF EXISTS FK_POLine_Product;
GO

DELETE FROM POLine
GO

DELETE FROM POHeader
GO
/****** Object:  Table [dbo].[POHeader] ******/
IF  EXISTS (SELECT * FROM sys.objects WHERE object_id = OBJECT_ID(N'[dbo].[POHeader]') AND type in (N'U'))
DROP TABLE [dbo].[POHeader]
GO

/****** Object:  Table [dbo].[POHeader] ******/
SET ANSI_NULLS ON
GO

SET QUOTED_IDENTIFIER ON
GO

CREATE TABLE [dbo].[POHeader](
	[POHeaderID] [int] IDENTITY(1,1) NOT NULL,
	[POHeaderOrderNumber] [int] NOT NULL,
	[POHeaderOrderDate] [datetime] NOT NULL,
	[POHeaderSupplierID] [int] NOT NULL,
	[POHeaderSupplierAddress1] [nvarchar](50) NULL,
	[POHeaderSupplierAddress2] [nvarchar](50) NULL,
	[POHeaderSupplierAddress3] [nvarchar](50) NULL,
	[POHeaderSupplierPostCode] [nvarchar](10) NULL,
	[POHeaderSupplierEmail] [nvarchar](256) NULL,
	[POHeaderRequestedBy] [nvarchar](450) NULL,
	[POHeaderIsArchived] [bit] NOT NULL,
 CONSTRAINT [PK_POHeader] PRIMARY KEY CLUSTERED
(
	[POHeaderID] ASC
)WITH (PAD_INDEX = OFF, STATISTICS_NORECOMPUTE = OFF, IGNORE_DUP_KEY = OFF, ALLOW_ROW_LOCKS = ON, ALLOW_PAGE_LOCKS = ON, OPTIMIZE_FOR_SEQUENTIAL_KEY = OFF) ON [PRIMARY]
) ON [PRIMARY]
GO

ALTER TABLE [dbo].[POHeader] ADD  CONSTRAINT [DF_POHeader_POHeaderOrderNumber]  DEFAULT ((0)) FOR [POHeaderOrderNumber]
GO

ALTER TABLE [dbo].[POHeader] ADD  CONSTRAINT [DF_POHeader_POHeaderIsArchived]  DEFAULT ((0)) FOR [POHeaderIsArchived]
GO
Purchase Order Listing
The initial problem is that we don't have any data! This is further compounded by the fact that purchase orders comprise both POHeader and POLine records, and as I have the list shown above the 'order total' is the sum of values from POLines. Instead of trying to achieve everything at once, we will be taking a step-by-step approach and in the first attempt we will limit ourselves to data from the POHeader table.
As the project is about Purchase Orders we will re-use the Index page to show the list of purchase orders. Open Index.razor and replace the existing code with:


@page "/"
@using BlazorPurchaseOrders.Data

@inject IPOHeaderService POHeaderService
@inject NavigationManager NavigationManager

<div class="col-sm-12">
    <h3>Purchase Orders</h3>
    <br />
    <SfGrid DataSource="@poheader"
            Toolbar="Toolbaritems">
        <GridEvents OnToolbarClick="ToolbarClickHandler" TValue="POHeader"></GridEvents>
        <GridColumns>
            <GridColumn Field="@nameof(POHeader.POHeaderOrderNumber)"
                        HeaderText="Order No"
                        TextAlign="@TextAlign.Left"
                        Width="20">
            </GridColumn>
            <GridColumn Field="@nameof(POHeader.POHeaderOrderDate)"
                        HeaderText="Date"
                        Format="d"
                        Type="ColumnType.Date"
                        TextAlign="@TextAlign.Center"
                        Width="20">
            </GridColumn>
        </GridColumns>
    </SfGrid>

</div>

@code {

    // Create an empty list, named poheader, of empty POHeader objects.
    IEnumerable<POHeader> poheader;

    private List<ItemModel> Toolbaritems = new List<ItemModel>();

    protected override async Task OnInitializedAsync()
    {
        //Populate the list of countries objects from the Countries table.
        poheader = await POHeaderService.POHeaderList();

        Toolbaritems.Add(new ItemModel() { Text = "Add", TooltipText = "Add a new order", PrefixIcon = "e-add" });
        Toolbaritems.Add(new ItemModel() { Text = "Edit", TooltipText = "Edit selected order", PrefixIcon = "e-edit" });
        Toolbaritems.Add(new ItemModel() { Text = "Delete", TooltipText = "Delete selected order", PrefixIcon = "e-delete" });
    }


    public void ToolbarClickHandler(Syncfusion.Blazor.Navigations.ClickEventArgs args)
    {
        if (args.Item.Text == "Add")
        {
            //Code for adding goes here
        }

        if (args.Item.Text == "Edit")
        {
            //Code for editing
        }

        if (args.Item.Text == "Edit")
        {
            //Code for deleting
        }
    }
}
This should look familiar. We have a page directive of "\", pointing to the root razor page, injecting the POHeader interface and service and the Navigation Manager, followed by a heading of "Purchase Orders" and a Syncfusion Grid. The SfGrid has a Datasource of poheader and a Toolbar. GridEvents handle the toolbar click event. At present we have two columns, defined by <GridColumn>, one for the Order Number and the other for the Order Date. (Note the Format and Type for the date column.)
The code declares IEnumerable<POHeader> called 'poheader' (the datasource for the grid) and the List called 'Toolbaritems'. When the form is initialised (opened) poheader is populated with purchase order headers from the POHeaderList function and the Toolbar items populated. Code is set up to handle the toolbar click event.
Save the code and run the application. It should look similar to this:

Purchase Order Form
The Purchase Order Form will consist of a 'header' section, recording the supplier information, order number and date and who requested the order. Under the header section we will have a 'details' section for the order lines; this part will be a Syncfusion data grid. Before we add the data grid for the lines we will get the header working, including recording data to the database.
Create Basic Form
So far, when adding details of products, suppliers and tax rates I have always used Syncfusion Dialogs to gather the data. Because of the potential complexity of this form I am going to depart from this and use a separate razor page (similar to adding countries in the previous project).
Right-click on the pages folder and select Add > Razor Component, call it 'PurchaseOrderPage.razor'. Add the following code, replacing the existing code.
@page "/purchaseorder/{POHeaderID:int}"
@using BlazorPurchaseOrders.Data

@inject NavigationManager NavigationManager

<h3>@pagetitle</h3>

@code {

    string pagetitle = "Add an Order";

    [Parameter]
    public int POHeaderID { get; set; }

}
This is about as basic as we can make it, a @page directive that will append a page with the POHeaderID as a suffix, declared as a [Parameter], and a page title.
To make sure we can open this, return to Index.razor and amend the toolbar click event handler so that it reads as follows:
        if (args.Item.Text == "Add")
        {
            //Code for adding goes here
            POHeaderID = 0;
            NavigationManager.NavigateTo($"/purchaseorder/{POHeaderID}");
        }
At the top of the code section, under the other declarations add the declaration for POHeaderID.
private int POHeaderID;Save the project and run it. Click the 'Add' button on the Purchase Order List toolbar to check that the 'Add an Order' page opens.

Add Header section
We now need to add an <EditForm> section to collect the header information from the user. The first item will be a drop-down list to allow the user to select a supplier. Once selected the supplier address and email details will be read from the supplier table and added to the purchase order. Next we need to record the 'Order No'; I propose this is allocated automatically as the order is saved to the database, and until it is saved will display '0'. The 'Order Date' can be entered by the user using a Syncfusion 'DatePicker', and lastly I propose that the 'Requested by' defaults to the currently logged in user. (I had originally thought this might be from a drop-down list of users, and we could return to this in due course.)
However, before we add the automatic parts, such as the completion of the supplier address, we will place the drop-down list and other controls on the form. Copy the code from below and replace everything in PurchaseOrderPage.razor.
@page "/purchaseorder/{POHeaderID:int}"
@using BlazorPurchaseOrders.Data

@inject NavigationManager NavigationManager
@inject ISupplierService SupplierService

<h3>@pagetitle</h3>

<EditForm Model="@orderaddedit" OnValidSubmit="@OrderSave">
    <SfDropDownList DataSource="@supplier"
                    TItem="Supplier"
                    TValue="int"
                    Text="SupplierID"
                    @bind-Value="orderaddedit.POHeaderSupplierID"
                    FloatLabelType="@FloatLabelType.Auto"
                    Placeholder="Select a Supplier"
                    Enabled="true">
        <DropDownListFieldSettings Text="SupplierName" Value="SupplierID"></DropDownListFieldSettings>
    </SfDropDownList>

    <SfTextBox Enabled="true" Placeholder="Address"
               FloatLabelType="@FloatLabelType.Always"
               @bind-Value="orderaddedit.POHeaderSupplierAddress1"></SfTextBox>
    <SfTextBox Enabled="true" Placeholder=""
               FloatLabelType="@FloatLabelType.Never"
               @bind-Value="orderaddedit.POHeaderSupplierAddress2"></SfTextBox>
    <SfTextBox Enabled="true" Placeholder=""
               FloatLabelType="@FloatLabelType.Never"
               @bind-Value="orderaddedit.POHeaderSupplierAddress3"></SfTextBox>
    <SfTextBox Enabled="true" Placeholder="Post Code"
               FloatLabelType="@FloatLabelType.Never"
               @bind-Value="orderaddedit.POHeaderSupplierPostCode"></SfTextBox>

    <SfTextBox Enabled="true" Placeholder="Email"
               FloatLabelType="@FloatLabelType.Auto"
               @bind-Value="orderaddedit.POHeaderSupplierEmail"></SfTextBox>
    <SfNumericTextBox Enabled="false" Placeholder="Order No"
                      FloatLabelType="@FloatLabelType.Always"
                      ShowSpinButton="false"
                      @bind-Value="orderaddedit.POHeaderOrderNumber"></SfNumericTextBox>
    <SfDatePicker TValue="DateTime"
                  Placeholder='Order Date'
                  FloatLabelType="@FloatLabelType.Auto"
                  @bind-Value="orderaddedit.POHeaderOrderDate"></SfDatePicker>
    <SfTextBox Enabled="false" Placeholder="Requested by"
               FloatLabelType="@FloatLabelType.Always"
               @bind-Value="orderaddedit.POHeaderRequestedBy"></SfTextBox>

    <br /><br />

    <div class="e-footer-content">
        <div class="button-container">
            <button type="submit" class="e-btn e-normal e-primary">Save</button>
            <button type="button" class="e-btn e-normal" @onclick="@Cancel">Cancel</button>
        </div>
    </div>

</EditForm>

@code {
    POHeader orderaddedit = new POHeader();
    IEnumerable<Supplier> supplier;

    string pagetitle = "Add an Order";

    [Parameter]
    public int POHeaderID { get; set; }

    //Executes on page open, sets headings and gets data in the case of edit
    protected override async Task OnInitializedAsync()
    {
        supplier = await SupplierService.SupplierList();

        if (POHeaderID == 0)
        {
            pagetitle = "Add an Order";
        }
        else
        {
            pagetitle = "Edit an Order";
        }
    }

    // Executes OnValidSubmit of EditForm above
    protected async Task OrderSave()
    {
        if (POHeaderID == 0)
        {
            //Save the record
            NavigationManager.NavigateTo("/");
        }
        else
        {
            NavigationManager.NavigateTo("/");
        }
    }

    //Executes if user clicks the Cancel button.
    void Cancel()
    {
        NavigationManager.NavigateTo("/");
    }
}
The <EditForm> section uses a Model called 'orderaddedit' and has an OnValidSubmit event of '@OrderSave'. This is followed by the Syncfusion drop-down list, text boxes for the supplier address and email, a numeric text box for the order number (which disabled), a date picker for the order date and lastly another disabled text box to record who requested the order.
The 'code' section
- injects the supplier service to provide access to the suppliers for the drop-down list
- declares the orderaddedit model, of type POHeader
- populates the supplier list when the form is initialised, as well as setting the page titles depending on whether the POHeaderID parameter is 0 for a new record, or not 0 for editing a record
- sets up the method for the 'OrderSave' and 'Cancel' events.
Save and run the application, selecting 'Add' at the top of the Purchase Order List. It should look similar to this, and clicking the supplier drop-down should show some suppliers, and clicking the data picker should allow you to select 'Today'. Clicking either 'Save' or 'Cancel' will return you to the Purchase Order list without saving the record.


This doesn't look great and the record cannot be saved, but before we put those things right we will get the data aspect of things working.
Populate Supplier Address
To trigger an event when the user selects a supplier we need to add the following within the <SfDropDownList> block.
<DropDownListEvents TItem="Supplier" TValue="int" ValueChange="OnChangeSupplier"></DropDownListEvents>
This will fire an event when the value of the drop-down list box changes (ValueChange), which I have called 'OnChangeSupplier'. When the supplier changes we want the text boxes for supplier address and email to be populated from the selected supplier. To do this add the following code for the 'OnChangeSupplier' method into the code section.
    //Populates the supplier address when Supplier drop-down changed.
    private void OnChangeSupplier(Syncfusion.Blazor.DropDowns.ChangeEventArgs<int, Supplier> args)
    {
        this.orderaddedit.POHeaderSupplierAddress1 = args.ItemData.SupplierAddress1;
        this.orderaddedit.POHeaderSupplierAddress2 = args.ItemData.SupplierAddress2;
        this.orderaddedit.POHeaderSupplierAddress3 = args.ItemData.SupplierAddress3;
        this.orderaddedit.POHeaderSupplierPostCode = args.ItemData.SupplierPostCode;
        this.orderaddedit.POHeaderSupplierEmail = args.ItemData.SupplierEmail;
    }
This is updating the 'orderaddedit' model with data from the supplier model from the drop-down data source. If you run the application the supplier address and email fields should now be populated.
Default Order Date
When the form opens the date picker currently defaults to an invalid date of 01/01/0001. It would be much better if it defaulted to the current date.
To do this, set orderaddedit.OrderDate to the current date by adding the following to the 'OnInitializedAsync' method:
orderaddedit.POHeaderOrderDate = DateTime.Now;Requested by
My original intention was that 'Requested by' would present the user with a drop-down list of registered users, however at this stage I will settle for it being completed automatically to record the currently logged in user. The drop-down list remains an aspiration.
After much research, the current objective can be achieved by inserting the following code into the very top section:
@using Microsoft.AspNetCore.Components.Authorization
@inject AuthenticationStateProvider AuthenticationStateProvider
@using System
@using System.Collections.Generic
Declaring a variable 'UserName' by adding this code to the top of the code section:
private string UserName;And inserting this code into the 'OnInitializedAsync' method:
        //Get user if logged in and populate the 'Requested by' column
        var authState = await AuthenticationStateProvider.GetAuthenticationStateAsync();
        var user = authState.User;

        if (user.Identity.IsAuthenticated)
        {
            UserName = user.Identity.Name;
        }
        else
        {
            UserName = "The user is NOT authenticated.";
        }

        orderaddedit.POHeaderRequestedBy = UserName;
If the user has registered and is logged in 'UserName' will be set to their 'Identity.Name' otherwise it will be set to "The user is NOT authenticated". The last line sets 'RequestedBy' to 'UserName'.
Save the project and run it. If necessary register and remember to 'Click here to confirm your account' on the Confirmation page. The 'Add an Order' page should look similar to this:

Design Improvement
This does what we want (as far as it goes - it doesn't save the order or allow the input of order lines!), but doesn't look great and doesn't leave much room for the purchase order lines grid.
The original design had the supplier information on the left-hand side of the form, with the remaining information on the right-hand side. I also want the tab sequence to go down the left-hand column and then move to the top of the right-hand column. We can use some relatively simple styling to achieve this. I am inexperienced in CSS, but found the information I needed on these two websites:
Add the following after <EditForm/> but before the code section. This defines the style.
<style>
    .grid-container {
        display: grid;
        max-width: 900px; /* Maximum width of the whole container - in this case both columns */
        grid-template-columns: 1fr 1fr; /* Relative width of each column (1fr 1fr is equivalent to, say, 33fr 33fr */
        grid-gap: 75px; /* size of the gap between columns */
    }
</style>
Next, wrap the whole of the contents of the Edit Form in a <div> with the opening <div> immediately after <EditForm> tag, and the closing <div/>. The opening <div> is shown below,
<div class="grid-container">We then need to wrap the controls we want in the left-hand column with:
<div class="grid-child left-column"><div/>And the right-hand columns with:
<div class="grid-child right-column"><div/>The whole of the <EditForm> section should now have this code:
<EditForm Model="@orderaddedit" OnValidSubmit="@OrderSave">
    <div class="grid-container">
        <div class="grid-child left-column">
            <SfDropDownList DataSource="@supplier"
                            TItem="Supplier"
                            TValue="int"
                            Text="SupplierID"
                            @bind-Value="orderaddedit.POHeaderSupplierID"
                            FloatLabelType="@FloatLabelType.Auto"
                            Placeholder="Select a Supplier"
                            Enabled="true">
                <DropDownListFieldSettings Text="SupplierName" Value="SupplierID"></DropDownListFieldSettings>
                <DropDownListEvents TItem="Supplier" TValue="int" ValueChange="OnChangeSupplier"></DropDownListEvents>
            </SfDropDownList>

            <SfTextBox Enabled="true" Placeholder="Address"
                       FloatLabelType="@FloatLabelType.Always"
                       @bind-Value="orderaddedit.POHeaderSupplierAddress1"></SfTextBox>
            <SfTextBox Enabled="true" Placeholder=""
                       FloatLabelType="@FloatLabelType.Never"
                       @bind-Value="orderaddedit.POHeaderSupplierAddress2"></SfTextBox>
            <SfTextBox Enabled="true" Placeholder=""
                       FloatLabelType="@FloatLabelType.Never"
                       @bind-Value="orderaddedit.POHeaderSupplierAddress3"></SfTextBox>
            <SfTextBox Enabled="true" Placeholder="Post Code"
                       FloatLabelType="@FloatLabelType.Never"
                       @bind-Value="orderaddedit.POHeaderSupplierPostCode"></SfTextBox>

            <SfTextBox Enabled="true" Placeholder="Email"
                       FloatLabelType="@FloatLabelType.Auto"
                       @bind-Value="orderaddedit.POHeaderSupplierEmail"></SfTextBox>
        </div>
        <div class="grid-child right-column">
            <SfNumericTextBox Enabled="false" Placeholder="Order No"
                              FloatLabelType="@FloatLabelType.Always"
                              ShowSpinButton="false"
                              @bind-Value="orderaddedit.POHeaderOrderNumber"></SfNumericTextBox>
            <SfDatePicker TValue="DateTime"
                          Placeholder='Order Date'
                          FloatLabelType="@FloatLabelType.Auto"
                          @bind-Value="@OrderDate"></SfDatePicker>
            <SfTextBox Enabled="false" Placeholder="Requested by"
                       FloatLabelType="@FloatLabelType.Always"
                       @bind-Value="orderaddedit.POHeaderRequestedBy"></SfTextBox>
        </div>
    </div>
    <br /><br />

    <div class="e-footer-content">
        <div class="button-container">
            <button type="submit" class="e-btn e-normal e-primary">Save</button>
            <button type="button" class="e-btn e-normal" @onclick="@Cancel">Cancel</button>
        </div>
    </div>

</EditForm>
Save and run the project. It should look like this:

Saving the record
Before turning our attention to the order lines I want to tackle saving the record. At this stage it will be only the POHeader data, but as part of this we need to allocate the Order No.
We'll start by just saving the record and once that is successful we will look at allocating the next order number to it as it is saved.
In the 'OrderSave' method, add the following line after the 'Save the record' comment.
bool Success = await POHeaderService.POHeaderInsert(orderaddedit);Save the project and run the application. Select to add a new order, make sure you select a supplier and click 'Save'. The purchase order header record should be saved and the focus will return to the purchase order list, which should show an order, with order number = 0 and the date you selected (or left as the default).

Next Order Number
We want the system to allocate the next order number to the order, and as there could potentially be multiple users adding orders simultaneously we want there to be no possibility that an order number is omitted or duplicated. Fortunately there is a way of achieving this using SQL 'Sequences'.
We will create a 'Sequence' and use that to determine the next purchase order number, and allocate that number at the point at which the insert takes place into the POHeader table.
Open SQL Management Studio, select PurchaseOrders database and click on the 'Programmability folder to expose 'Sequences'. Right-click on Sequences and select 'New Sequence'. Enter 'NextPurchaseOrderNumber' in the 'Sequence Name' field and set the Start and Increment to 1. Save the Sequence.


Alternatively, this SQL script could also be used.
USE [PurchaseOrders]
GO
/****** Object: Sequence [dbo].[NextPurchaseOrderNumber] ******/
CREATE SEQUENCE [dbo].[NextPurchaseOrderNumber]
AS [bigint]
START WITH 1
INCREMENT BY 1
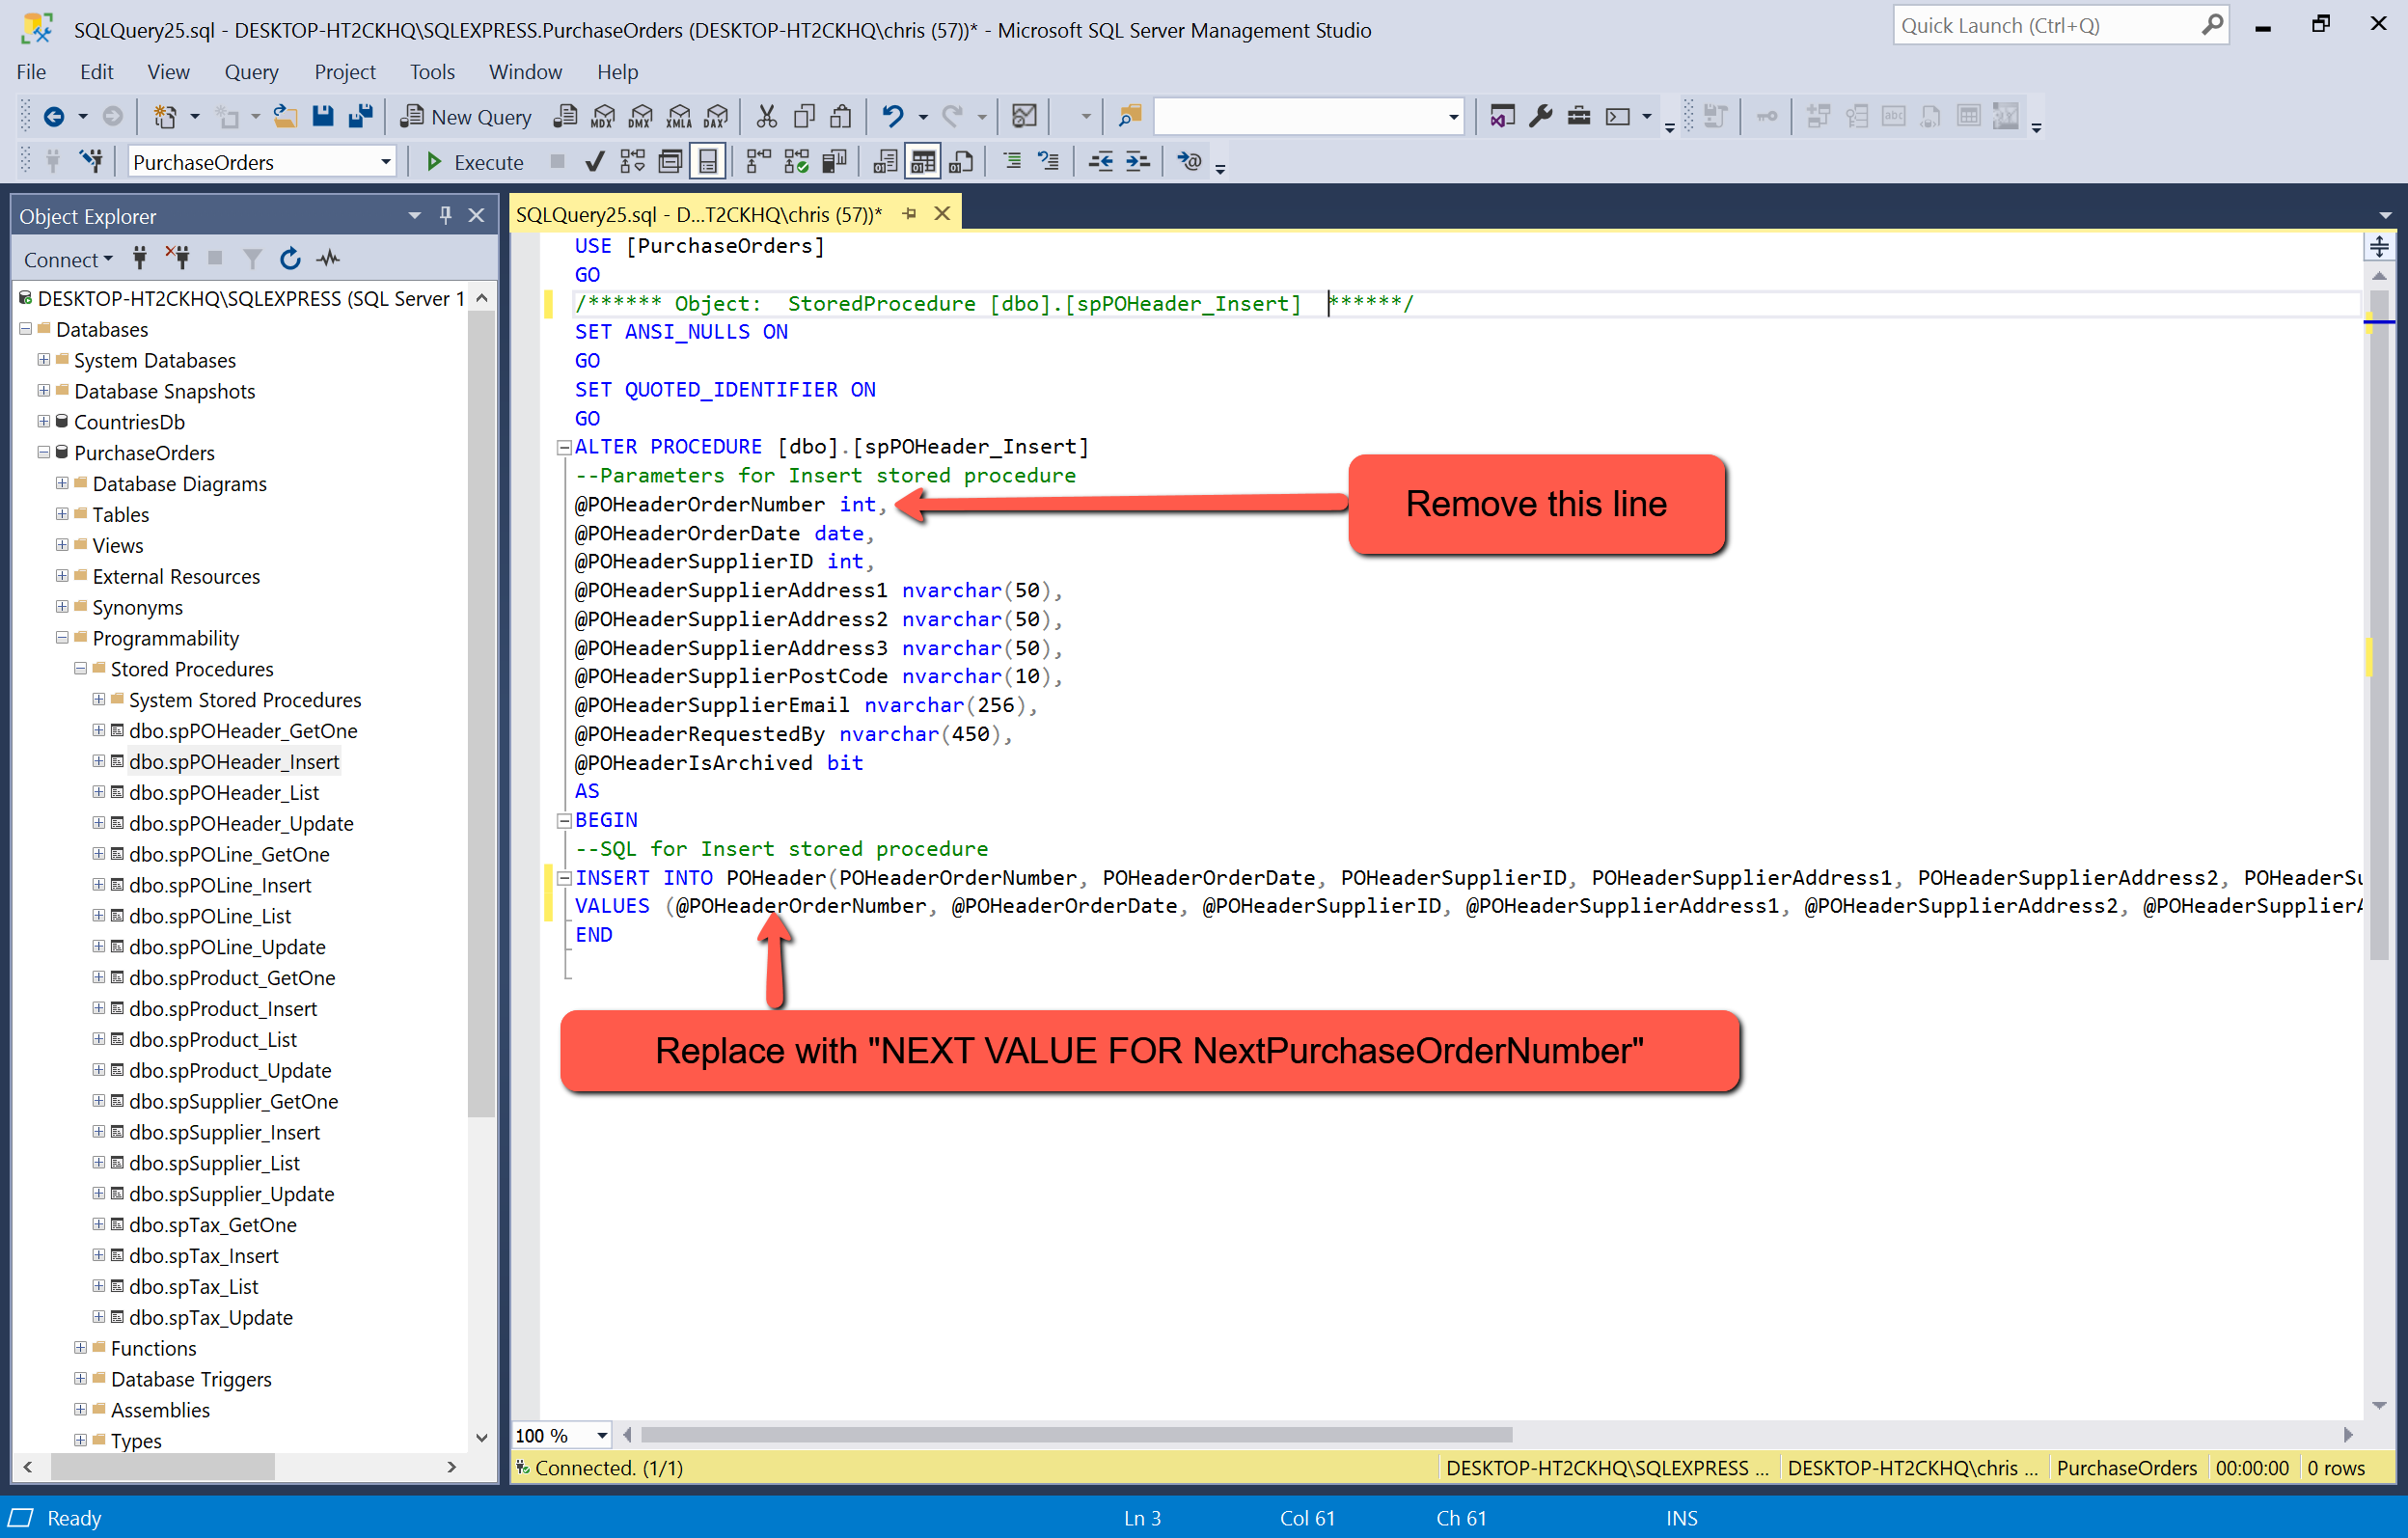
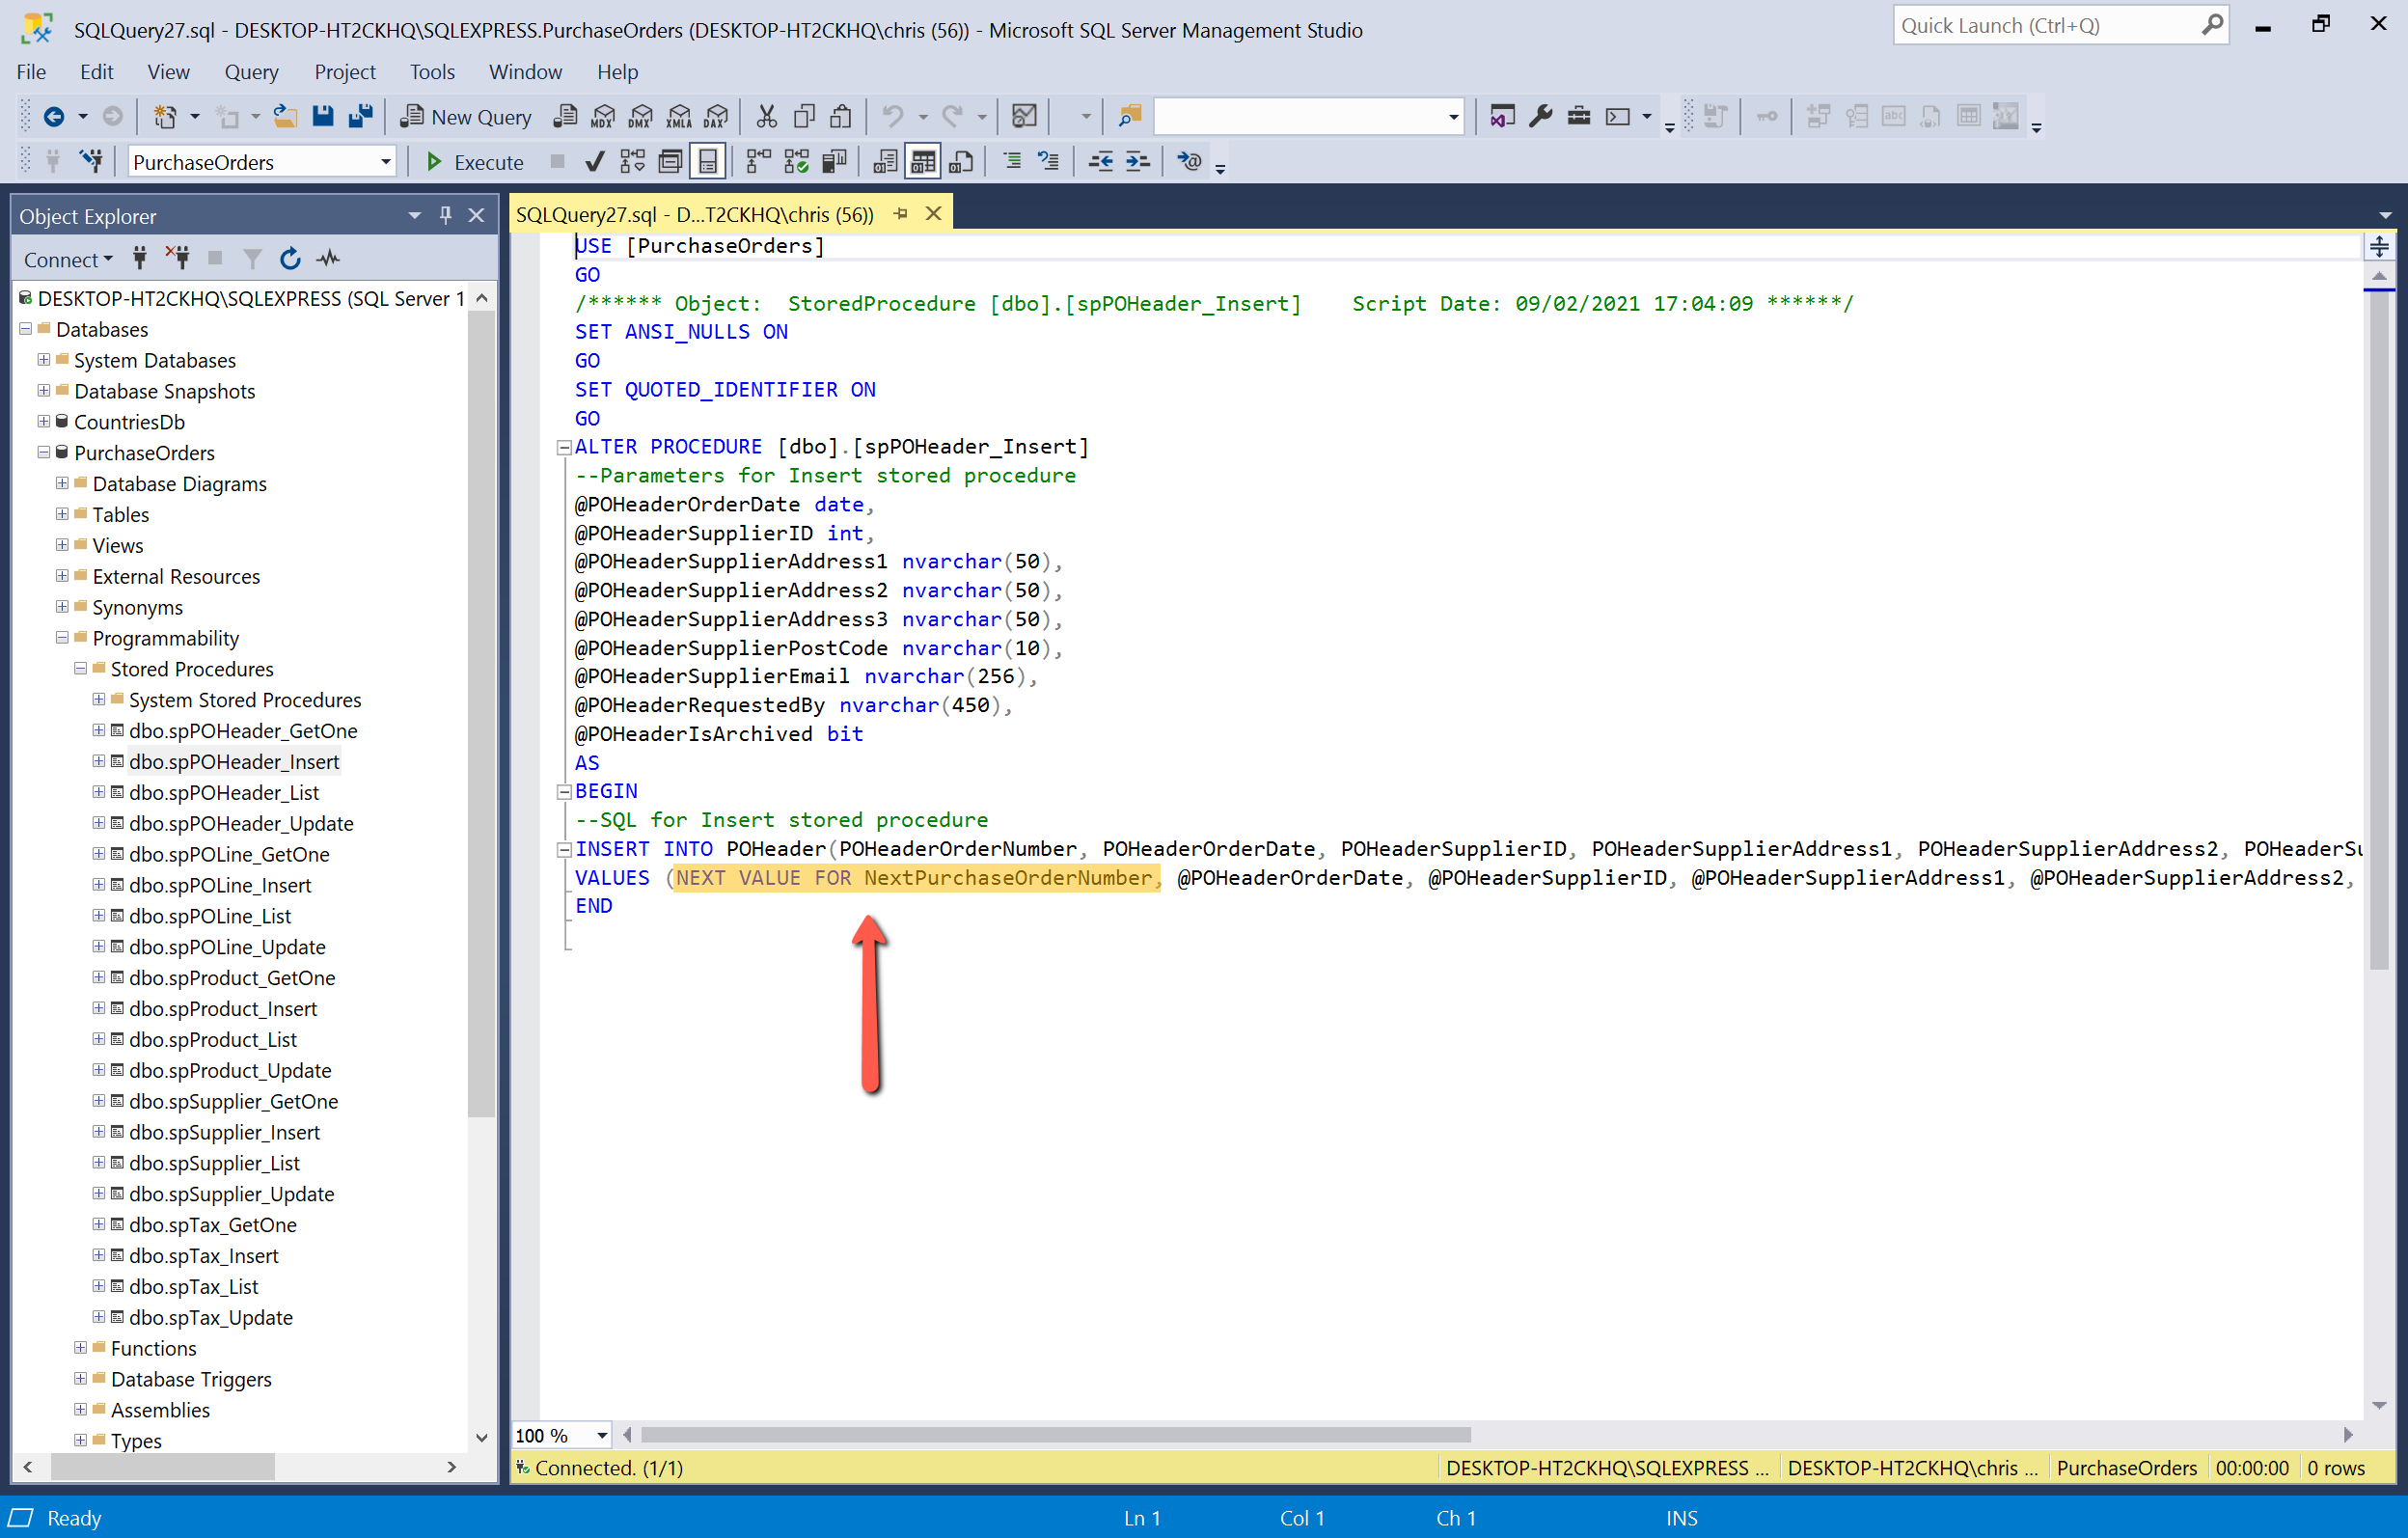
GOHaving created the 'NextPurchaseOrderNumber' sequence, we can now modify the 'POHeader_Insert' stored procedure to use the 'NextPurchaseOrderNumber'. To do this select the POHeader_Insert stored procedure, right-click and select 'Modify'. Remove the @POHeaderOrderNumber from the parameters section and in the 'Values' clause replace it with 'NEXT VALUE FOR NextPurchaseOrderNumber'.
Alternatively, this SQL script could be used instead.
USE [PurchaseOrders]
GO

/****** Object:  StoredProcedure [dbo].[spPOHeader_Insert]     ******/
DROP PROCEDURE [dbo].[spPOHeader_Insert]
GO

/****** Object:  StoredProcedure [dbo].[spPOHeader_Insert]     ******/
SET ANSI_NULLS ON
GO

SET QUOTED_IDENTIFIER ON
GO

CREATE PROCEDURE [dbo].[spPOHeader_Insert]
--Parameters for Insert stored procedure
@POHeaderOrderDate date,
@POHeaderSupplierID int,
@POHeaderSupplierAddress1 nvarchar(50),
@POHeaderSupplierAddress2 nvarchar(50),
@POHeaderSupplierAddress3 nvarchar(50),
@POHeaderSupplierPostCode nvarchar(10),
@POHeaderSupplierEmail nvarchar(256),
@POHeaderRequestedBy nvarchar(450),
@POHeaderIsArchived bit
AS
BEGIN
--SQL for Insert stored procedure
INSERT INTO POHeader(POHeaderOrderNumber, POHeaderOrderDate, POHeaderSupplierID, POHeaderSupplierAddress1, POHeaderSupplierAddress2, POHeaderSupplierAddress3, POHeaderSupplierPostCode, POHeaderSupplierEmail, POHeaderRequestedBy, POHeaderIsArchived)
VALUES (NEXT VALUE FOR NextPurchaseOrderNumber, @POHeaderOrderDate, @POHeaderSupplierID, @POHeaderSupplierAddress1, @POHeaderSupplierAddress2, @POHeaderSupplierAddress3, @POHeaderSupplierPostCode, @POHeaderSupplierEmail, @POHeaderRequestedBy, @POHeaderIsArchived)
END

GO
Return to Visual Studio, open POHeaderService.cs and comment out, or remove, the POHeaderOrderNumber from parameters.

Save the project and run the application. Add a new order and note that it is allocated Order No 1. Try adding a few more...
Reset Purchase Order data
During testing it can be quite useful to delete all purchase orders and reset the next purchase order number sequence. This SQL script does that, allowing testing to start again with a clean sheet.
USE [PurchaseOrders]
GO

DELETE FROM POHeader
GO

DELETE FROM POLine
GO

ALTER SEQUENCE NextPurchaseOrderNumber RESTART WITH 1
GO
Project Code
The SQL and C# code for the changes made for adding the purchase order form are shown here.
YouTube Video
Blazor Purchase Orders - Part 10 - Design and layout of the Purchase Order Form page.