Preview an Order
Introduction
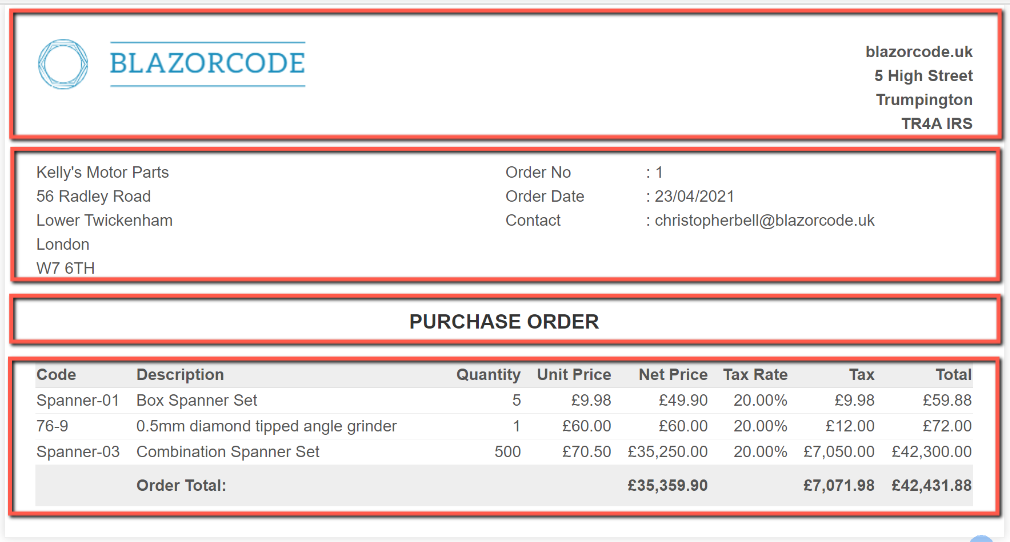
To be able to email, or print, a purchase order we need a means of creating a report in a visually pleasing format suitable for presenting to a supplier. This is the end result I will be aiming for:

My inspiration for this was this simple HTML and CSS invoice layout I found on github

The link for this is : https://github.com/sparksuite/simple-html-invoice-template
YouTube Video
Creating the basic page
We will be taking the sample code for the SparkSuite simple invoice and modifying it to produce our order layout.
Open the project in C# and add a new razor component in the Pages folder called 'PreviewOrderPage.razor'. Delete the default code, and replace with the html code from the above gihub link. To do this,
- Open the github link
- Click on the 'invoice.html' link to open the code
- Copy the code
- Paste into PreviewOrderPage
On line 72 (approximately) there is a section that starts '@media'. Delete this section.
At the top of the file insert a page directive as shown below:
@page "/previeworder/"To test that the page opens, run the project and manually append '/previeworder' to the localhost address in the browser address bar. The example invoice should open.
Opening the Preview Page
We will want to preview the report by selecting an order from the purchase order list on the index page. We already have a toolbar above the order list, so it seems appropriate to add a further button to open the preview. In Index.razor, enter the following, under the existing Toolbar Items in the OnInitializedAsync method to add the new toolbar item.
Toolbaritems.Add(new ItemModel() { Text = "Preview", TooltipText = "Preview selected order", PrefixIcon = "e-print" });To implement this add the following code to the ToolbarClickHandler method.
        if (args.Item.Text == "Preview")
        {

            //Code for editing - Check that an Order has been selected from the grid
            if (selectedPOHeaderID == 0)
            {
                WarningHeaderMessage = "Warning!";
                WarningContentMessage = "Please select an Order from the grid.";
                Warning.OpenDialog();
            }
            else
            {
                NavigationManager.NavigateTo($"/previeworder/");
            }

        }
This checks that the user has selected an order and then opens the PreviewOrder page currently displaying the sample invoice (at this stage it isn't linked to a specific order).
Run the code to check that the sample invoice opens by selecting an order and clicking 'Preview'. It doesn't matter which order is selected, the sample invoice will be displayed in all cases.
Editing the Preview Page
The first stage of editing the HTML is to move the <style> section out of the <head> section and place it below the <html> section. The <head> section is no longer required and can be deleted. The sample invoice consists of just one table, and within that table the 'data' is 'hard-coded'. We want the data to come from the SQL database. To make life a little easier we will split the single table into 4 separate tables:
- Logo and company name and address
- Supplier name and address, and order date, number and contact
- A table to display the 'document type'
- Order lines
We will also be defining our own CSS styling.
Logo and company name and address
We will start at the top and replace the sample invoice logo and invoice number data. Copy the following and place immediately below the <div class="invoice-box"> tag, and delete the <tr class="top"> row/section.
        <table>
            <tr class="addressbar">
                <td class="addressbar-left">
                    <img src="https://blazorcode.uk/media/files/blazorcode_logo_small.png" style="width: 100%; max-width: 300px" />
                </td>

                <td class="addressbar-right">
                    blazorcode.uk<br />
                    5 High Street<br />
                    Trumpington <br />
                    TR4A IRS
                </td>
            </tr>
        </table>
        <br />
I have used a styling class called 'addressbar' with two sub-styles, 'addressbar-left' and 'addressbar-right', which as you can probably guess, aligns the text horizontally to the left and right! I have linked to a logo (which could equally well be a local file) and hard-coded the company name and address. Ideally I think these would be saved in a control or company table in SQL, but for simplicity I haven't.
To add the CSS for the styling, add the following to the foot of the <style> section.
    .addressbar {
        vertical-align: top;
    }

   .addressbar-left {
        text-align: left;
    }

    .addressbar-right {
        text-align: right;
        font-weight: bold;
        padding-top: 5px;
    }
Supplier name & address, and order #
Copy and paste the following code below the logo and company name table and delete the <tr class="information"> row/section
        <table>
            <tr class="addressbar">
                <td style="width:50%">
                    SupplierName<br />
                    SupplierAddress1<br />
                    SupplierAddress2<br />
                    SupplierAddress3<br />
                    SupplierPostCode<br />
                </td>
                <td style="width:15%">
                    Order No<br />
                    Order Date<br />
                    Contact
                </td>
                <td style="width:35%">
                    : OrderNumber<br />
                    : OrderDate<br />
                    : RequestedBy
                </td>
            </tr>
        </table>
For the moment I have put placeholders for SupplierName, etc. These will be eventually replaced by columns from the POHeader class. I have been a little lazy and included inline styling to control the column widths.
Document type
Copy and paste the following and place it immediately below the table for supplier address.
        <table>
            <tr class="doctype">
                <td>PURCHASE ORDER</td>
            </tr>
        </table>
Add the CSS styling for 'doctype' by inserting the following at the foot of the <style> section.
    .doctype {
        font-size: 20px;
        line-height: 80px;
        color: #333;
        font-weight: bold;
        text-align: center
    }
Order Lines
The Order Lines section will consist of a column header section, a variable number of order lines and a 'total' section. This can be achieved by adding the following below the Document Type section.
        <table>
            <tr class="heading">
                <th>Code</th>
                <th>Description</th>
                <th class="column-right">Quantity</th>
                <th class="column-right">Unit Price</th>
                <th class="column-right">Net Price</th>
                <th class="column-right">Tax Rate</th>
                <th class="column-right">Tax</th>
                <th class="column-right">Total</th>
            </tr>
            <tr class="item">
                <td>ProductCode</td>
                <td>ProductDescription</td>
                <td class="column-right">ProductQuantity</td>
                <td class="column-right">ProductUnitPrice</td>
                <td class="column-right">NetPrice</td>
                <td class="column-right">TaxRate</td>
                <td class="column-right">TaxAmount</td>
                <td class="column-right">GrossPrice</td>
            </tr>
            <tr class="totals">
                <td></td>
                <td class="column-left">Order Total:</td>
                <td></td>
                <td></td>
                <td>NetPrice</td>
                <td></td>
                <td>Tax</td>
                <td>OrderValue</td>
            </tr>
        </table>
Note that it is a single table with 3 rows, one for the column header, one for the order lines and one for the totals row. Again I have temporarily used placeholders for data that will be derived from the SQL tables.
Add the CSS needed for this section by inserting the following at the foot of the <style> section.
    .heading {
        background: #eee;
        border-bottom: 1px solid #ddd;
        font-weight: bold;
    }

    .column-left {
        text-align: left;
    }

    .column-right {
        text-align: right;
    }

    .item {
         border-bottom: 1px solid #eee;
      }

    .totals {
        background: #eee;
        font-weight: bold;
        line-height: 40px;
        text-align: right;
    }
One last small change, amend the max-width of .invoice-box to 1000px to make the most of the screen's resolution if it will permit.

Delete the now, redundant HTML (the <table> section below our newly inserted HTML) and CSS (everything from ".invoice-box table td" inclusive, to our newly inserted CSS)
If we run the project now it should look like this:

Getting the Data
Now we have the layout as we require, we can turn our attention to getting the data and replacing the placeholders with actual data.
The first stage of this is to amend the Index page so that the ID of the purchase order is passed to the PreviewOrderPage. This will follow the pattern used for editing an order. In Index.razor, replace the Preview navigation line with this:
NavigationManager.NavigateTo($"/previeworder/{selectedPOHeaderID}");In PreviewOrderPage the page directive needs to be changed to:
@page "/previeworder/{POHeaderID:int}"And a new code block added, as shown below.
@code {
    IEnumerable<POLine> orderLinesByPOHeader;
    public List<POLine> orderLines = new List<POLine>();
    POHeader orderHeader = new POHeader();

    [Parameter]
    public int POHeaderID { get; set; }

    protected override async Task OnInitializedAsync()
    {
        orderHeader = await POHeaderService.POHeader_GetOne(POHeaderID);
        orderLinesByPOHeader = await POLineService.POLine_GetByPOHeader(POHeaderID);
        orderLines = orderLinesByPOHeader.ToList(); //Convert from IEnumable to List
    }

}
These changes will also require the following to be inserted at the top of the file:
@using BlazorPurchaseOrders.Data;
@inject IPOHeaderService POHeaderService
@inject IPOLineService POLineService
As mentioned previously, this follows the pattern used in the Edit Order page, to link the page to the order selected (POHeaderID), which in turn is used to populate orderHeader using the POHeaderService.POHeader_GetOne, and orderLines by using POLineServicePOLine_GetByPOHeader.
With the data connected we can now start replacing the placeholders. We'll start with the POHeader data. Replace the existing <table> containing the supplier name and address with:
        <table>
            <tr class="addressbar">
                <td style="width:50%">
                    @orderHeader.SupplierName<br />
                    @orderHeader.POHeaderSupplierAddress1<br />
                    @orderHeader.POHeaderSupplierAddress2<br />
                    @orderHeader.POHeaderSupplierAddress3<br />
                    @orderHeader.POHeaderSupplierPostCode<br />
                </td>
                <td style="width:15%">
                    Order No<br />
                    Order Date<br />
                    Contact
                </td>
                <td style="width:35%">
                    : @orderHeader.POHeaderOrderNumber<br />
                    : @orderHeader.POHeaderOrderDate.ToShortDateString()<br />
                    : @orderHeader.POHeaderRequestedBy
                </td>
            </tr>
        </table>
The only item of note is that the order date is turned into the short string format.
The next section to tackle is the order lines. Here we can use a 'foreach' statement to loop through the records in the orderLines list adding a table row for each order line. This shows the ability of Blazor pages to combine both C# and HTML to great effect.
Replace the <tr class="item"> with the following:
            @foreach (var orderline in orderLines)
            {
                <tr class="item">
                    <td>@orderline.POLineProductCode</td>
                    <td>@orderline.POLineProductDescription</td>
                    <td class="column-right">@String.Format("{0:N0}", orderline.POLineProductQuantity)</td>
                    <td class="column-right">@String.Format("{0:C2}", orderline.POLineProductUnitPrice)</td>
                    <td class="column-right">@String.Format("{0:C2}", orderline.POLineNetPrice)</td>
                    <td class="column-right">@String.Format("{0:P2}", orderline.POLineTaxRate)</td>
                    <td class="column-right">@String.Format("{0:C2}", orderline.POLineTaxAmount)</td>
                    <td class="column-right">@String.Format("{0:C2}", orderline.POLineGrossPrice)</td>
                </tr>
            }
Notice the String.Format() statements to format the numbers with the appropriate number of decimals and currency or percentage format.
Running the project at this stage should show something similar to this:
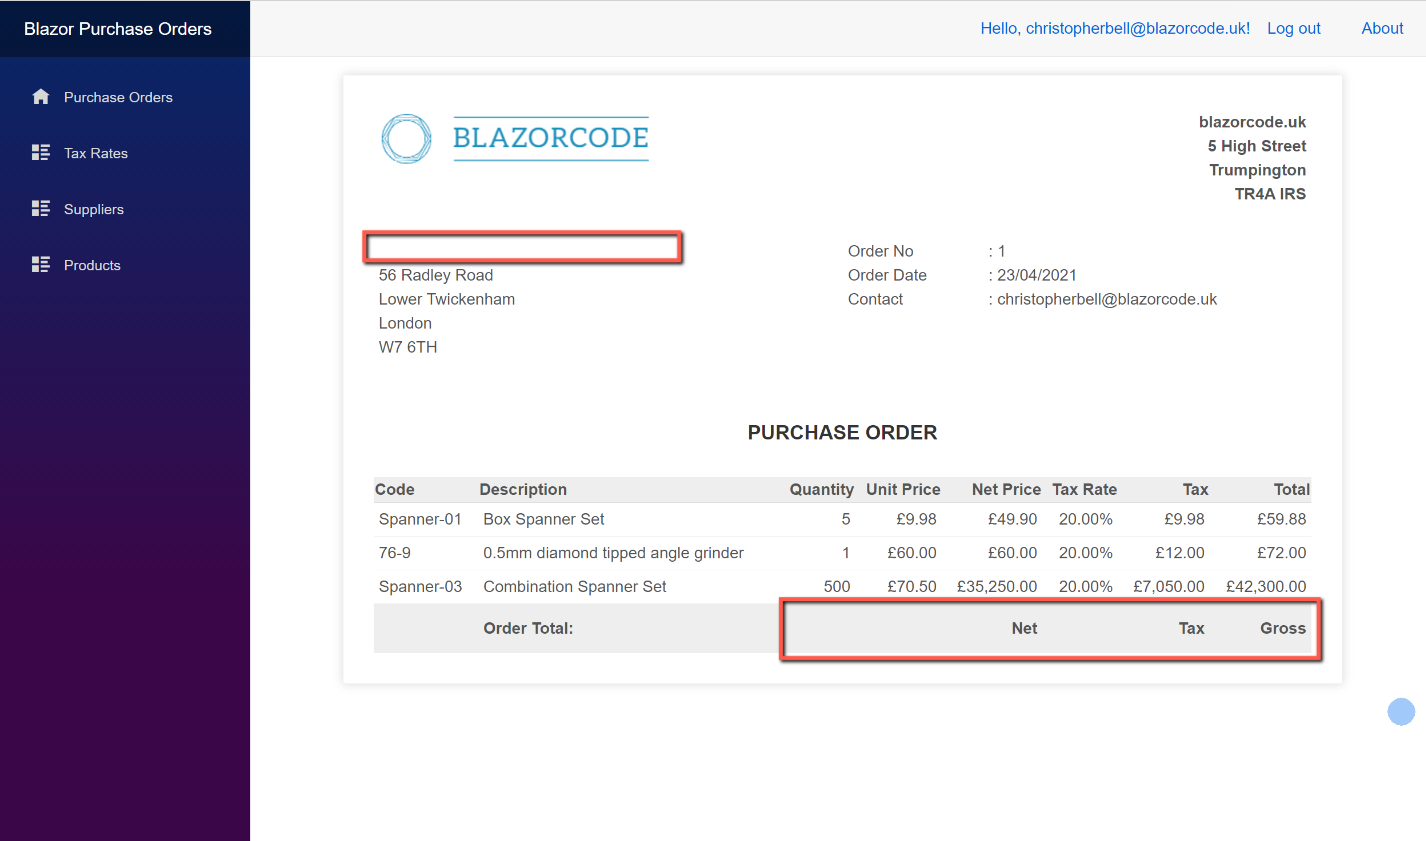
We haven't yet inserted the figures for the Order Total row, but notice that although we added the element for supplier name that it is missing. The reason that supplier name is missing is that although it is present in the POHeader class (which is why we didn't get any errors), it is not being returned by the SQL stored procedure for POHeader_GetOne.
We therefore need to modify the POHeader_GetOne stored procedure to include supplier name, but we can also take advantage of the fact that for each POHeader there is (logically) one total net, one total tax and one total gross. We can therefore include these in the SQL stored procedure. The code to alter the stored procedure is shown below:
USE [PurchaseOrders]
GO
/****** Object:  StoredProcedure [dbo].[spPOHeader_GetOne] ******/
SET ANSI_NULLS ON
GO
SET QUOTED_IDENTIFIER ON
GO

--------------  Stored Proc for SELECT (one)
ALTER PROCEDURE [dbo].[spPOHeader_GetOne]
-- Needs one parameter for primary key
@POHeaderID int
AS
BEGIN
-- SQL Select for one table row
SELECT dbo.POHeader.POHeaderID, dbo.POHeader.POHeaderOrderNumber, dbo.POHeader.POHeaderOrderDate, dbo.POHeader.POHeaderSupplierID, dbo.POHeader.POHeaderSupplierAddress1, dbo.POHeader.POHeaderSupplierAddress2, dbo.POHeader.POHeaderSupplierAddress3, dbo.POHeader.POHeaderSupplierPostCode,
           dbo.POHeader.POHeaderSupplierEmail, dbo.POHeader.POHeaderRequestedBy, dbo.POHeader.POHeaderIsArchived, dbo.Supplier.SupplierName, SUM(ISNULL((dbo.POLine.POLineProductQuantity * dbo.POLine.POLineProductUnitPrice), 0)) AS NetPrice,
           SUM(ISNULL((dbo.POLine.POLineProductQuantity * dbo.POLine.POLineProductUnitPrice * dbo.POLine.POLineTaxRate),0)) AS Tax, SUM(ISNULL(((dbo.POLine.POLineProductQuantity * dbo.POLine.POLineProductUnitPrice) * (1 + dbo.POLine.POLineTaxRate)),0)) AS TotalOrderValue
FROM   dbo.POHeader LEFT OUTER JOIN
           dbo.POLine ON dbo.POHeader.POHeaderID = dbo.POLine.POLineHeaderID LEFT OUTER JOIN
           dbo.Supplier ON dbo.POHeader.POHeaderSupplierID = dbo.Supplier.SupplierID
		   WHERE POHeader.POHeaderID= @POHeaderID
GROUP BY dbo.POHeader.POHeaderID, dbo.POHeader.POHeaderOrderNumber, dbo.POHeader.POHeaderOrderDate, dbo.POHeader.POHeaderSupplierID, dbo.POHeader.POHeaderSupplierAddress1, dbo.POHeader.POHeaderSupplierAddress2, dbo.POHeader.POHeaderSupplierAddress3, dbo.POHeader.POHeaderSupplierPostCode,
           dbo.POHeader.POHeaderSupplierEmail, dbo.POHeader.POHeaderRequestedBy, dbo.Supplier.SupplierName, dbo.POHeader.POHeaderIsArchived
END
With this in place if we simply re-run the project, the supplier name will be shown on the Preview page. Before we can include the new fields for the totals we need to amend the POHeader class to include them. (In fact we already have 'TotalOrderValue' as that is returned by the POHeader_List stored procedure.) Add the following to POHeader,cs
        public decimal NetPrice { get; }

        public decimal Tax { get; }
We can now them to PreviewOrderPage. Replace the <tr class="totals"> section with the following;
            <tr class="totals">
                <td></td>
                <td class="column-left">Order Total:</td>
                <td></td>
                <td></td>
                <td>@String.Format("{0:C2}", orderHeader.NetPrice)</td>
                <td></td>
                <td>@String.Format("{0:C2}", orderHeader.Tax)</td>
                <td>@String.Format("{0:C2}", orderHeader.TotalOrderValue)</td>
            </tr>
Re-run the project, and the preview should look similar to this:

Formatting the Address for missing lines
There is one last annoyance that needs to be fixed, and again we can use the ability to mix C# and HTML to resolve the problem. Currently, if we have one, or more, non-required lines of the address a gap is shown on the preview:

To handle this we can test each address line to see if it is null or empty; if it isn't we show it, if not the address line is skipped. To do this replace the address lines in the supplier address section with this:
@if (!String.IsNullOrEmpty(orderHeader.POHeaderSupplierAddress1))
{
@orderHeader.POHeaderSupplierAddress1<br />
}
@if (!String.IsNullOrEmpty(orderHeader.POHeaderSupplierAddress2))
{
@orderHeader.POHeaderSupplierAddress2<br />
}
@if (!String.IsNullOrEmpty(orderHeader.POHeaderSupplierAddress3))
{
@orderHeader.POHeaderSupplierAddress3<br />
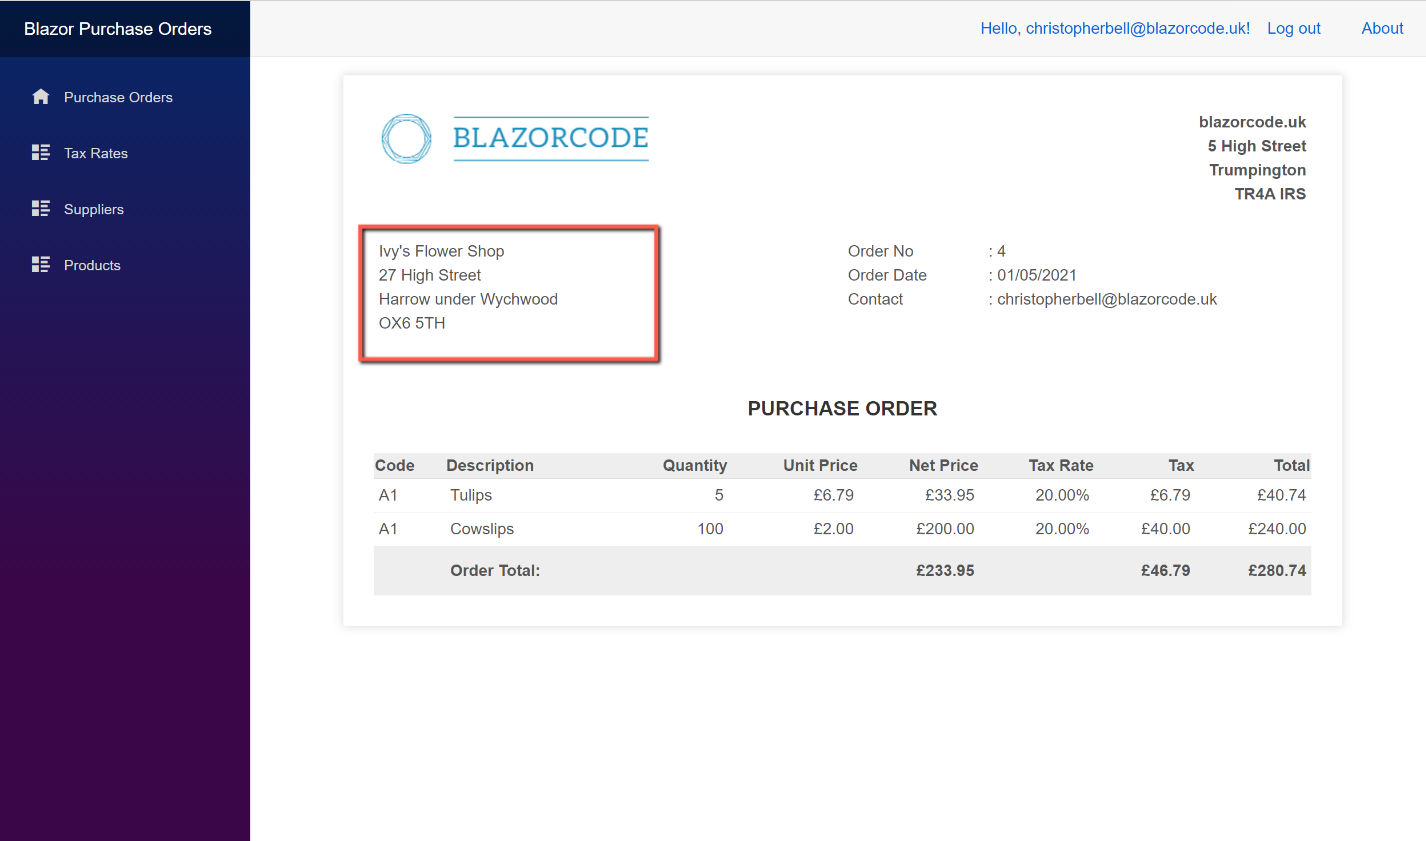
}I haven't included the Post Code in this as it is the last line and won't matter if it's blank. With the above change, re-running the project and previewing an order with a missing address line should now look similar to this:
Showing on a blank page
On reflection, it might be better to show the document on a blank tab. i.e. one without the navigation menu or login information.
This can be achieved by creating a blank layout 'template'. To do this, go to the Shared folder and add a new razor component, called 'BlankLayout.razor'. Replace all the default code with:
@inherits LayoutComponentBase

@Body
Save the new file and open PreviewOrderPage and insert the following after the @page directive:
@layout BlankLayoutRerunning the project and selecting an order and clicking the preview button should open the document in a blank page.

One final adjustment can be made to open the document in a new tab (leaving the orders list available on the original tab. To achieve this requires two small changes to Index.razor. Under the other 'Inject' statements at the top of the code, insert the following:
@inject IJSRuntime IJSAnd replace the "NavigationManager.NavigateTo..." statement in the Preview section of ToolbarHandeler with
await IJS.InvokeAsync<object>("open", new object[] { "/previeworder/" + selectedPOHeaderID + "", "_blank" });Re-running the project again should open a new blank tab when selecting an order and clicking 'Preview'.

Project Code
The code for all the files changed in this post are shown here.