Index Page - Dynamic Dialog
Introduction
I have called the application 'Wall Area Calculator', but so far we have done precious little calculating. This is where the groundwork for the calculations start. I mentioned at the very beginning that I wanted to calculate the area for walls in a couple of bathrooms, and that the bathroom walls were odd shapes. Specifically, the roof eaves form part of the ceiling, so some walls are not rectangular.
Example diagrams of these walls are shown here; a simple wall and what I am describing as a complex wall.
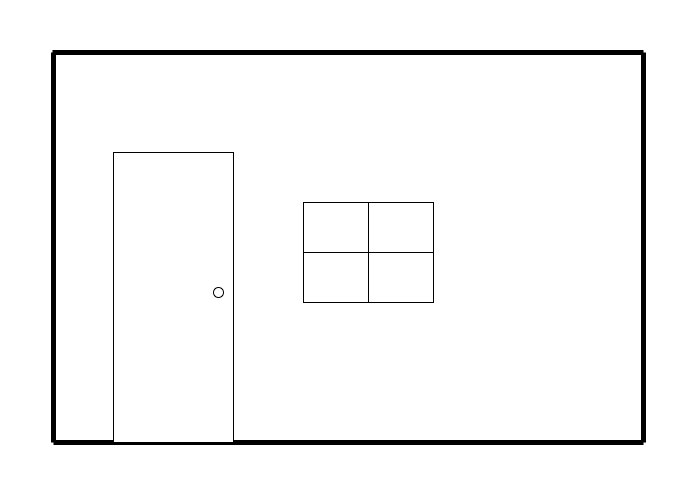

The way I am going to calculate the net area required for tiling is to take the gross area and deduct the area of doors and wall.
Calculating the gross area for a simple wall is, well, simple! Just the height (a) times length (b):

For complex walls calculating the gross are is a little more complicated (but basically quite simple).

To calculate the gross area I'm going to split the wall into two rectangles and a triangle. I will ask the user to provide the values for c (maximum length), a (maximum height), b (minimum length) and d (minimum height). From these we can see that the base of the triangle (e) is c-b and the height (f) is a-d. The gross area is therefore:
- Area of rectangle A (a * b), plus
- Area of rectangle B (e * d), plus
- Area of triangle C (e * f) * 0.5
As an alternative I could have calculated the area of the equivalent simple wall (a * b) and subtracted the area of the missing triangle (the same as triangle C). But I decided to go with the first option.
Dialog Design
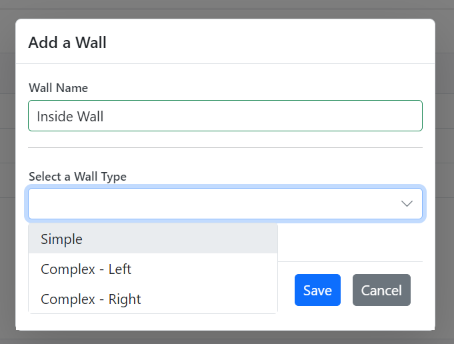
I want the dialog to cater for both simple and complex walls. To achieve this I propose having a drop-down list at the top of the dialog with 3 choices: simple, complex-left and complex-right. Complex-left and complex-right are essentially the same as far as calculations are concerned, but may make it easier for the user to visualise.
Depending on the type of wall selected I want the dialog to react dynamically by displaying a graphic of the type of wall and only requiring the user to enter the essential dimensions for the wall type chosen.
- Step 1 - Select the Wall Type
- Step 2 - the user selects a 'Simple' wall

In this case the user is required only to enter the Wall Length and Wall Height.
- Step 3 - the user selects one of the 'Complex' walls:


If a 'Complex' type is selected Max and Min Wall lengths and heights are required.
The key parts to this design are that, depending on the wall type selected:
- a different diagram is displayed.
- different text boxes are displayed with different labels
- the height of the dialog adjusted to accommodate one or two rows of text boxes.
The other subtlety is that I only want the option to select a wall type when adding a wall; I don't want the user to be able to edit a wall and change its type.
Diagrams
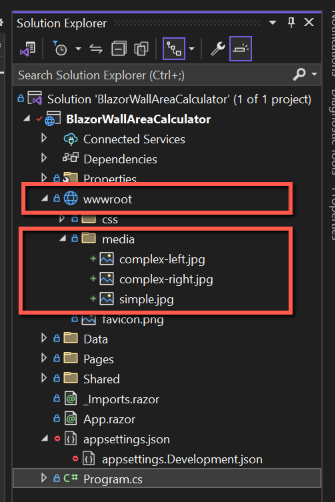
We will need three diagrams. I'm not going into how to create these, other than to say that I used Draw.io, a free application. I hadn't used Draw.io before, but found it relatively intuitive. It can either be downloaded as an app, or used in a browser. I exported the diagrams into a temporary folder as .jpg files and called them:
- simple.jpg
- complex-left.jpg
- complex-right.jpg

When exporting you may need to experiment with export options (Zoom, Border Width, Size, and Appearance) to get the results you require. In my case I went with Zoom = 100%, Border Width = 0, Size = Diagram, Appearance = Light. My diagrams were about 700px wide and 450px tall.)
Dialog Box
Wall Types
We only require three wall types and rather than add a WallType table to the database we can simply 'declare' them in code. Under the lists for toolbar items enter the following:
public class WallType
{
    public int WallTypeID { get; set; } = 0;
    public string WallTypeName { get; set; } = string.Empty;
}

List<WallType> LocalData = new List<WallType>
{
    new WallType() {WallTypeID =1, WallTypeName= "Simple" },
    new WallType() {WallTypeID =2, WallTypeName= "Complex - Left" },
    new WallType() {WallTypeID =3, WallTypeName= "Complex - Right" },
};
I am declaring WallType to have an ID as well as a Name so that I can order them in the Wall Type drop-down list in the sequence 1 to 3.
We will be using a variable of SelectedWallTypeName, (it will make the code easier to read than SelectedWallTypeID), so insert the following under the declaration for SelectedWallID:
public string SelectedWallTypeName { get; set; } = string.Empty;Adding or Editing
We need to distinguish between a user adding a new wall and editing an existing wall; to do this we read/set a Boolean variable, which I am calling 'IsAdd'. Declare this as follows:
public bool IsAdd { get; set; }We can now modify the "WallToolbarClickHandler" to set 'IsAdd' to true if the user clicks the 'Add' button, or false if they choose to edit an existing wall. In the case of 'Add' we can also set the "WallTypeID" to 0, and the "WallTypeName" to an empty string. Add this to the top of the 'Add' section of the "WallToolbarClickHandler".
IsAdd = true;
SelectedWallID = 0;
SelectedWallTypeName = string.Empty;
And this to the Edit option:
IsAdd = false;
Wall Type
We can now turn our attention to the Wall Dialog Box. After the Wall Name we need either a dropdown list for wall types in the case of adding a new wall, or a text box displaying the wall type if editing an existing wall.
Place the following after the Wall Name text box in the CSHTML code for WallDialog:
<hr />
@if (IsAdd)
{
	<SfDropDownList TItem="WallType"
				TValue="string"
				FloatLabelType="@FloatLabelType.Always"
				DataSource="@LocalData"
				Placeholder="Select a Wall Type"
				PopupHeight="200px"
				PopupWidth="250px">
		<DropDownListFieldSettings Text="WallTypeName" Value="WallTypeID"></DropDownListFieldSettings>
		<DropDownListEvents TItem="WallType" TValue="string" ValueChange="@OnChangeWallType"></DropDownListEvents>
	</SfDropDownList>
}
else
{
	<SfTextBox Enabled="false" Placeholder="Wall Type"
		   FloatLabelType="@FloatLabelType.Always"
		   @bind-Value="wallAddEdit.WallTypeName">
	</SfTextBox>
}
We no longer need the code section for WallSqM, so that can be deleted.
What the above does is check to see if IsAdd is true, and if so it displays a Syncfusion Dropdown list populated from the local data for Wall Types. This has a ValueChange event calling the 'OnChangeWallType' method. (See next section). If IsAdd is false a TextBox is displayed, showing the WallTypeName.
The 'OnChangeWallType' method should be added to the C# code in the Walls region; I suggest at the top of this section. This will assign values of WallTypeID and WallTypeName to the wallAddEdit object (being used for the 'add').
public void OnChangeWallType(ChangeEventArgs<string, WallType> args)
{
    wallAddEdit.WallTypeID = args.ItemData.WallTypeID;
    wallAddEdit.WallTypeName = args.ItemData.WallTypeName;
}
Switch
How the rest of the dialog appears will depend on the Wall Type being added/edited. And to handle the three wall types (Simple, Complex-Left and Complex-Right) we can use the C# 'switch' statement. To provide the scaffold for this, add the following after the if(IsAdd) section.
@switch (wallAddEdit.WallTypeName)
{
    case "Simple":

        break;

    case "Complex - Left":

        break;

    case "Complex - Right":

        break;
}
The above will behave in one of three ways depending on the value of 'WallTypeName'. (Here I could have used WallTypeID, but the code is much clearer by using the name.) The code will run through the options until WallTypeName matches one of the cases and then executes the the code until it reaches a 'break' statement.
In all three cases we want to display the diagram of the relevant wall with descriptions of the measurements required.
Add a new folder under wwwroot and call it 'media'. Copy the diagrams created using Draw.io into this folder.
Insert the following code into the 'switch' statement for 'Simple':
<div>
    <br />
    <img src=".\\media\\simple.jpg" />
    <br />
</div>
And the equivalents for 'Compex-Left' and 'Complex-Right'.
<div>
	<br />
	<img src=".\\media\\complex-left.jpg" />
	<br />
</div>
<div>
	<br />
	<img src=".\\media\\complex-right.jpg" />
	<br />
</div>
The code should now look like this:

Save the files and run the application. By adding a wall and changing its 'WallType' the different diagrams should be displayed.
We'll now deal with each of the Wall Types:
Simple
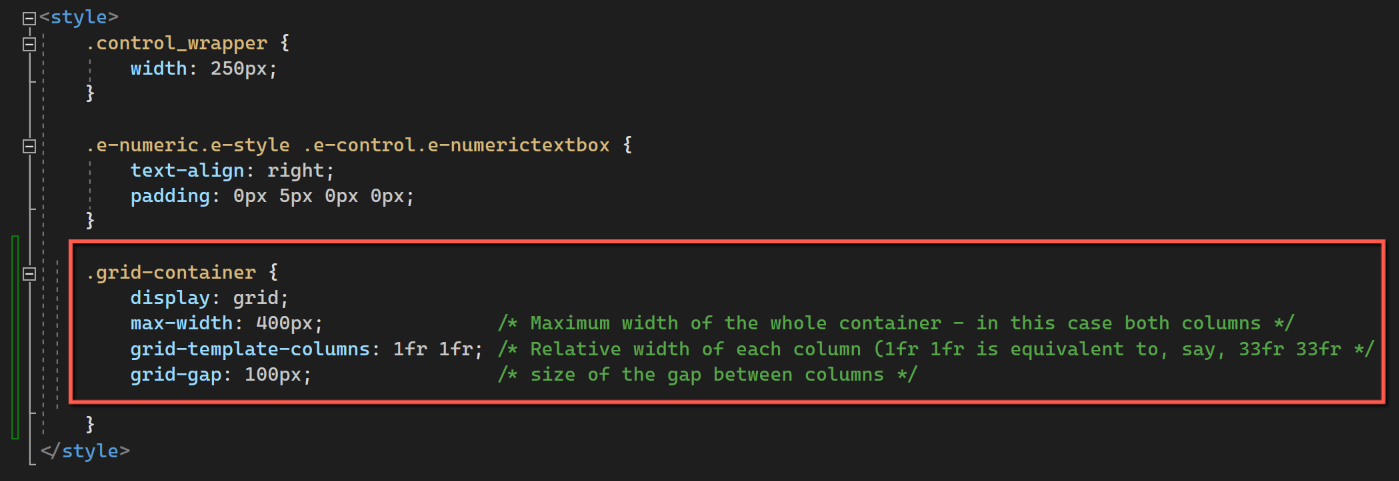
For the 'Simple' wall type we only need the user to provide the wall length and wall height. We will therefore have two numeric textboxes and to make the layout as visually pleasing as possible, we'll have them on the same row. To put them on the same row we will need some css formatting. Insert the following into the style tags section:
.grid-container {
	display: grid;
	max-width: 400px; /* Maximum width of the whole container - in this case both columns */
	grid-template-columns: 1fr 1fr; /* Relative width of each column (1fr 1fr is equivalent to, say, 33fr 33fr */
	grid-gap: 100px; /* size of the gap between columns */
}
We can now add the numeric text boxes. Insert the following under the image section of the 'Simple' switch statement:
<div class="grid-container">
	<div class="grid-child left-column">
		<SfNumericTextBox Enabled="true"
				  Placeholder="Wall Length (mm)"
				  Format="n0"
				  FloatLabelType="@FloatLabelType.Always"
				  @bind-Value="wallAddEdit.WallLengthMax"
				  ShowSpinButton=false
				  CssClass="e-style">
		</SfNumericTextBox>
	</div>
	<div class="grid-child right-column">
		<SfNumericTextBox Enabled="true"
				  Placeholder="Wall Height (mm)"
				  Format="n0"
				  FloatLabelType="@FloatLabelType.Always"
				  @bind-Value="wallAddEdit.WallHeightMax"
				  ShowSpinButton=false
				  CssClass="e-style">
		</SfNumericTextBox>
	</div>
</div>
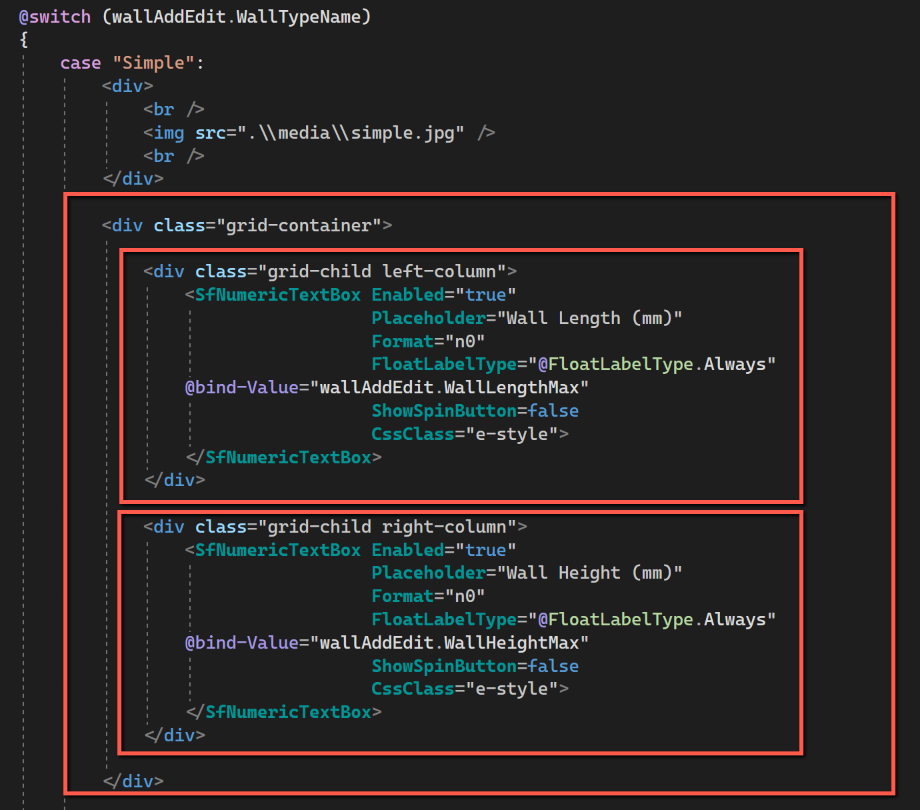
The two numeric text boxes are placed within their own div tags with css classes that place them either in the left-hand or right-hand columns. (There are lots of online resources for css grid styling.)
Essentially, the left-column is for Wall Length, its formatted as n0 (comma separated thousands and no decimal places), and is bound to wallAddEdit.WallLengthMax. The right-column is basically the same but for wall height.
Complex
For the 'Complex' wall types we need the user to input maximum and minimum wall lengths and wall heights. (Note that for the 'Simple' wall type we used 'WallMaxLength' and 'WallMinLength' for data binding, but displayed the label as 'Wall Length' and 'Wall Height'.) We use the same technique as for the 'Simple' wall type, but just add the two numeric text boxes for minimum wall length and height. Insert the following after the 'image' section of both 'Complex' switch options:
<div class="grid-container">
	<div class="grid-child left-column">
		<SfNumericTextBox Enabled="true"
				  Placeholder="Max Wall Length (mm)"
				  Format="n0"
				  FloatLabelType="@FloatLabelType.Always"
				  Width="50"
				  @bind-Value="wallAddEdit.WallLengthMax"
				  ShowSpinButton=false
				  CssClass="e-style">
		</SfNumericTextBox>

		<SfNumericTextBox Enabled="true"
				  Placeholder="Min Wall Length (mm)"
				  Format="n0"
				  FloatLabelType="@FloatLabelType.Always"
				  Width="50"
				  @bind-Value="wallAddEdit.WallLengthMin"
				  ShowSpinButton=false
				  CssClass="e-style">
		</SfNumericTextBox>
	</div>

	<div class="grid-child right-column">
		<SfNumericTextBox Enabled="true"
				  Placeholder="Max Wall Height (mm)"
				  Format="n0"
				  FloatLabelType="@FloatLabelType.Always"
				  Width="50"
				  @bind-Value="wallAddEdit.WallHeightMax"
				  ShowSpinButton=false
				  CssClass="e-style">
		</SfNumericTextBox>

		<SfNumericTextBox Enabled="true"
				  Placeholder="Min Wall Height (mm)"
				  Format="n0"
				  FloatLabelType="@FloatLabelType.Always"
				  Width="50"
				  @bind-Value="wallAddEdit.WallHeightMin"
				  ShowSpinButton=false
				  CssClass="e-style">
		</SfNumericTextBox>
	</div>

</div>

This will give the dialog the appearance we are looking for, reacting to the user selection of wall type, but we still need to change some code to read and save data.
Adding a wall
Until these changes, the user entered the wall area in the textbox we've just deleted and default data for wall type ID, wall type name, maximum and minimum wall lengths and heights were set in the 'WallSave' method. As we will now be calculating the wall area from the data input by the user we now need to remove those defaults. In the 'WallSave' method comment out the section that provided this data.

Editing a wall
We are saving wall lengths and heights during the add option, but when editing a wall we need to retrieve this data. The technique we will use is to modify the "WallRowSelectHandler" to capture the data when the user selects a record. (The key to this is that when the 'walls' enumerable is populated by "WallService.WallsReadByRoom(SelectedRoomID)" it retrieves all columns in the walls object, including WallTypeName, lengths and heights.)
We need to make three changes to do this, the first to declare variables to hold the data, the second to change the "WallRowSelectHandler" to save the data to the new variables and lastly to populate the dialog with these values when the user selects 'Edit'
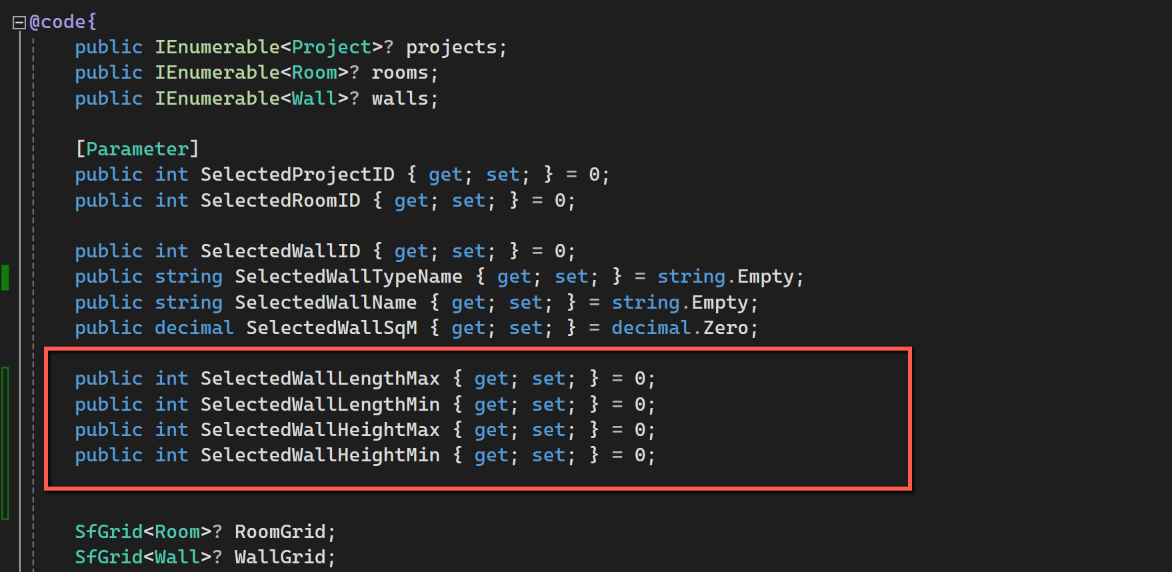
Add the following code to the 'Declarations' section of the code: (we have already declared SelectedWallTypeName)
public int SelectedWallLengthMax { get; set; } = 0;
public int SelectedWallLengthMin { get; set; } = 0;
public int SelectedWallHeightMax { get; set; } = 0;
public int SelectedWallHeightMin { get; set; } = 0;
And this to the "WallRowSelectHandler":
SelectedWallTypeName = args.Data.WallTypeName;
SelectedWallLengthMax = args.Data.WallLengthMax;
SelectedWallLengthMin = args.Data.WallLengthMin;
SelectedWallHeightMax = args.Data.WallHeightMax;
SelectedWallHeightMin = args.Data.WallHeightMin;
Lastly, we need to change the "WallToolbarClickHandler" to populate the wallAddEdit object with data read from the wall row. Insert the following in the block that populates wallAddEdit:
wallAddEdit.WallTypeName = SelectedWallTypeName;
wallAddEdit.WallLengthMax = SelectedWallLengthMax;
wallAddEdit.WallLengthMin = SelectedWallLengthMin;
wallAddEdit.WallHeightMax = SelectedWallHeightMax;
wallAddEdit.WallHeightMin = SelectedWallHeightMin;


Wall Area Calculation
We finally get to the calculation of the wall area!
But first a bit of tidying up. In the "WallRowSelectHandler" and "WallToolbarClickHandler" we are reading and assigning values from/to "WallSqM". We no longer need to do this, so comment out lines that refer to "SelectedWallSqM" in these two methods.
We will create a separate method for calculating the area of a wall and call that method where needed.
We want the area of a wall in Sq Metres, but the dialog asked for the measurements in millimetres (the usual unit of measure used by the construction trade in the UK). This presents a small problem in that the wall length and height types are integers and we want the final result as a decimal. We therefore need to change the type of these measurements to decimal types. To prepare for this add the following to the declarations, they are simply the variables we already have as integers, but decimal equivalents:
public decimal decWallSqM = decimal.Zero;
public decimal decWallLengthMax = decimal.Zero;
public decimal decWallLengthMin = decimal.Zero;
public decimal decWallHeightMax = decimal.Zero;
public decimal decWallHeightMin = decimal.Zero;
Insert the following code to create the 'CalculateArea' method:
#region Area Calculation
public async Task CalculateArea(Wall wallAddEdit)
{
    switch (wallAddEdit.WallTypeName)
    {
        case "Simple":

            decWallLengthMax = Convert.ToDecimal(wallAddEdit.WallLengthMax);
            decWallHeightMax = Convert.ToDecimal(wallAddEdit.WallHeightMax);

            decimal area = decimal.Round((decWallLengthMax * decWallHeightMax) / 1000000, 3, MidpointRounding.AwayFromZero);

            wallAddEdit.WallSqM = area;

            break;

        case "Complex - Left":
        case "Complex - Right":

            decWallLengthMax = Convert.ToDecimal(wallAddEdit.WallLengthMax);
            decWallHeightMax = Convert.ToDecimal(wallAddEdit.WallHeightMax);
            decWallLengthMin = Convert.ToDecimal(wallAddEdit.WallLengthMin);
            decWallHeightMin = Convert.ToDecimal(wallAddEdit.WallHeightMin);

            decimal area1 = (decWallHeightMax * decWallLengthMin);
            decimal area2 = ((decWallLengthMax - decWallLengthMin) * decWallHeightMin);
            decimal area3 = decimal.Round((((decWallLengthMax - decWallLengthMin) * (decWallHeightMax - decWallHeightMin)) / 2), 3, MidpointRounding.AwayFromZero);

            wallAddEdit.WallSqM = decimal.Round(((area1 + area2 + area3) / 1000000), 3, MidpointRounding.AwayFromZero);

            break;
    }
}
#endregion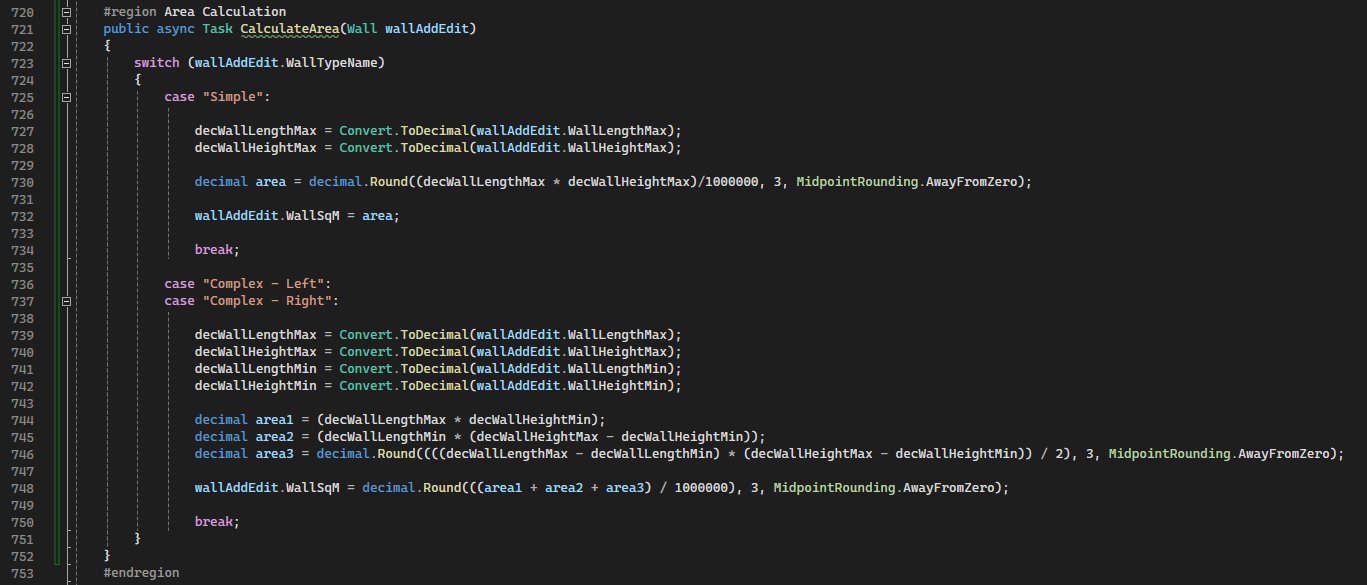
We need two different ways of calculating the area depending on whether the user selected a 'simple' or 'complex' wall. We use the 'switch' command to handle this. Note that 'Complex - Left' and 'Complex - Right' use the same code by placing them on adjacent lines with no 'break' command between them.
In both cases we convert our integer values for wall length and height to decimals.
There are 4 possible rounding methods offered by C#
- Round(Decimal)
- Rounds a decimal value to the nearest integer
- Round(Decimal, Int32)
- Rounds a decimal value to the specified number of decimal places
- Round(Decimal, MidpointRounding)
- Rounds a decimal value to an integer using the specified rounding strategy.
- Round(Decimal, Int32, MidpointRounding)
- Rounds a decimal value to the specified precision using the specified rounding strategy.
We want our result to be a decimal (the wall area is in SqM, so we will want a couple of decimal places at least). We can therefore discount methods 1 and 3 that both return integers.
It probably won't make any significant difference to us, but I'm not keen on method 2 because it uses "banker's rounding". This method rounds to the nearest even number. For example, when rounded to two decimals, the value 2.345 becomes 2.34 and the value 2.355 becomes 2.36.
Option 4 is therefore the calculation method we will use, but this deserves a little more explanation as there are a number of different "MidpointRounding" options available to us.
- AwayFromZero
- ToEven
- ToZero
- ToPositiveInfinity
- ToNegativeInfinity
'AwayFromZero' is the option we will be using and is the conventional 'rounding up', so that 2.345 rounded to 2 decimal places becomes 2.35 and 2.355 becomes 2.36. Similarly -2.345 becomes -2.35 and -2.355 becomes -2.36. (Hence the 'AwayFromZero'.)
'ToEven' follows the 'banker's rounding' example described above and 'ToZero' is the conventional 'rounding down'. 'ToPositiveInfinity' and 'ToNegativeInfinity' treat positive and negative numbers differently and describes the direction of rounding.
Note that it is only when carrying out a division that there is any need to do the rounding.
Another Note: Why am I using "decimal.Round", not "Math.Round"? As far as I can find out, there is basically no difference between the two - I just alighted on "decimal.Round" first! It seems I could have also used "Decimal.Round".
(Also note that I am probably going completely overboard by holding SqM to three places of decimals...)
//Always do area calculation
await CalculateArea(wallAddEdit);
Having added the 'CalculateArea' method we just have to call it from the 'WallSave' method. Insert this code at the top of 'WallSave' - we will need to call CalculateArea for both adding and editing wall, hence it is placed at the top of 'WallSave':

Save all files and run the application. Should be able to add and edit walls and have the area calculated.
Resources
Dynamic Dialog - Code