Projects Page
YouTube Video
Adding the Page
At last we have the data handling code in place and can start to build a page to maintain projects. In the Solution Explorer
- Right-click the Pages folder
- Select Add
- Select Razor Component
- Enter a name for the page. Call it 'ProjectPage'. (It must start with an uppercase letter, and I have found previously that naming a razor component exactly the same as a model can cause problems.)
A very basic page is created. A typical .razor page for a Blazor application has a directive at the top of the page with routing to a URL followed by any 'using' statements and/or injecting any services needed. The next section is HTML (actually CSHTML where the CS stands for C Sharp) that will render the page, followed by C# code (identified by '@code').
We will start by inserting the following at the top of the file:
@page "/project"
@using BlazorWallAreaCalculator.Data
@inject IProjectService ProjectService
Amend the heading within the H3 tags to simply 'Projects'.
We will amend the menu to allow easy access to the page (especially helpful whilst testing!)
- Open NavMenu.razor (in the Shared folder)
- Uncomment the 'Counter' section
- Change the href from "counter" to "project"
- Change the link from 'Counter' to 'Projects'
Next we will be adding some Syncfusion controls and to save adding 'using' statements at the top of all pages we can add the required statements into _Imports.
- Open _Imports (in the Shared folder)
- Add the following
@using Syncfusion.Blazor.Inputs
@using Syncfusion.Blazor.Popups
@using Syncfusion.Blazor.Data
@using Syncfusion.Blazor.DropDowns
@using Syncfusion.Blazor.Navigations
@using Syncfusion.Blazor.Lists
@using Syncfusion.Blazor.Grids
@using Syncfusion.Blazor.Buttons
@using Syncfusion.Blazor.Notifications
Return to ProjectsPage.razor and add the following code (replacing the @code section)
<hr />

<SfGrid DataSource="@projects">
    <GridColumns>
        <GridColumn Field="@nameof(Project.ProjectName)"
                    HeaderText="Project"
                    TextAlign="TextAlign.Left"
                    Width="60">
        </GridColumn>
        <GridColumn Field="@nameof(Project.UserEmail)"
                    HeaderText="User Email"
                    TextAlign="TextAlign.Left"
                    Width="60">
        </GridColumn>
    </GridColumns>
</SfGrid>

@code {
    IEnumerable<Project>? projects;

    protected override async Task OnInitializedAsync()
    {
        //Populate the list of Project objects from the Project table.
        projects = await ProjectService.ProjectReadAll();
    }
}
The above inserts a horizontal line under the Projects heading.
The SfGrid section firstly declares its 'datasource' as '@projects' followed by two columns. Each column has a 'Field', the name of the column from the Project data model (and database), the column Header Text, the alignment of the text in the column and the column width (in pixels).
In the code section we declare an IEmunerable of type 'Project' called 'projects'. This is then used in the 'OnInitializedAsync' method where it is populated by ProjectService.ProjectReadAll.
We have no data at this point, but if we run the application we should get an empty grid displayed.
Adding a Toolbar
We will use a toolbar on the Syncfusion grid to open dialog boxes to allow the user to add, edit and delete records. To add a toolbar to the grid:
- Add the keyword 'Toolbar' to the SfGrid opening tag
- Declare a list for the 'Toolbaritems' (i.e. Add, Edit & Delete)
- Add the 'Toolbaritems' to the 'OnInitializedAsync' to add the buttons to the toolbar
To do this, change the SfGrid tag to this:
<SfGrid DataSource="@projects" Toolbar="@Toolbaritems">
Add this to the declarations section:
private List<ItemModel> Toolbaritems = new List<ItemModel>();To add the buttons to the toolbar when the page opens, insert this to the OnInitializedAsync method:
        Toolbaritems.Add(new ItemModel() { Text = "Add", TooltipText = "Add a new Project", PrefixIcon = "e-add" });
        Toolbaritems.Add(new ItemModel() { Text = "Edit", TooltipText = "Edit selected Project", PrefixIcon = "e-edit" });
        Toolbaritems.Add(new ItemModel() { Text = "Delete", TooltipText = "Delete selected Project", PrefixIcon = "e-delete" });


Clicking on the toolbar doesn't do anything yet. We need to add some code that will handle the user clicking the toolbar. To do this we will:
- Add a 'GridEvents' tag to the grid
- Add a method to handle a tool bar click
Add the following code immediately after the SfGrid tag. It will cater for the user clicking on the toolbar, but also captures the row selected (if there is one), for processing row edit or deletion.
<GridEvents OnToolbarClick="ToolbarClickHandler" TValue="Project"></GridEvents>
Add the bare bones of the toolbar click handler by adding a new method after the OnInitializedAsync method:
    public async Task ToolbarClickHandler(ClickEventArgs args)
    {
        if (args.Item.Text == "Add")
        {
            //Code for adding goes
        }

        if (args.Item.Text == "Edit")
        {
            //Code for editing
        }

        if (args.Item.Text == "Delete")
        {
            //Code for deleting
        }
    }
Add/Edit Dialog
Adding a record
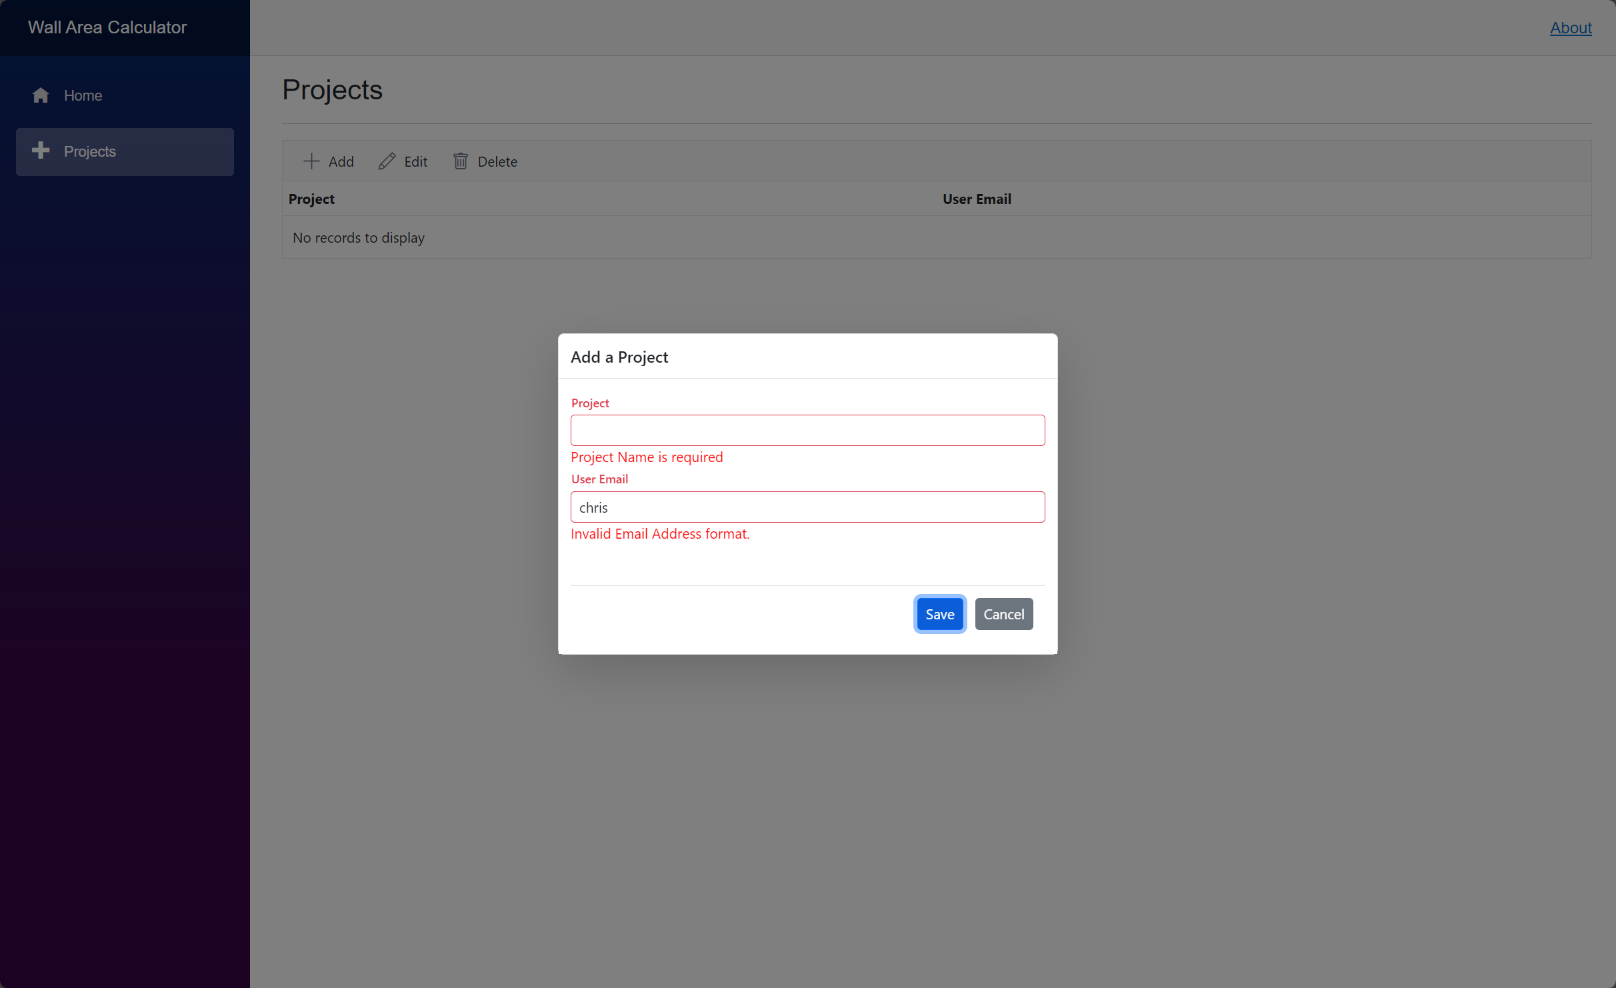
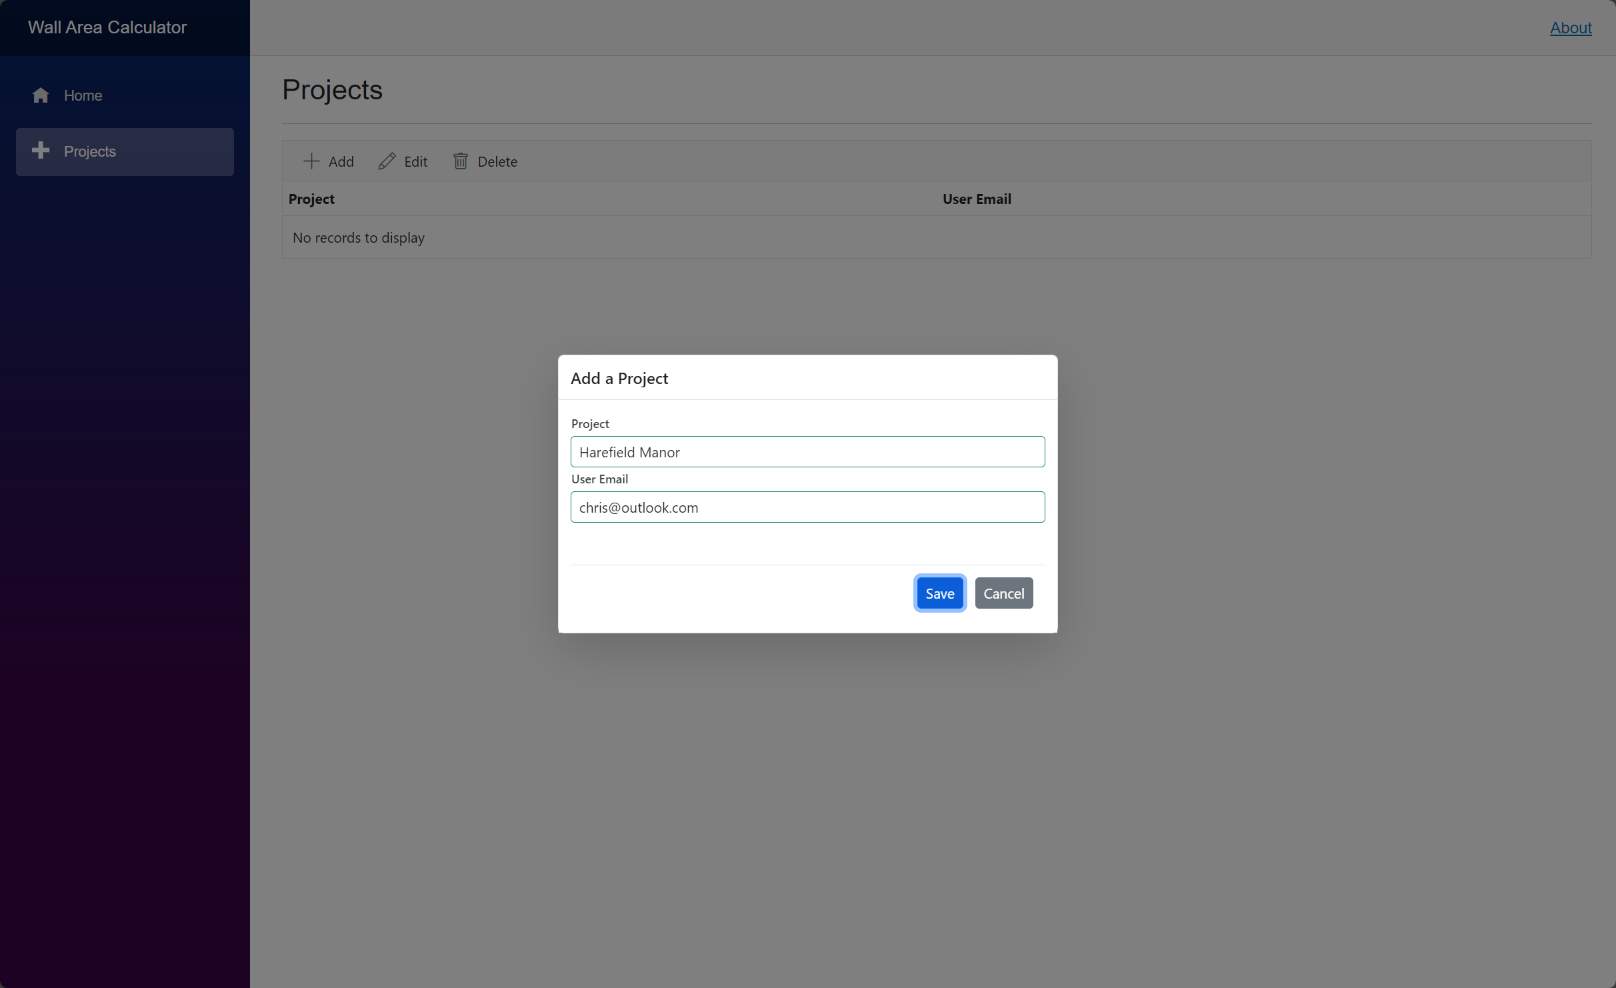
We will add and edit Project records using a pop-up dialog. It will only contain text boxes for the Project Name and the User Email plus buttons to save the record or cancel. When called by the toolbar 'Add' button the text boxes will be blank awaiting the user to enter new data. If called by the toolbar 'Edit' button the text boxes will be populated with existing data for the row selected by the user.
The cshtml (c sharp html) code for the complete Add/Edit dialog is shown below. Place this code immediately after the SfGrid section.
<SfDialog @ref="DialogAddEditProject" IsModal="true" Width="500px" ShowCloseIcon="false" AllowDragging="true" Visible="false">
    <DialogTemplates>
        <Header> @HeaderText </Header>
    </DialogTemplates>
    <EditForm Model="@projectAddEdit" OnValidSubmit="@Save">
        <DataAnnotationsValidator />
        <div>

            <SfTextBox Enabled="true" Placeholder="Project"
                       FloatLabelType="@FloatLabelType.Always"
                       @bind-Value="projectAddEdit.ProjectName">
            </SfTextBox>
            <ValidationMessage For="@(() => projectAddEdit.ProjectName)" />

            <SfTextBox Enabled="true" Placeholder="User Email"
                       FloatLabelType="@FloatLabelType.Always"
                       @bind-Value="projectAddEdit.UserEmail">
            </SfTextBox>
            <ValidationMessage For="@(() => projectAddEdit.UserEmail)" />

        </div>
        <br /><br />
        <div class="e-footer-content">
            <div class="button-container">
                <button type="submit" class="e-btn e-normal e-primary">Save</button>
                <button type="button" class="e-btn e-normal" @onclick="@CloseDialog">Cancel</button>
            </div>
        </div>
    </EditForm>
</SfDialog>
The above consists of:
- a Syncfusion dialog tag specifying
- a name (@ref)
- it is modal (always has the focus)
- a specified width
- it won't have a close icon (in the top-right)
- it will allow dragging around the screen
- a 'header' tag within a 'DialogTemplates' section. This will allow us to place a header (@HeaderText) showing whether the dialog is adding or editing a record
- an 'EditForm' section specifying
- a model for the data (@projectAddEdit)
- the method to be called on successful submission (@Save)
- 'DataAnnotationsValidator' tag to enable the use of data annotations for data error handling
- we then have a 'div' section containing the two text boxes (SfTextBox) for the Project Name and User Email. Each of these
- is set to be enabled (allowing the cursor to be placed in the text box)
- a 'placeholder'. This is the label displayed to the user indication what the textbox is used for
- a 'FloatLabelType'. This is used to place the label (placeholder). Always has it within the text box until the user enters data, at which point it moves above the text box
- a '@bind-Value' with the model column name to which the data is bound
- Following each text box is the validation message to be displayed should a data error be detected. (The position of this ValidationMessage controls the position on the screen for the message to be displayed.) The error message is derived from the model class.
- two line breaks are then shown to separate the text boxes from the buttons
- two nested div sections with class names control the display of two buttons
- the first of which is the button handling a successful submission and will display 'Save' and will call the '@Save' method
- the second will display 'Cancel' and will call the @CloseDialog method
- The EditForm and SfDialog tags are then closed
We have the code for the Add/Edit dialog, but as yet no way of displaying it. To do this we need to look at the code for the Add and Edit buttons on the toolbar, but before we do that we need to declare the new variables we have introduced. Add the following to the declarations section
    SfDialog? DialogAddEditProject;
    Project projectAddEdit = new Project();
    string HeaderText = "";
Go to the ToolBarClickHandler and add the following to the section for adding
            //Code for adding
            projectAddEdit = new Project();             // Ensures a blank form when adding
            HeaderText = "Add a Project";
            if (DialogAddEditProject is not null)
            {
                await DialogAddEditProject.ShowAsync();
            }
This code
- sets the projectAddEdit object to a new empty Project object
- sets the HeaderText string to 'Add a Project' (this will be displayed at the top of the dialog when it opens)
- checks that DialogAddEditProject exists and then opens the dialog
This will open the dialog but we need two methods to handle the Save and Cancel buttons in the dialog.
Add the following code for the Save method. Place it after the existing methods.
protected async Task Save()
{
    if (projectAddEdit.ProjectID == 0)
    {
        // Record is being added
        try
        {
            await ProjectService.ProjectCreate(projectAddEdit);
            //Refresh datagrid
            projects = await ProjectService.ProjectReadAll();
            StateHasChanged();
            await CloseDialog();
        }
        catch
        {
            // Display warning message
        }

    }
    else
    {
        // Record is being edited
        try
        {
            await ProjectService.ProjectUpdate(projectAddEdit);
            //Refresh datagrid
            projects = await ProjectService.ProjectReadAll();
            StateHasChanged();
            await CloseDialog();
        }
        catch
        {
            // Display warning message
        }
    }
}
The 'Save' method will be used for both adding a new record and editing an existing one. To start we will consider the 'Add' option. To determine if a record is being added or edited the value of ProjectID is checked. If a new record is being added ProjectID will be 0; in that case we call the ProjectService.ProjectCreate passing in the projectAddEdit object. If the service is successful we refresh the grid by calling the ProjectReadAll and adding the 'StateHasChanged' command that will force a refresh, followed by 'CloseDialog' (to be added next). We need to consider what to do is the ProjectCreate fails, but will we leave that for the moment.
If the user clicks the 'Cancel' button we need to close the dialog. We also need to close the dialog after a successful add (or edit), so can use this method. Add it after the existing methods.
    private async Task CloseDialog()
    {
        if (DialogAddEditProject is not null)
        {
            await DialogAddEditProject.HideAsync();
        }
        StateHasChanged();
    }
If we run the application at this point it should allow us to add new projects (with validation messages if we enter invalid data), but we won't be able to edit or delete records.


We ought to deal with the (unlikely) possibility that the ProjectCreate service will fail. Fortunately Syncfusion provides an easy way to display warnings, the SfDialogService. To use this insert the following at the top of the code:
@inject SfDialogService DialogServiceAnd register the service in Program.cs by inserting this into the builder section
builder.Services.AddScoped<SfDialogService>();Lastly we need to amend MainLayout.razor so the 'article' tags look like this:
<article class="content px-4">
    @Body
    <Syncfusion.Blazor.Popups.SfDialogProvider />
</article>
We can now add our warnings to the Save method where we currently just have placeholder comments.
await DialogService.AlertAsync("An unexpected error has occured.", "Unknown Error");
return;
I don't expect to get errors that will trigger these warnings, so testing could be problematical.
Editing a record
To edit a record we want the user to select a record from the grid and then click the 'Edit' button. To do this we use an additional Syncfusion 'GridEvent' called 'RowSelected' that we will link to a new method, which for simplicity, we are going to call 'RowSelectHandler' (it could be anything).
Each row of the grid has the whole Project object in memory and we can use that fact to populate the 'Edit Record' dialog with the data we need. We'll start by declaring variables for each of the fields of the record selected from the grid by the user. Add the following to the declarations section:
public int SelectedProjectId { get; set; } = 0;
public string SelectedProjectName { get; set; } = string.Empty;
public string SelectedProjectUserEmail { get; set; } = string.Empty;
To capture the row selected by the user we now need to change the 'GridEvents' tag to include 'RowSelected'. Replacing the whole 'GridEvents' tag with this:
<GridEvents OnToolbarClick="ToolbarClickHandler" TValue="Project" RowSelected="RowSelectHandler"></GridEvents>We now need the 'RowSelectHandler' method. Add this at the end of the code section.
public void RowSelectHandler(RowSelectEventArgs<Project> args)
{
    //{args.Data} returns all the data for the current selected record.
    SelectedProjectId = args.Data.ProjectID;
    SelectedProjectName = args.Data.ProjectName;
    SelectedProjectUserEmail = args.Data.UserEmail;
}
We can now return to ProjectPage and deal with the ToolbarClickHandler for the Edit button. Insert this code into the Edit section:
//Code for editing
//Check that a Project has been selected
if (SelectedProjectId == 0)
{
    await DialogService.AlertAsync("Please select a project.", "No Project Selected");
    return;
}
else
{
    //populate projectAddEdit (temporary data set used for the editing process)
    projectAddEdit.ProjectID = SelectedProjectId;
    projectAddEdit.ProjectName = SelectedProjectName;
    projectAddEdit.UserEmail = SelectedProjectUserEmail;

    HeaderText = "Edit Project";
    if (DialogAddEditProject is not null)
    {
        await DialogAddEditProject.ShowAsync();
    }
}
The above
- Checks that the user has selected a row,
- if not,
- uses the Syncfusion DialogService to display a warning message
- if a row is selected
- populates projectAddEdit from the variables from the selected row
- changes the HeaderText to display 'Edit Project'
- opens DialogAddEditProject
The code previously used for DialogAddEditProject will handle the save and cancel options.
Run the application to test that Edits can be performed.
Deleting a record
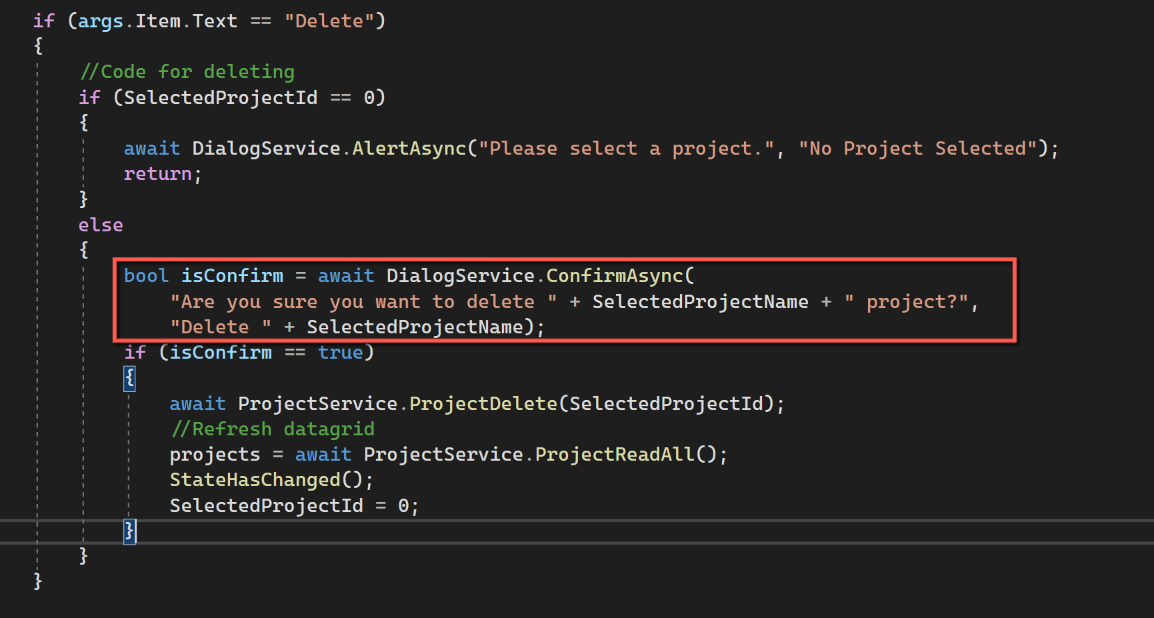
One of the options of the Syncfusion DialogService is to ask the user for confirmation of an action. We can therefore simply use the Syncfusion DialogService to ask for the user to confirm they want to delete the currently selected record. Add the following to the 'Delete' section of the toolbar handler.
First, we check the user has selected a record. If so we ask the user for confirmation that the record should be deleted. If they confirm we go ahead and call the ProjectDelete service and delete the record followed by refreshing the grid.
//Code for deleting
if (SelectedProjectId == 0)
{
    await DialogService.AlertAsync("Please select a project.", "No Project Selected");
    return;
}
else
{
    bool isConfirm = await DialogService.ConfirmAsync(
        "Are you sure you want to delete " + SelectedProjectName + " project?",
        "Delete " + SelectedProjectName);
    if (isConfirm == true)
    {
        await ProjectService.ProjectDelete(SelectedProjectId);
        //Refresh datagrid
        projects = await ProjectService.ProjectReadAll();
        StateHasChanged();
        SelectedProjectId = 0;
    }
}
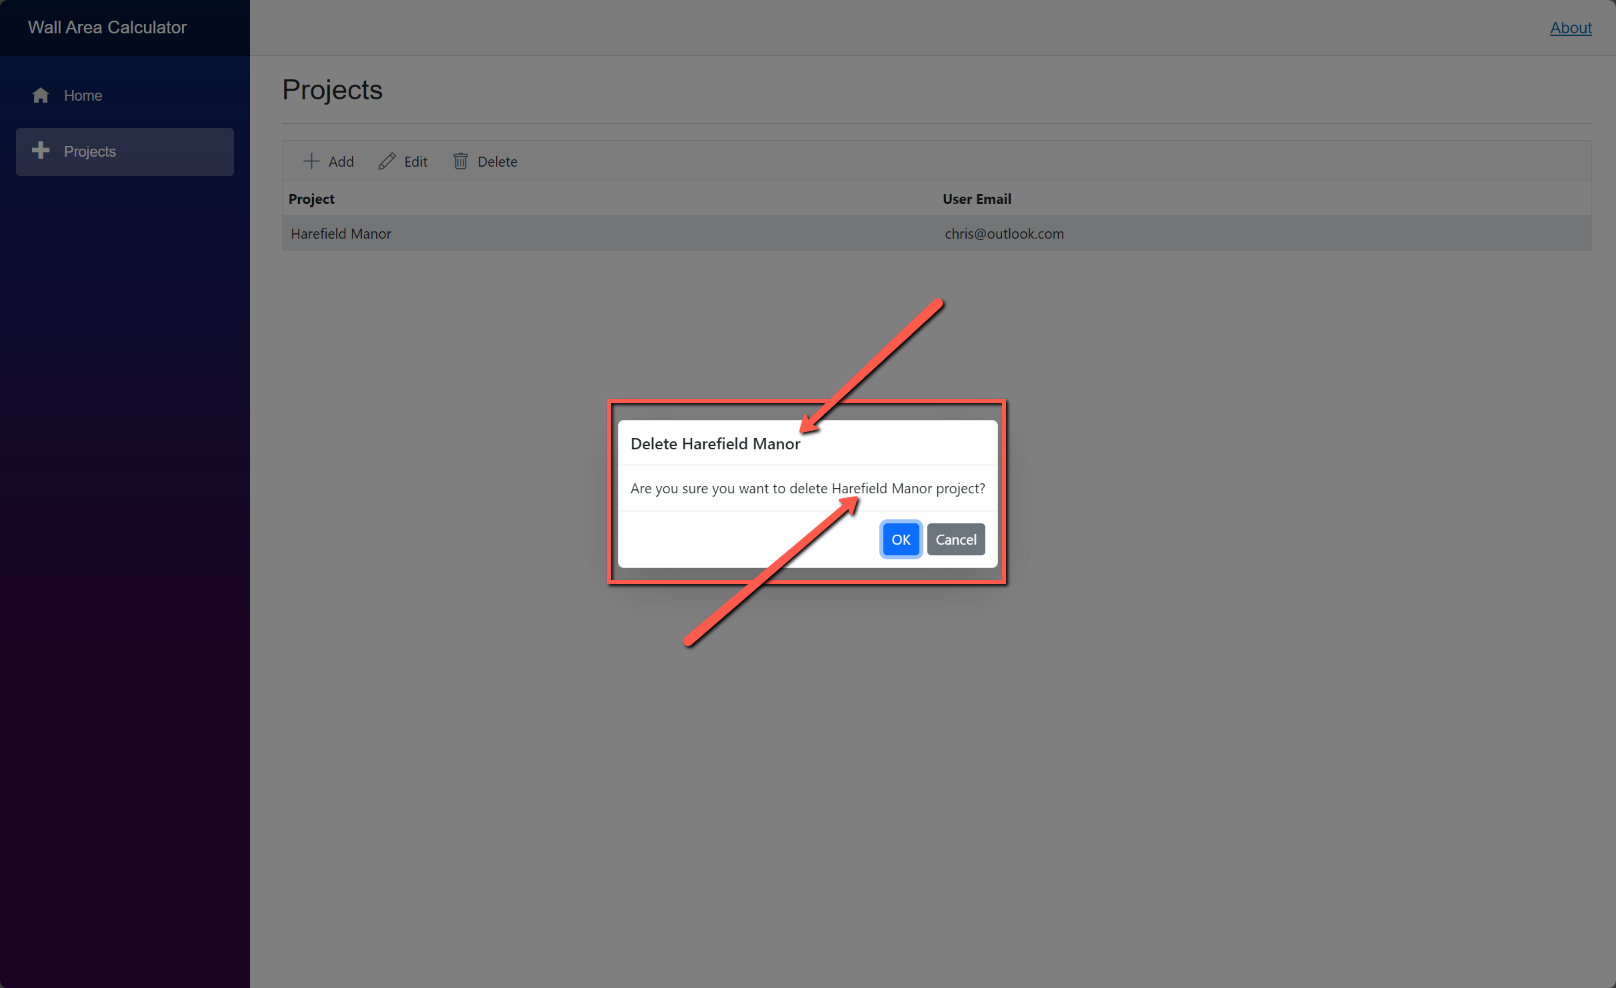
Notice that in the dialog asking the user to confirm the deletion we can incorporate the ProjectName drawing the user's attention to the record being deleted.

Duplicates
There is a constraint in the database that requires that Project Names are unique. By using the Try/Catch error handling mechanism we are catching the error returned by the database when a duplicate is attempted to be inserted, but we are not being specific in the error message, just displaying a generic 'Unknown Error', whereas we could inform the user rather than keeping them guessing. To do this we could check that we aren't about to create a duplicate before we attempt to insert the new record into the database. We do this by counting the number of projects already in the database with the name we have chosen for our new record and if the number is not zero we do not attempt to create the record and warn the user.
When adding a new project we need a new service to count the number of projects with the name we intend to create. However, when editing we also need to check we won't be creating a duplicate, but in this case we must exclude the record currently being edited. To tackle this we need two new methods. Open ProjectService and insert the following:
public async Task<int> CountProjectsByName(string ProjectName)
{
    var parameters = new DynamicParameters();
    parameters.Add("@ProjectName", ProjectName, DbType.String);

    sqlCommand = "Select Count(*) from Project ";
    sqlCommand += "where Upper(ProjectName) = Upper(@ProjectName)";

    using IDbConnection conn = new SQLiteConnection(_configuration.GetConnectionString(connectionId));
    {
        var countProject = await conn.QueryFirstOrDefaultAsync<int>(sqlCommand, parameters);
        return countProject;
    }
}

public async Task<int> CountProjectsByNameAndId(string ProjectName, int ProjectID)
{
    var parameters = new DynamicParameters();
    parameters.Add("@ProjectName", ProjectName, DbType.String);
    parameters.Add("@ProjectID", ProjectID, DbType.Int32);

    sqlCommand = "Select Count(*) from Project ";
    sqlCommand += "where Upper(ProjectName) = Upper(@ProjectName) ";
    sqlCommand += "and ProjectID <> @ProjectID";

    using IDbConnection conn = new SQLiteConnection(_configuration.GetConnectionString(connectionId));
    {
        var countProject = await conn.QueryFirstOrDefaultAsync<int>(sqlCommand, parameters);
        return countProject;
    }
}
We also need to amend the interface, by inserting these two lines:
Task<int> CountProjectsByName(string ProjectName);
Task<int> CountProjectsByNameAndId(string ProjectName, int ProjectID);
And ProjectSave changed to:
protected async Task Save()
{
    if (projectAddEdit.ProjectID == 0)
    {
        // Record is being added
        //Check for duplicates
        int duplicates = await ProjectService.CountProjectsByName(projectAddEdit.ProjectName);

        if (duplicates == 0)
            try
            {
                await ProjectService.ProjectCreate(projectAddEdit);
                //Refresh datagrid
                projects = await ProjectService.ProjectReadAll();
                StateHasChanged();
                await CloseDialog();
            }
            catch
            {
                // Display warning message
                await DialogService.AlertAsync("An unexpected error has occured.", "Unknown Error");
                return;
            }
        else
        {
            //Project already exists - warn the user
            await DialogService.AlertAsync("This project already exists", "Project Already Exists");
            return;
        }

    }
    else
    {
        // Record is being edited
        //Check for duplicates
        int duplicates = await ProjectService.CountProjectsByNameAndId(projectAddEdit.ProjectName, projectAddEdit.ProjectID);

        if (duplicates == 0)
        {
            try
            {
                await ProjectService.ProjectUpdate(projectAddEdit);
                //Refresh datagrid
                projects = await ProjectService.ProjectReadAll();
                StateHasChanged();
                await CloseDialog();
            }
            catch
            {
                // Display warning message
                await DialogService.AlertAsync("An unexpected error has occured.", "Unknown Error");
                return;
            }
        }
        else
        {
            //Project already exists - warn the user
            await DialogService.AlertAsync("This project already exists", "Project Already Exists");
            return;
        }

    }
}